Easy crochet patterns, cute projects, and beginner-friendly ideas to inspire your next make.


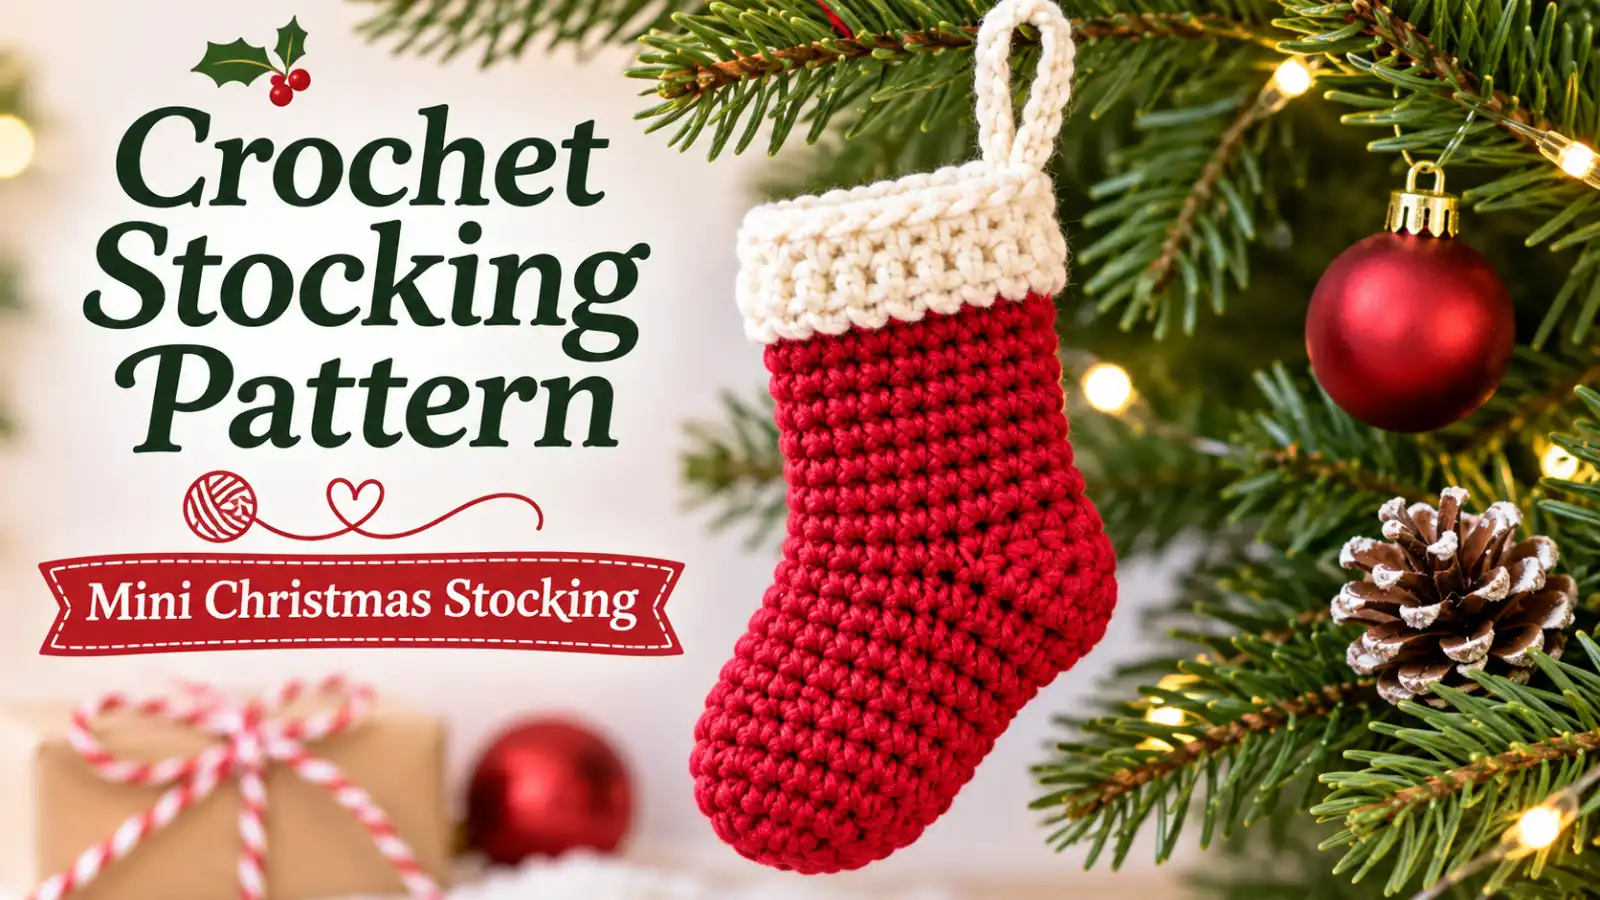
This crochet stocking pattern makes a small Christmas stocking with a rounded toe, simple cuff, hanging loop, and a heel added after the main body. The construction uses clear stitch-count checkpoints so you can see exactly where the heel opening begins and how the heel is completed.
Table of Contents
Crochet Stocking Pattern at a Glance
| Pattern Detail | Information |
|---|---|
| Project | Mini Christmas stocking |
| Construction | Toe-up with heel added later |
| Main body | 18 stitches |
| Heel opening | 9 upper + 9 lower stitches |
| Heel shaping | 18 → 18 → 18 → 12 → 6 |
| Cuff | 3 simple rounds |
| Hanging loop | 12 chains, pending physical validation |
| Suggested yarn | DK / #3, pending testing |
| Suggested hook | 3.5 mm, pending testing |
| Terminology | US crochet terms |
| Sewing | Yarn needle required for closing and finishing |
| Physical testing | Pending |
If you enjoy making small holiday projects, you may also like this crochet Christmas tree ornament pattern.
Materials You’ll Need
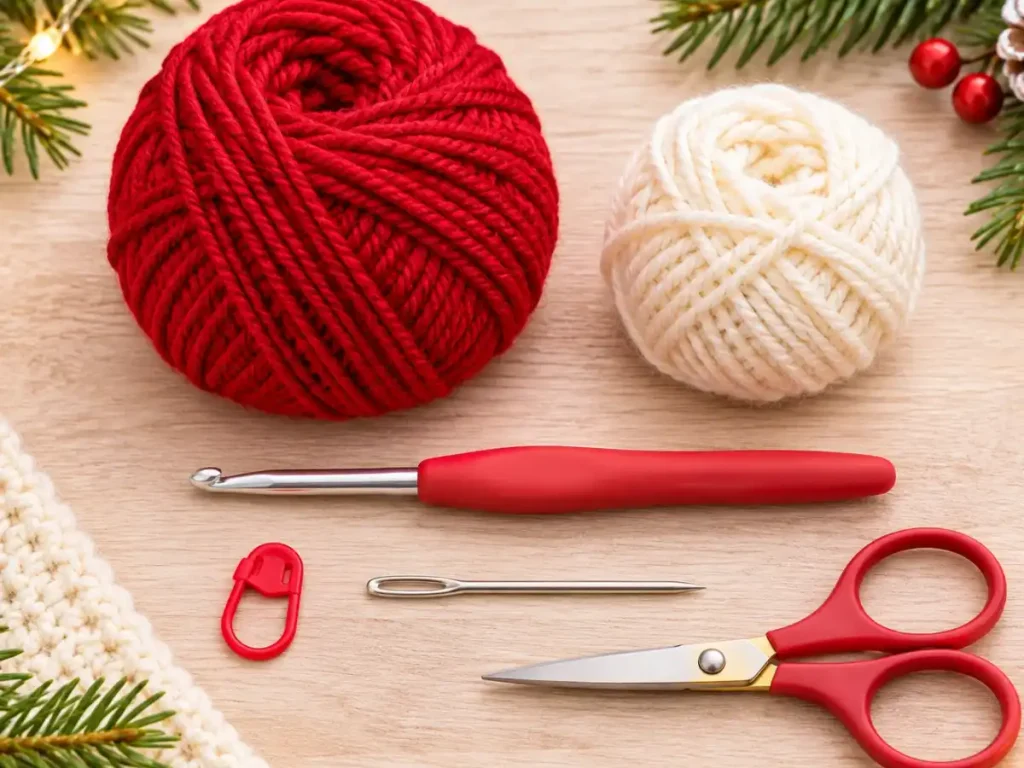
For the first version of this mini crochet stocking pattern, the proposed materials are:
- Smooth DK / #3 yarn in your main stocking color
- A small amount of contrasting yarn for the cuff
- 3.5 mm crochet hook
- Stitch marker
- Yarn needle
- Scissors
The yarn weight and hook size above are the current prototype combination. Exact yarn brand, fiber, yardage, gauge, and finished measurements still need to be confirmed during physical testing.
Crochet Abbreviations
This pattern uses US crochet terminology.
- ch – chain
- sc – single crochet
- inc – increase; work 2 sc in the same stitch
- dec / sc2tog – single crochet decrease over the next 2 stitches
- sl st – slip stitch
- st / sts – stitch / stitches
- rnd – round
- MR – magic ring
You can also check the Craft Yarn Council crochet abbreviations guide for standard US crochet terminology.
Important Pattern Notes
The stocking body is worked in joined rounds.
At the end of each normal round:
- Sl st to the first sc.
- Ch 1.
- The ch 1 does not count as a stitch.
- Work the first sc of the new round into the same stitch as the join unless the instructions say otherwise.
Do not count the joining slip stitch as an extra stitch.
Stitch totals are shown in brackets at the end of each round.
The heel is not worked immediately. You will first create a 9-stitch opening, continue the leg and cuff, and then return to the opening to crochet the heel.
Mini Crochet Stocking Pattern
Step 1: Crochet the Toe
Using your main color:
R1: Work 6 sc in a magic ring. [6]
Pull the ring closed and join.
R2: Inc in each stitch around. [12]
R3: (1 sc, inc) × 6. [18]
Toe Stitch Check
Your counts should be:
6 → 12 → 18
Stop after R3 and make sure you have exactly 18 stitches.
Step 2: Crochet the Foot
Continue with the main color.
R4: Sc around. [18]
R5: Sc around. [18]
R6: Sc around. [18]
R7: Sc around. [18]
The stocking now has a rounded toe followed by four straight foot rounds.
Keep all 18 stitches visible before starting the heel opening.
Step 3: Create the Heel Opening
This is the first important shaping round.
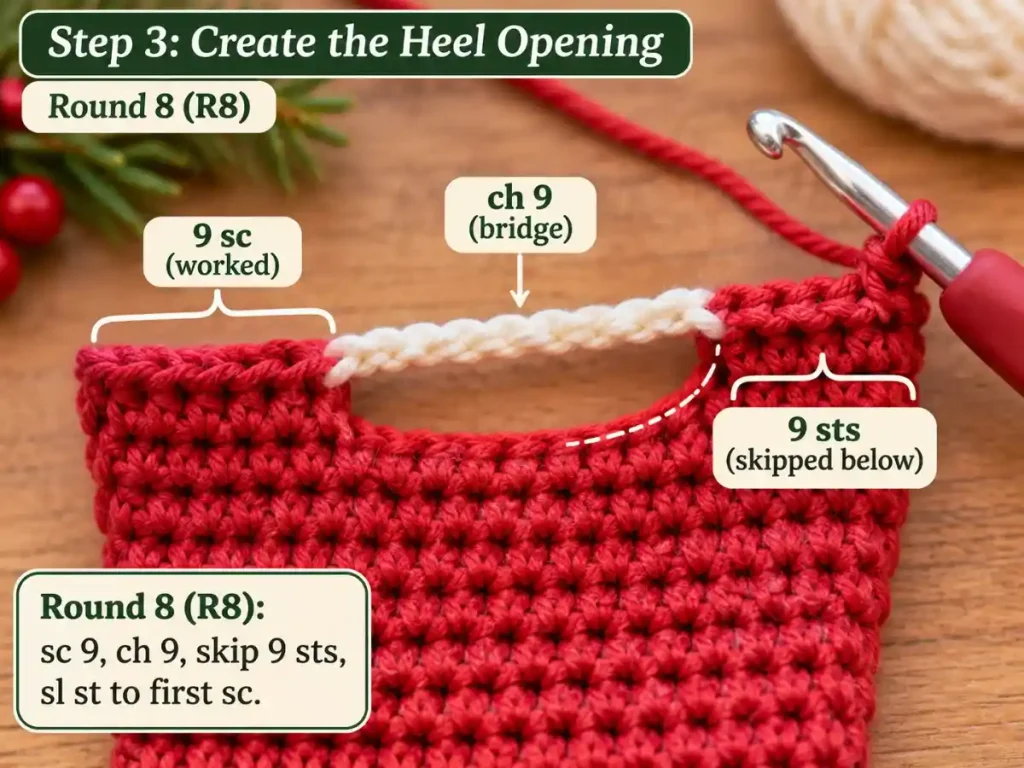
R8: Sc in the next 9 sts, ch 9, skip the remaining 9 sts, then sl st to the first sc to join.
The structure is:
9 worked stitches + 9 skipped stitches
The ch-9 bridge sits above the 9 skipped stitches.
Do not crochet into the skipped stitches yet. They will form the lower edge of the heel opening later.
Before continuing, count the nine skipped stitches and make sure the chain is not twisted.
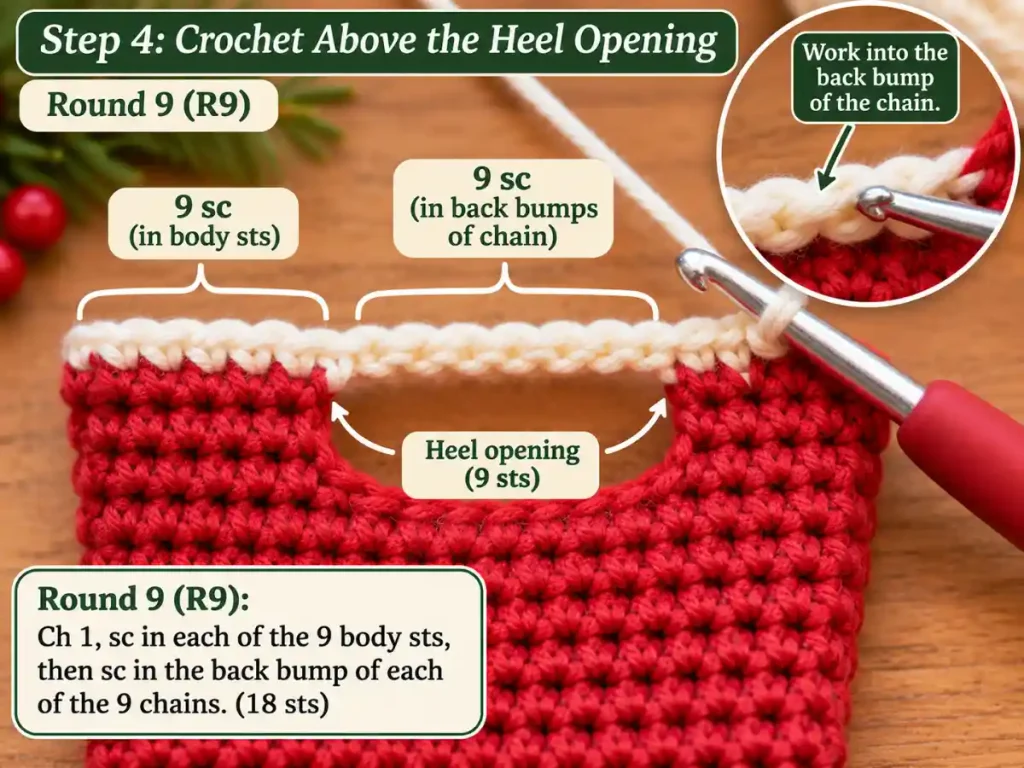
Step 4: Crochet Above the Heel Opening
For this round, work into the back bumps of the chain stitches.
R9: Sc in each of the 9 body sts, then work 1 sc into the back bump of each of the 9 chains. [18]
Join.
Why Work Into the Back Bumps?
Working into the back bumps leaves the top V of each chain available.
Those nine exposed chain V’s will become the upper edge of the heel.
After R9 you should have:
- 18 working stitches around the leg;
- 9 exposed chain V’s along the upper heel edge;
- 9 skipped stitches along the lower heel edge.
Do not use those heel stitches yet.
Step 5: Crochet the Leg
Continue in joined rounds.
R10: Sc around. [18]
R11: Sc around. [18]
R12: Sc around. [18]
R13: Sc around. [18]
R14: Sc around. [18]
R15: Sc around. [18]
Keep checking that the leg remains at exactly 18 stitches.
Step 6: Crochet the Cuff
Change to a contrasting color if desired.
R16: Sc around. [18]
R17: Sc around. [18]
R18: Sc around. [18]
Join after R18.
A simple three-round cuff keeps the top of this crochet Christmas stocking pattern easy to count without adding complicated ribbing.
Step 7: Add the Hanging Loop
After R18:
Ch 12.
Sl st into the next stitch of R18 to form the loop.
Fasten off and weave in the yarn tail securely.
Testing note: The 12-chain length and two-point attachment are the current engineered version. Final hanging length, stretch, orientation, and durability still require physical validation.
How to Crochet the Stocking Heel
The heel is worked directly into the opening created earlier.
This section uses only clearly identifiable stitches.
You do not need to distribute stitches evenly along an unfinished edge.
Before starting, locate:
- 9 exposed chain V’s along the upper edge;
- 9 skipped body stitches along the lower edge.
Together they create:
9 + 9 = 18 heel stitches
Heel Round 1: Pick Up the Heel Stitches
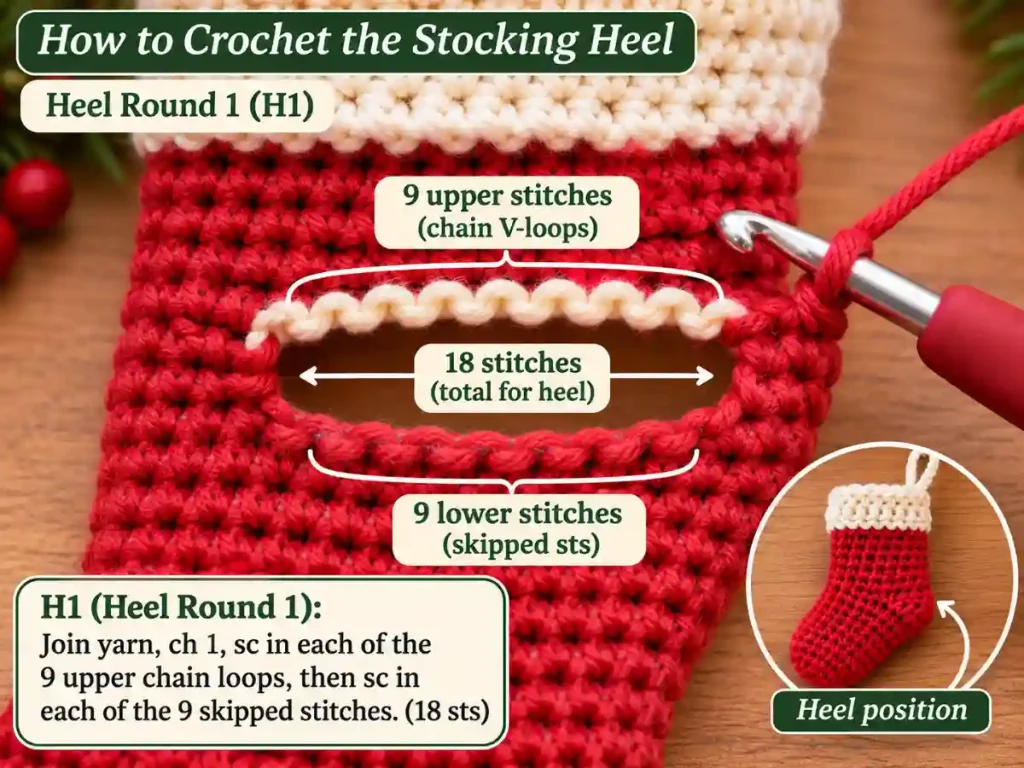
Join the main-color yarn to the first exposed chain V at one corner of the heel opening.
Ch 1. The chain does not count as a stitch.
Work:
- 1 sc under both loops of each of the 9 exposed chain V’s;
- then 1 sc in each of the 9 skipped body stitches.
Join.
H1: [18]
Heel Stitch Check
Stop before continuing.
You should have exactly:
9 upper stitches + 9 lower stitches = 18 stitches
Do not add extra stitches into the two heel corners.
Add Heel Depth
H2: Sc around. [18]
H3: Sc around. [18]
These rounds create depth before the heel begins to narrow.
Shape the Heel
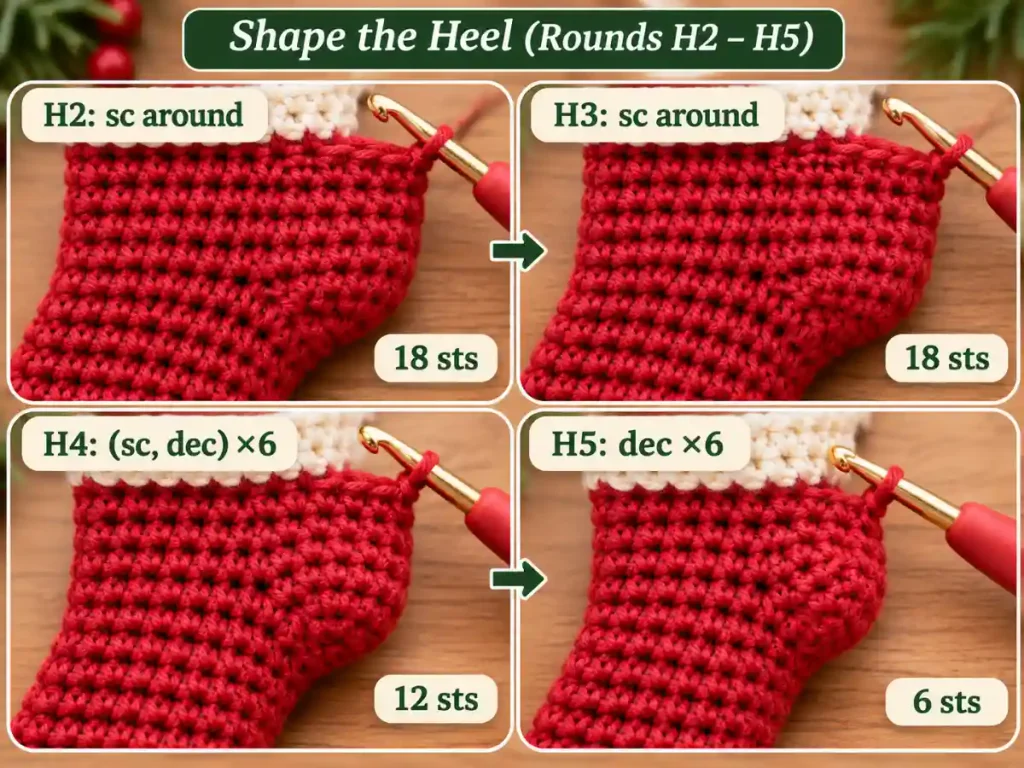
H4: (1 sc, dec) × 6. [12]
Check the count before continuing.
H5: Dec × 6. [6]
Fasten off, leaving a tail.
Thread the tail onto a yarn needle and pass it through the front loops of all 6 remaining stitches.
Pull gently to close the opening.
Secure the yarn and weave in the end.
Heel Stitch Sequence
The heel should follow:
18 → 18 → 18 → 12 → 6 → closed
The final heel proportions and corner behavior must still be checked on the physical sample.
Finishing the Mini Christmas Stocking
Weave in any remaining yarn ends.
Gently straighten the cuff and heel without pulling the fabric out of shape.
Check that:
- the toe is centered;
- the heel opening is completely closed;
- the cuff sits evenly;
- the hanging loop is firmly attached;
- no loose yarn tails remain.
Once physical testing is complete, the final measured size and any necessary shaping instructions can be added here.
If you want another small Christmas project for your tree, try the crochet star ornament pattern.
Tips for a Neater Crochet Stocking
- Count carefully after R3, R8/R9, H1, H4, and H5.
- Do not count the joining sl st or ch 1 as a stitch.
- Use a stitch marker if the first sc of a round is difficult to identify.
- Before R9, identify all nine chain back bumps.
- Before H1, count the nine upper loops and nine lower stitches separately.
- Keep the ch-9 heel bridge relaxed but even.
- Do not add an extra stitch at a heel corner unless a future tested revision specifically instructs you to.
Crochet Stocking Pattern Troubleshooting
Why Do I Have 19 Stitches Instead of 18?
Check whether you accidentally counted or crocheted into the joining slip stitch.
The joining sl st and ch 1 do not count as body stitches.
Why Is My Heel Opening Off-Center?
Recheck R8.
You should have:
9 worked stitches + 9 skipped stitches
The opening uses exactly half of the 18-stitch circumference.
Why Can’t I Find the Upper Heel Stitches?
Check R9.
The nine chain stitches should be worked through their back bumps.
This leaves the top V loops free for H1.
How Many Stitches Should I Have in the First Heel Round?
Exactly 18:
9 upper + 9 lower = 18
Do not add extra corner stitches.
Why Is There a Hole at the Heel Corner?
Do not automatically add another stitch.
Corner behavior is one of the construction points still awaiting physical sample validation. First check that all nine upper and nine lower stitches were worked correctly.
Why Does My Heel Look Too Pointed or Too Flat?
First verify the stitch counts:
18 → 18 → 18 → 12 → 6
The final shape can also be affected by yarn, hook size, and tension. Physical testing is still required before recommending a structural correction.
Why Is My Hanging Loop Twisting the Cuff?
Check that the chain is not twisted and that both attachment points sit next to each other along the cuff.
The final loop length and attachment behavior remain part of the physical test.
Ways to Customize Your Mini Christmas Stocking
Once the basic construction is established, you can personalize the stocking without changing the main stitch counts.
Try:
- a traditional red body with a cream cuff;
- green and white Christmas colors;
- soft pastel holiday colors;
- a contrasting hanging loop;
- simple color changes in the straight leg rounds.
Keep the heel opening and shaping counts unchanged if you want to preserve the original construction.
For another small seasonal make, you can pair the stocking with this crochet snowman ornament pattern.
Ways to Use a Mini Crochet Stocking
The finished stocking is designed for small-scale holiday decorating.
Possible uses include:
- Christmas tree ornament;
- handmade gift topper;
- part of a crochet Christmas garland;
- small seasonal decoration.
A gift-card-holder claim has not been added because the finished dimensions have not yet been physically verified.
Crochet Stocking Pattern FAQs
Is This Crochet Stocking Pattern Free?
Yes. The complete written free crochet stocking pattern is included on this page, from the toe and heel opening through the cuff and heel closure.
How Do You Crochet a Mini Christmas Stocking?
Start by crocheting a rounded toe and short foot.
Next, create a nine-stitch heel opening and continue upward to make the leg and cuff.
After adding the hanging loop, return to the heel opening and work around its 18 defined stitch positions before decreasing the heel closed.
How Is the Heel Made?
The heel uses two matching edges:
9 exposed chain loops + 9 skipped body stitches = 18 stitches
After two straight heel rounds, the count decreases from:
18 → 12 → 6
The remaining six stitches are then drawn closed.
Is This Crochet Stocking Pattern Suitable for Beginners?
The pattern uses a short stitch vocabulary based mainly on single crochet, chains, increases, decreases, and slip stitches.
However, physical usability testing is still pending, so I am not labeling the pattern as beginner-tested yet.
The heel opening requires careful counting and identifying chain back bumps.
Can I Use a Different Yarn?
Yes, but changing the yarn weight or hook size will change the finished size, fabric density, and potentially the proportions of the stocking.
For the most predictable result, use the final tested yarn and hook combination once physical validation is complete.
Why Do I Crochet Into the Back Bump of the Heel Chain?
Working R9 into the chain back bumps keeps the top V loops of those chains available.
Those exposed loops form nine clearly identifiable stitches for the upper edge of the heel.
Can I Make the Hanging Loop Longer?
Technically, changing the number of chains changes the loop length.
The current pattern uses ch 12, but the final recommended length should be confirmed after the stocking is physically tested while hanging.
Can This Mini Christmas Stocking Hold a Gift Card?
That has not yet been verified.
A real gift-card fit test is required before this pattern is described as a gift-card holder.
Final Thoughts
This crochet stocking pattern keeps the main body at 18 stitches and uses a clearly divided heel opening so you do not need to guess where heel-edge stitches should be placed.
The core construction follows:
6 → 12 → 18 for the toe
then:
9 upper + 9 lower stitches for the heel
and:
18 → 12 → 6 for the final heel shaping.
Once physical testing confirms the materials, proportions, heel shape, and hanging loop, the remaining measurements and verified project details can be added without changing the SEO structure of the article.
For another cute holiday ornament, see the crochet penguin ornament pattern.
Pattern testing note: This original pattern has undergone mathematical stitch-count and technical review, but physical sample testing is still pending. The suggested yarn and hook, finished measurements, gauge, completion time, final heel shape, and hanging-loop behavior have not yet been confirmed on a completed sample.