Easy crochet patterns, cute projects, and beginner-friendly ideas to inspire your next make.


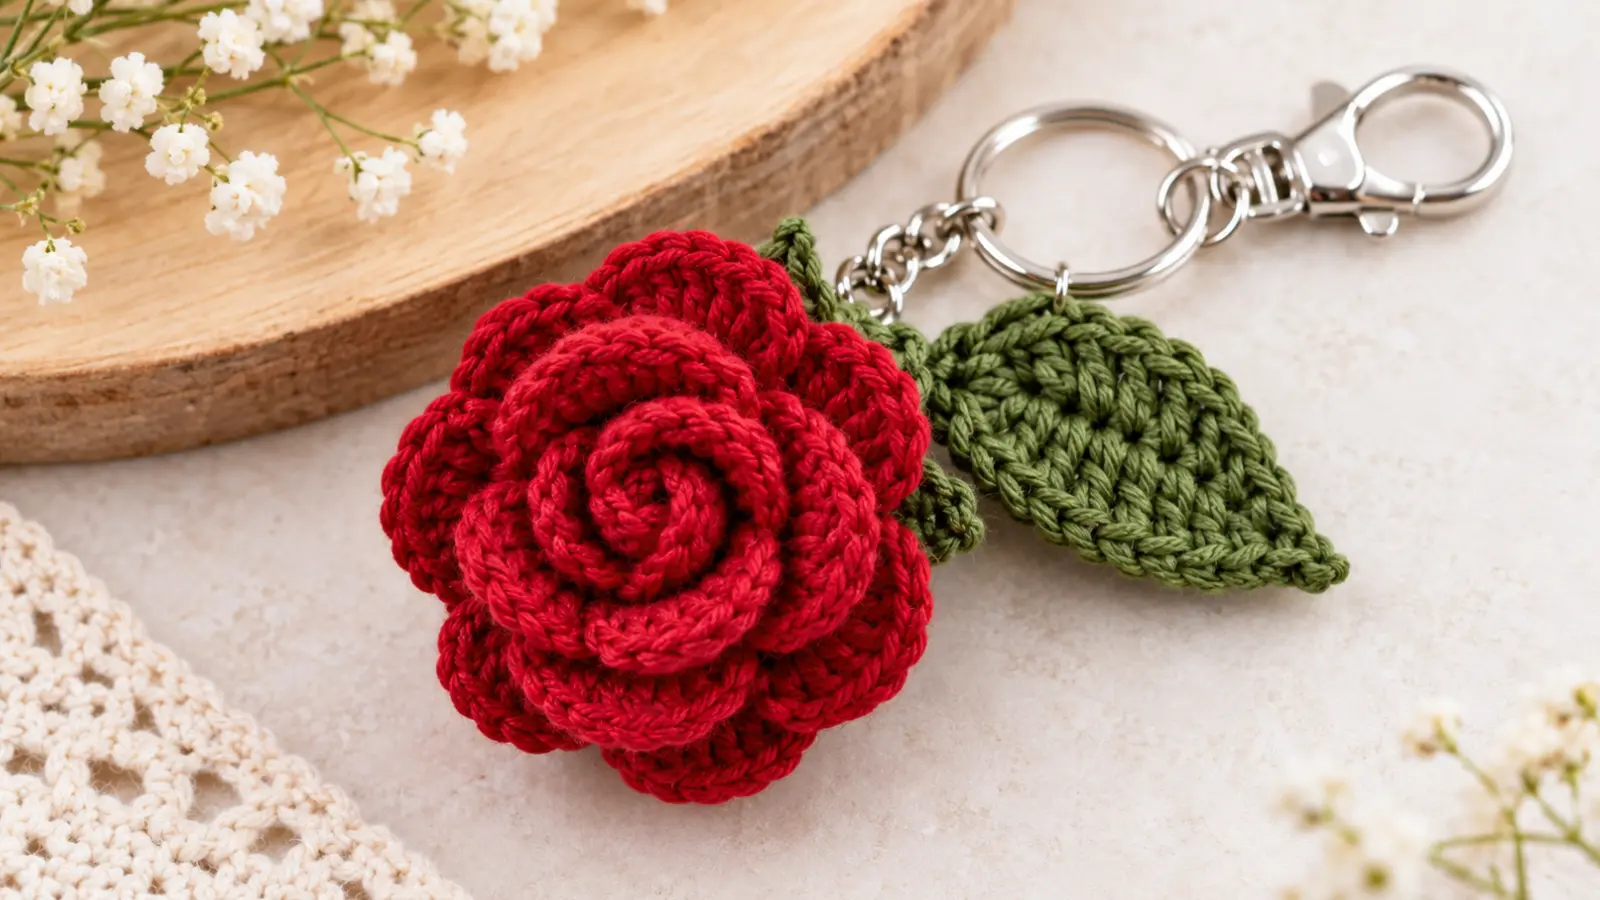
Want to turn a beautiful crochet rose into something you can carry everywhere? This crochet rose keychain is a lovely little project featuring soft, layered petals, a green leaf, and a silver clasp that makes it easy to attach to your keys, backpack, or favorite bag.
Instead of crocheting each petal separately, you’ll make one long strip of rounded petals, roll it into a miniature rose, and secure it with a few careful stitches. A small green base and matching leaf complete the flower.
This free crochet tutorial walks you through the process in eight steps, from your first chain to the finished bag charm.
Table of Contents
Crochet Rose Keychain Pattern at a Glance
This crochet rose keychain pattern combines basic crochet stitches with a little shaping and sewing to create a dimensional flower.
Here’s what to know before getting started.
| Project Detail | Information |
|---|---|
| Skill level | Confident beginner |
| Crochet hook | 2 mm |
| Yarn | 4-ply cotton yarn in red and green |
| Main stitches | Chain, single crochet, half double crochet, double crochet, slip stitch |
| Construction | Rolled petal strip, green sepal base, separate leaf |
| Terminology | US crochet terms |
| Finished size | Depends on yarn thickness, tension, and assembly |
| Making time | Varies with experience |
| Best for | Keychains, bag charms, and handmade gifts |
The rose begins as a flat strip of crocheted petals. Once you roll and secure it, the overlapping scallops create the look of a small blooming flower.
You’ll also crochet a green base to cover the underside and a separate leaf to give the finished charm a more natural appearance.
Pattern note: This tutorial is informed by the crochet rose keychain demonstration from Knit Bucket By Pinki Mehta. The foundation and major stitch sequences are visible in the video, but some repeat boundaries, attachment positions, and finished measurements have not been independently sample-tested. Those details are identified below rather than presented as verified totals.
Materials and Tools for a Crochet Rose Keychain
You won’t need many supplies to make this miniature flower accessory.
Yarn and Crochet Hook
Gather the following materials:
- Red cotton yarn for the rose petals
- Green cotton yarn for the sepals and leaf
- 2 mm crochet hook
- Tapestry needle
- Scissors
- Metal keychain ring with a short connector or clasp
- Small jewelry pliers, if needed
- Optional fabric-compatible glue for positioning the pieces
The original demonstration uses 4-ply cotton yarn.
Yarn labels aren’t always consistent between manufacturers, so check the actual yarn thickness before choosing your hook. A smooth cotton yarn is a practical choice because it helps the petals maintain their shape and makes the stitches easier to see.
You can use pink, cream, lavender, or another flower color instead of red without changing the general construction.
Choosing the Right Keychain Hardware
Choose a small metal clasp or split ring that suits the size of your finished rose.
A short connector keeps the flower close to your keys or bag and helps prevent unnecessary swinging.
Check that the metal edges are smooth and that any connecting rings close securely.
Because a keychain is handled and moved frequently, the flower needs a strong attachment point. Sewing the hardware securely into the base is more reliable than depending on glue alone.
Crochet Stitches and Abbreviations (US Terms)
Before starting this crochet rose keychain, make sure you’re comfortable with a few basic stitches.
| Abbreviation | Meaning |
|---|---|
| ch | Chain |
| sc | Single crochet |
| hdc | Half double crochet |
| dc | Double crochet |
| sl st | Slip stitch |
| MR | Magic ring |
| sk | Skip |
| st / sts | Stitch / stitches |
| ch-2 sp | Chain-two space |
| rep | Repeat |
All instructions use US crochet terminology.
If you need a refresher, the Craft Yarn Council’s crochet abbreviation guide explains the standard terms used in written patterns.
Understanding the V-Stitch Foundation
The rose petals begin with a row of V-shaped crochet stitches.
A V-stitch consists of:
1 dc, ch 2, 1 dc worked into the same stitch.
The two double crochets form the sides of the V, while the two chains create an opening in the middle.
These openings are called chain-two spaces.
In the next row, you’ll work groups of double crochet stitches into selected chain-two spaces to create rounded petals.
The V-stitches provide the structure, while the taller stitches form the decorative scalloped edges.
Before You Start: Important Rose Pattern Notes
The red rose is worked in rows, not in continuous rounds.
You’ll crochet a foundation chain, add the V-stitch openings, and create a row of rounded petals. The finished strip is then rolled into a spiral and sewn together.
The green base uses a magic ring, and the separate leaf is crocheted along both sides of a short foundation chain.
Keep your tension consistent throughout the project. Very tight stitches can make the petal strip stiff and difficult to roll, while loose stitches may leave unwanted gaps.
Stitch-count reminder: The video specifies 37 foundation chains and seven double crochets for the demonstrated petal groups. It does not clearly establish every end-of-row attachment or the final number of completed petals. The instructions below preserve those demonstrated details and flag the remaining uncertainties.
Crochet Rose Keychain Pattern: Step-by-Step Tutorial
Follow these eight steps to make your miniature crochet rose, shape the flower, and finish it as a decorative keychain.
Step 1: Make the 37-Chain Rose Foundation
Start with your red cotton yarn and a 2 mm crochet hook.
Make a slip knot and place it on your hook.
Hold the working yarn comfortably in your non-dominant hand, then yarn over and pull through the loop on your hook to make your first chain.
Continue chaining until you have 37 chains.
Try to keep each chain approximately the same size. The foundation should feel flexible rather than tightly pulled together.
Before moving on, count the chains carefully. The loop currently on your hook is not counted as a chain stitch.
Lay the foundation on your work surface and check that it isn’t twisted.
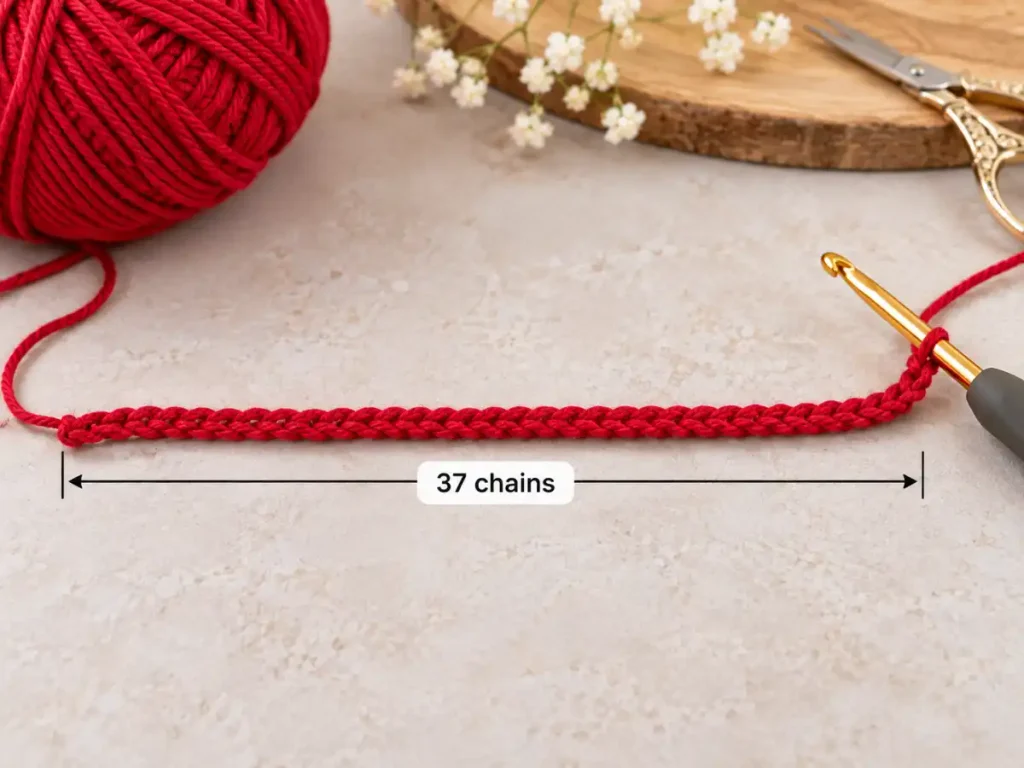
You’ll use this chain to build the openwork row that supports the rose petals.
Beginner tip: If your foundation chain curls slightly, that’s usually fine. Just make sure you can identify each chain when working the first row.
Step 2: Crochet the V-Stitch Foundation Row
Now you’ll turn the foundation chain into a series of open V-shaped stitches.
Working with the red yarn, count three chains from your hook.
Insert the hook into the next chain and work one double crochet.
Chain two.
Work another double crochet into that same foundation chain.
You’ve created your first V-stitch.
To continue the demonstrated spacing, skip three foundation chains and work another group of:
(1 dc, ch 2, 1 dc)
into the next available chain.
Continue repeating the V-stitch structure along the foundation.
Take your time and keep the chain-two openings easy to identify. These spaces will hold the rounded petals in the next step.
When you reach the end, lay the strip flat and check that the V-stitches are evenly spaced.
The completed row should resemble a narrow strip of small open loops.
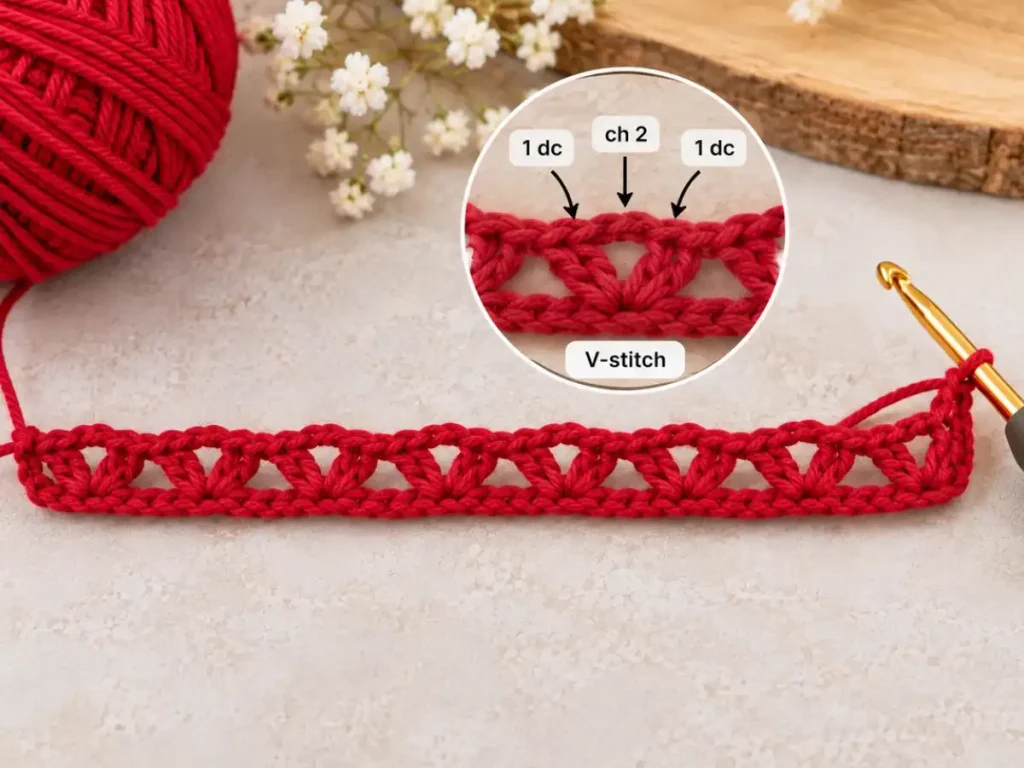
Pattern verification note: The video shows the 37-chain foundation and the skip-three/V-stitch method, but the exact final foundation-chain placement has not been independently tested. A straightforward four-chain spacing suggests nine V-stitch positions, although that total should not be treated as a confirmed pattern count until the row end is checked on a physical sample.
Step 3: Create the Rounded Rose Petals
This is where your crochet strip starts looking like a flower.
Chain two and turn your work, as demonstrated.
Locate a chain-two opening from the previous row.
Work seven double crochet stitches into the same chain-two space.
As you add the stitches, they’ll spread outward and begin forming a rounded, fan-shaped petal.
After completing the group, use a slip stitch in the following indicated space to secure the scallop.
Chain one to prepare for the next repeat.
Continue working the demonstrated seven-double-crochet petal groups, separating them with the slip-stitch and chain transitions.
The result should be a strip of curved red petals joined along a narrower foundation edge.
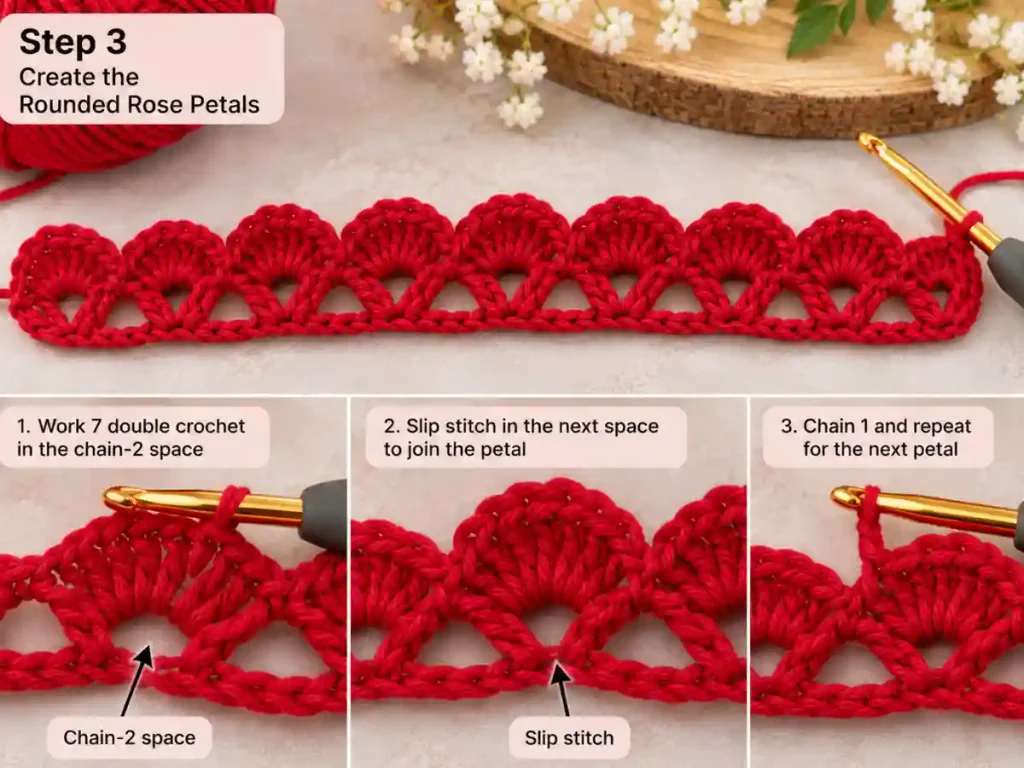
Important: The video specifies seven double crochets per petal group and a slip-stitch connection into the next space. The exact repeat boundary and final shell count still need sample verification. Avoid assuming that every V-stitch creates a separate seven-double-crochet petal, since some openings serve as connecting points.
Once you’ve completed the scalloped row, gently spread the strip on your work surface.
The top edge should look full and rounded, while the lower edge remains narrow enough to roll together.
Fasten off, leaving a generous yarn tail for sewing the rose.
Step 4: Roll and Sew the Crochet Rose
Now it’s time to transform the flat petal strip into a three-dimensional flower.
Hold one end of the strip between your fingers, with the rounded petals facing outward.
Begin rolling the narrow foundation edge into a tight spiral.
This first section creates the center of your rose.
Keep the center compact, but don’t pull so firmly that the petals collapse into one another.
As you continue rolling, allow the outer petals to sit a little more loosely.
This creates the layered appearance of a blooming rose.
Pause occasionally to look at the flower from above. Adjust the scalloped edges so the petals overlap naturally rather than forming a perfectly flat circle.
When you’re happy with the shape, thread the long yarn tail through your tapestry needle.
Turn the flower over and make several small stitches through the gathered underside of the rolled strip.
Pass the needle through multiple layers to secure the center and outer coils together.
Avoid pulling the yarn through the visible front petals whenever possible.
Continue stitching until the rose holds its shape when you release it.
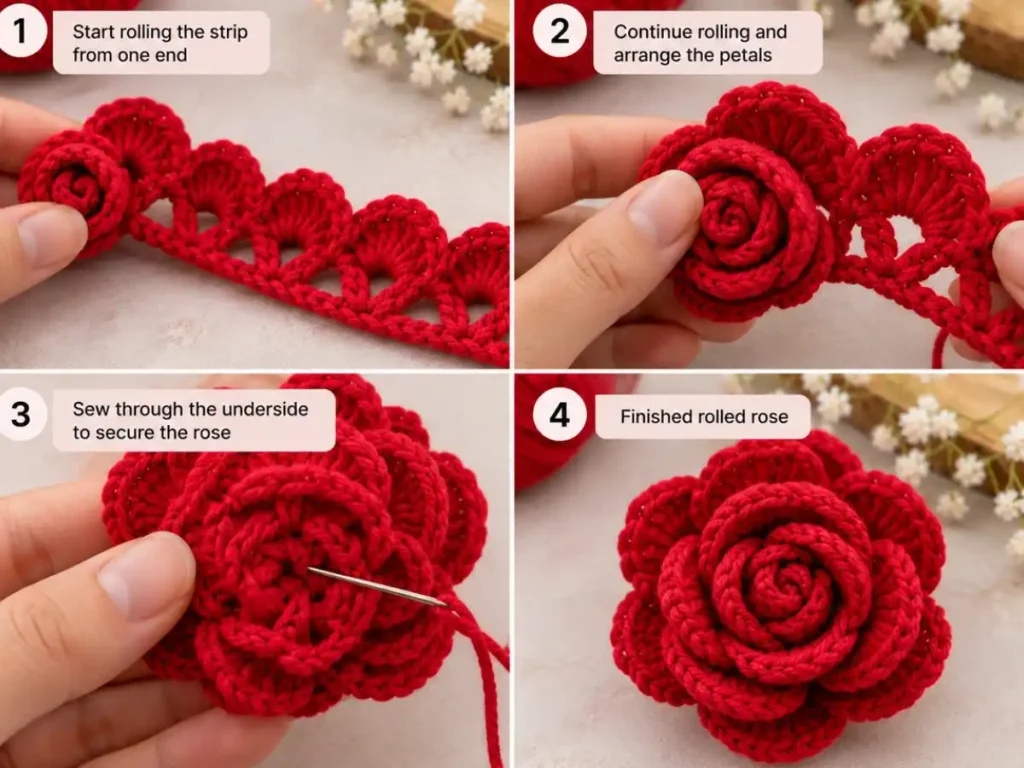
Finally, weave the yarn through the underside and secure the end.
You should now have a small, dimensional red rose with a compact center and several overlapping petals.
Helpful tip: If your rose looks too tight, gently loosen the outer coils before completing the sewing. If it starts to unroll, add more stitches through the underside rather than pulling on the petals.
Step 5: Crochet the Green Base With a Magic Ring
The green base, sometimes called a calyx or sepal base, sits underneath the rose.
It helps cover the gathered yarn and provides a surface for securing the flower and keychain attachment.
Switch to your green yarn.
Make a magic ring, leaving enough yarn to tighten the center.
Work 10 single crochet stitches into the magic ring.
Hold the stitches gently while pulling the yarn tail to close the ring.
Insert your hook into the first single crochet and join with a slip stitch.
You should now have a small green circle containing 10 single crochet stitches.
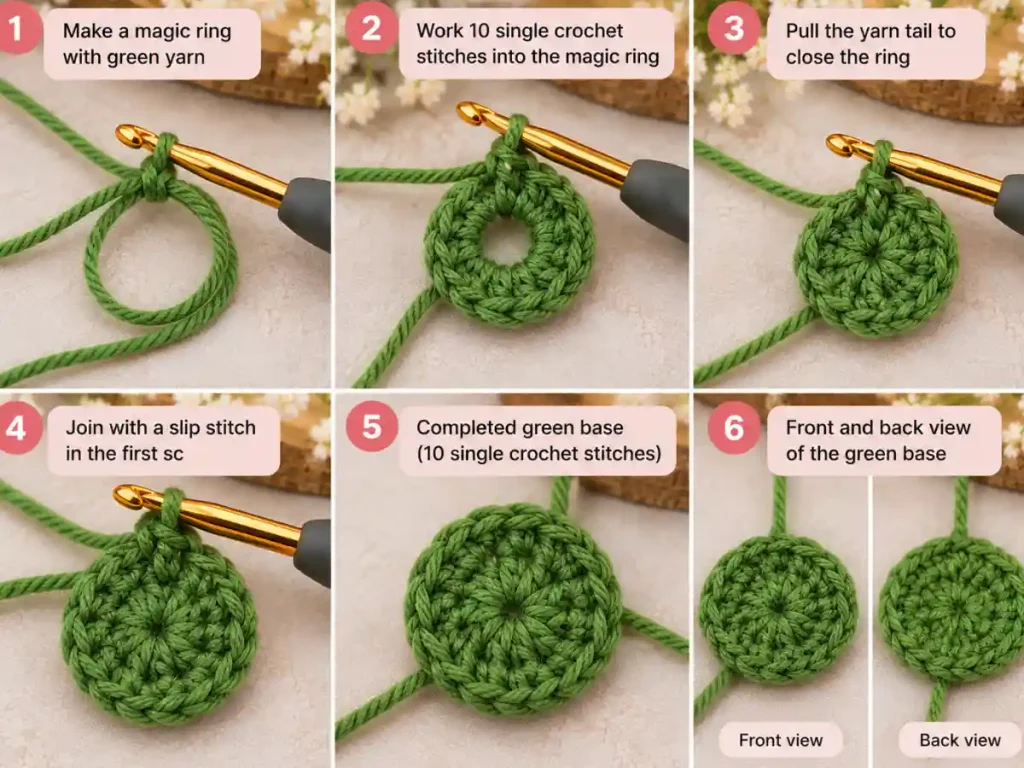
Check that the circle lies relatively flat.
Avoid pulling the center so tightly that the stitches become difficult to work into.
If you’re unfamiliar with magic rings, practice closing one before starting the final piece.
The completed green circle will form the center of the pointed sepal piece.
Step 6: Make the Pointed Sepals and Attach the Base
Next, you’ll add small pointed extensions around the green circle.
These green points sit beneath the rose petals, giving the finished flower a more realistic shape.
The video demonstrates starting a point with four chains, then working back down the chain using a slip stitch, single crochet, and half double crochet stitches.
The on-screen sequence indicates:
Ch 4 → sl st → sc → 2 hdc → sk 1 → sc
A possible arrangement of these stitches is to work a slip stitch into the second chain from the hook, a single crochet into the next chain, and two half double crochets into the chain closest to the base.
You would then skip one stitch on the circular base and anchor the point with a single crochet in the following stitch.
This chain-by-chain placement is a reconstruction for testing, not a verified transcription. Four chains provide three available chain positions when working back from the second chain, so the two half double crochets must share a position if that interpretation is used.
Continue forming evenly spaced points around the circular base, checking their spacing before fastening off.
The goal is a small green piece with pointed edges that extend slightly beyond the underside of the rose.
Once the piece is complete, position it beneath the red flower.
Make sure the pointed sections are visible around the sides rather than covering the decorative petals.
Use your tapestry needle and green yarn to stitch the base securely to the underside of the rose.
Pass through the green base and the gathered foundation edge of the flower.
Keep the stitches close together so the base doesn’t pull away when the charm moves.
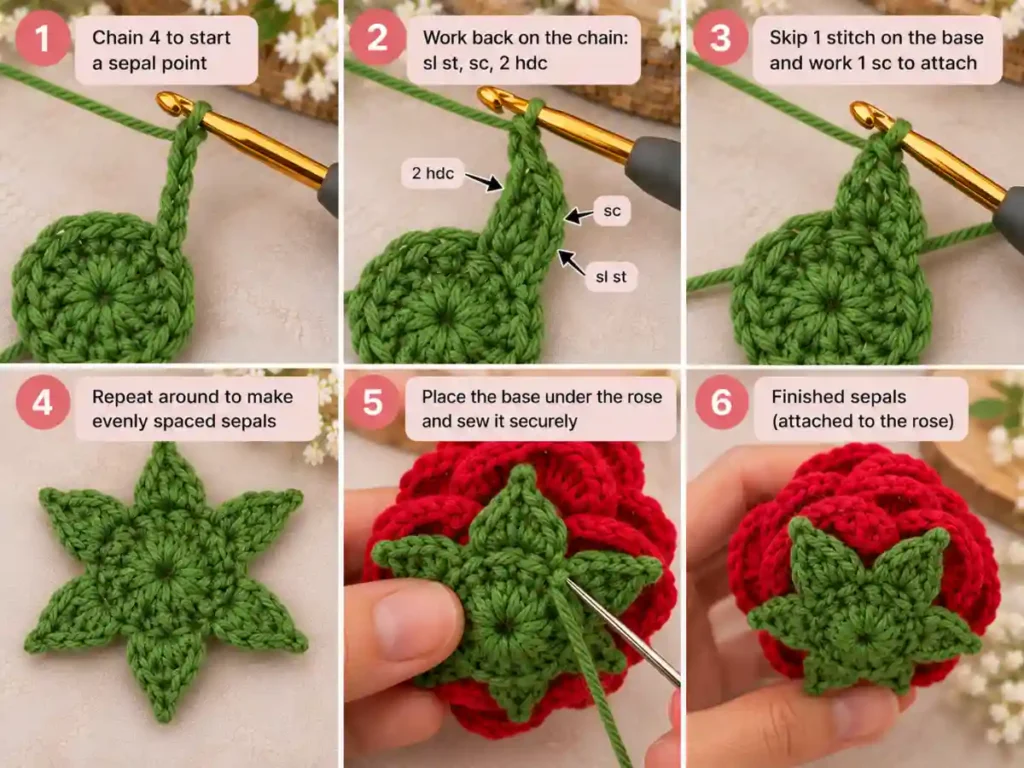
The original demonstration also uses glue during assembly. If you choose to use glue, treat it as an optional positioning aid and allow it to dry according to the manufacturer’s instructions.
For a frequently handled keychain, secure stitching should carry the load.
Step 7: Crochet the Small Green Leaf
A separate green leaf gives the rose a lovely finishing detail.
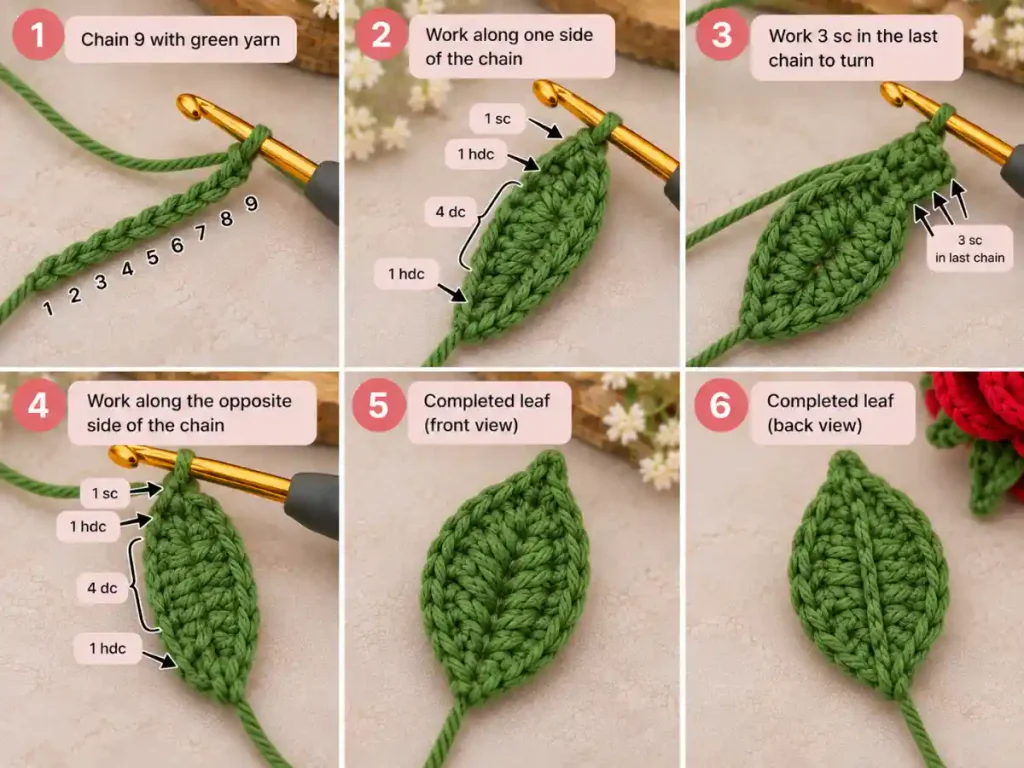
Using the same green yarn, make a slip knot and chain nine.
You’ll work along one side of the foundation chain, around the tip, and back along the opposite side to form a pointed oval.
Start in the second chain from your hook.
Work the following stitches along the first side:
- 1 single crochet in the first available chain
- 1 half double crochet in the next chain
- 1 double crochet in each of the next four chains
- 1 half double crochet in the next chain
- 3 single crochets in the final chain to turn around the tip
Now rotate your work so you can crochet along the unused loops on the opposite side of the foundation chain.
Work:
- 1 half double crochet
- 4 double crochets, one in each of the next four positions
- 1 half double crochet
- 1 single crochet near the starting end
These stitch heights create the leaf’s shape.
The shorter single crochet stitches form the narrower ends, while the taller double crochet stitches create a fuller middle.
The three single crochets at the far end help you turn smoothly around the tip.
This sequence is consistent with the nine-chain foundation and the on-screen stitch instructions. However, the precise finishing join and the final worked sample haven’t been independently checked.
Once you’ve reached the starting end, secure the leaf with a slip stitch where appropriate and fasten off.
Leave a yarn tail for assembly.
Gently shape the leaf with your fingers. It should look like a small pointed oval with a slightly raised center.
Don’t worry if it curls a little. You can adjust it when attaching it to the keychain.
Step 8: Attach the Keychain Hardware and Finish
Your rose, green base, and leaf are ready to become a finished accessory.
Place the red rose on your work surface with the green base facing upward.
Decide where you’d like the keychain connector to sit.
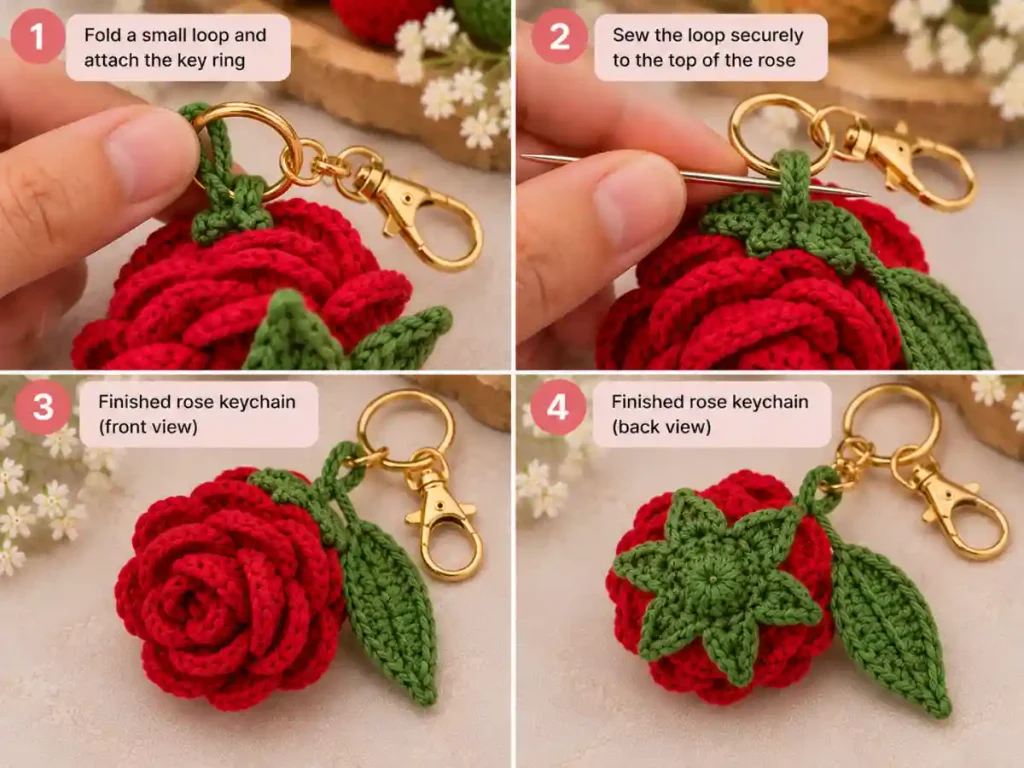
For a balanced result, position the attachment close to the flower’s center or securely within the green base, rather than through a loose outer petal.
If your keychain includes a short metal connector, use jewelry pliers to open the connecting ring carefully.
Position the connector through an attachment loop that has been reinforced with strong stitches.
Close the metal ring completely.
Next, place the green leaf near the side of the rose, allowing it to extend slightly beyond the petals.
Thread the leaf’s remaining yarn tail through your tapestry needle.
Sew the leaf securely to the green base and the underside of the rose, taking care not to distort the flower.
If desired, use a little fabric-compatible glue to help hold the leaf in position while sewing. Do not rely on glue alone to secure the keychain.
Once everything is attached, weave in the remaining yarn ends.
Trim any excess yarn neatly.
Hold the finished charm by the keychain ring and let the rose hang naturally.
Check that the leaf sits in the right position, the petals remain secure, and the metal hardware is completely closed.
Give the connector a gentle pull to check for loose stitching.
Your crochet rose keychain is ready to add a handmade floral touch to your keys, purse, or backpack!
Tips for a Neat and Durable Crochet Rose Keychain
A few simple finishing techniques can make a big difference in the appearance and durability of your finished project.
Keep your foundation tension even. Uneven chains can create irregular V-stitch spaces, making the petals different sizes.
Check each seven-double-crochet group. If a petal looks much smaller than the others, count the double crochet stitches before continuing.
Don’t roll the rose too tightly. A very tight spiral can hide the scalloped edges. Keep the center firm and arrange the outer petals more openly.
Secure the underside carefully. A rolled rose needs stitches passing through multiple layers so the flower doesn’t unwind when handled.
Keep the green sepals proportionate. They should support the rose without covering too much of the red petals.
Position the leaf before sewing. Hold the flower by the keyring to see how the leaf hangs before attaching it permanently.
Avoid excessive glue. Too much adhesive can stiffen the yarn or leave visible residue.
Check the hardware regularly. A bag charm may rub against other objects, so make sure the connecting rings remain closed and the yarn attachment stays secure.
Crochet Rose Keychain Color and Gift Ideas
One of the nicest things about this crochet rose keychain is how easily you can personalize the finished flower.
A classic red rose with dark green leaves creates a traditional floral look.
For a softer handmade gift, try pale pink with sage green. Cream petals with olive green leaves create a simple, neutral charm that looks lovely on a canvas tote bag.
Lavender, coral, and peach are also pretty alternatives.
You can change the flower color without altering the basic construction, but changing the yarn thickness may affect the finished dimensions and the way the petals roll.
These miniature roses make thoughtful small gifts for birthdays, Valentine’s Day, Mother’s Day, or a handmade gift exchange.
Attach the finished charm to a simple gift card or place it in a small fabric pouch for a personal finishing touch.
Frequently Asked Questions
Is this crochet rose keychain suitable for beginners?
Yes, it’s suitable for confident beginners who already understand chains, single crochet, half double crochet, double crochet, and slip stitches.
The most challenging parts are following the V-stitch petal repeats, rolling the flower evenly, and securing the green base.
If you’re new to crochet, practicing those techniques on a small swatch can help before attempting the full project.
How do I stop my crochet rose from unrolling?
The most important step is securing the underside of the rose.
Use a tapestry needle to sew through several layers of the rolled foundation edge.
Make multiple small stitches rather than relying on one large stitch.
Check that the center and outer coils remain stable before attaching the flower to the keychain hardware.
Can I make a crochet rose keychain without glue?
Yes. Glue is optional.
You can sew the green base, leaf, and attachment loop securely with matching yarn or strong thread.
For a keychain that will be handled frequently, stitching provides an important mechanical connection. If you use glue for positioning, it should not replace secure sewing.
What yarn and hook size should I use?
The video demonstrates 4-ply cotton yarn and a 2 mm crochet hook.
A smooth yarn helps define the rounded petals, while a relatively small hook can create the compact fabric needed for a miniature accessory.
Different yarn weights may change the overall flower size, so choose a compatible hook and check your tension.
Can I use this rose as a bag charm?
Absolutely. The finished flower can be attached to a handbag, backpack, tote bag, or keyring.
For everyday use, choose secure metal hardware and reinforce the point where the connector attaches to the crocheted base.
Remember that small crocheted embellishments and loose metal pieces are not suitable for unsupervised use by young children.
More Small Crochet Patterns to Try
If you enjoyed making this miniature flower charm, there are plenty of other small crochet projects to explore.
For a different rose design, try our Crochet Rose Pattern, which focuses on creating the flower itself.
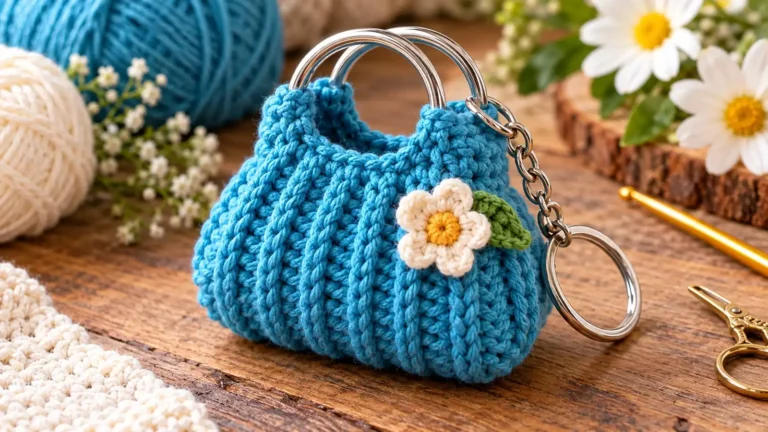
If you’d like another handmade accessory, our Mini Crochet Bag Keychain Pattern shows how to create a cute ribbed purse with circular metal handles.
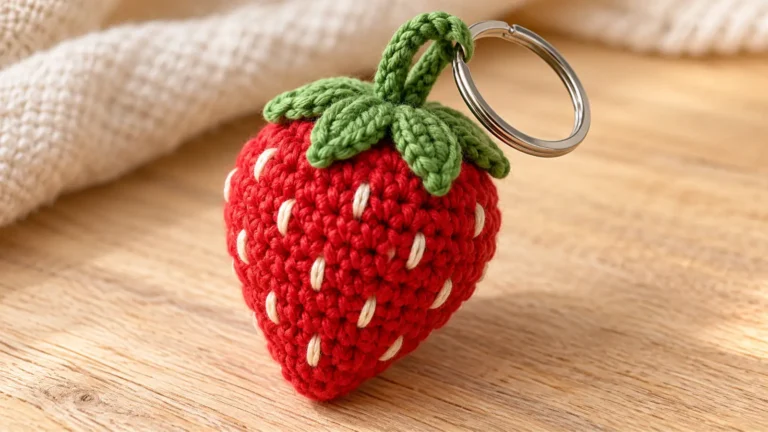
For a fruit-shaped alternative, follow our strawberry crochet keychain pattern.
You can also explore our Easy Crochet Flower Pattern for a simpler floral project.
Each offers another opportunity to practice your stitches while making something small, creative, and giftable.
Once you’ve completed your crochet rose keychain, try experimenting with your favorite flower colors and turning your finished rose into a personalized handmade gift.