Easy crochet patterns, cute projects, and beginner-friendly ideas to inspire your next make.


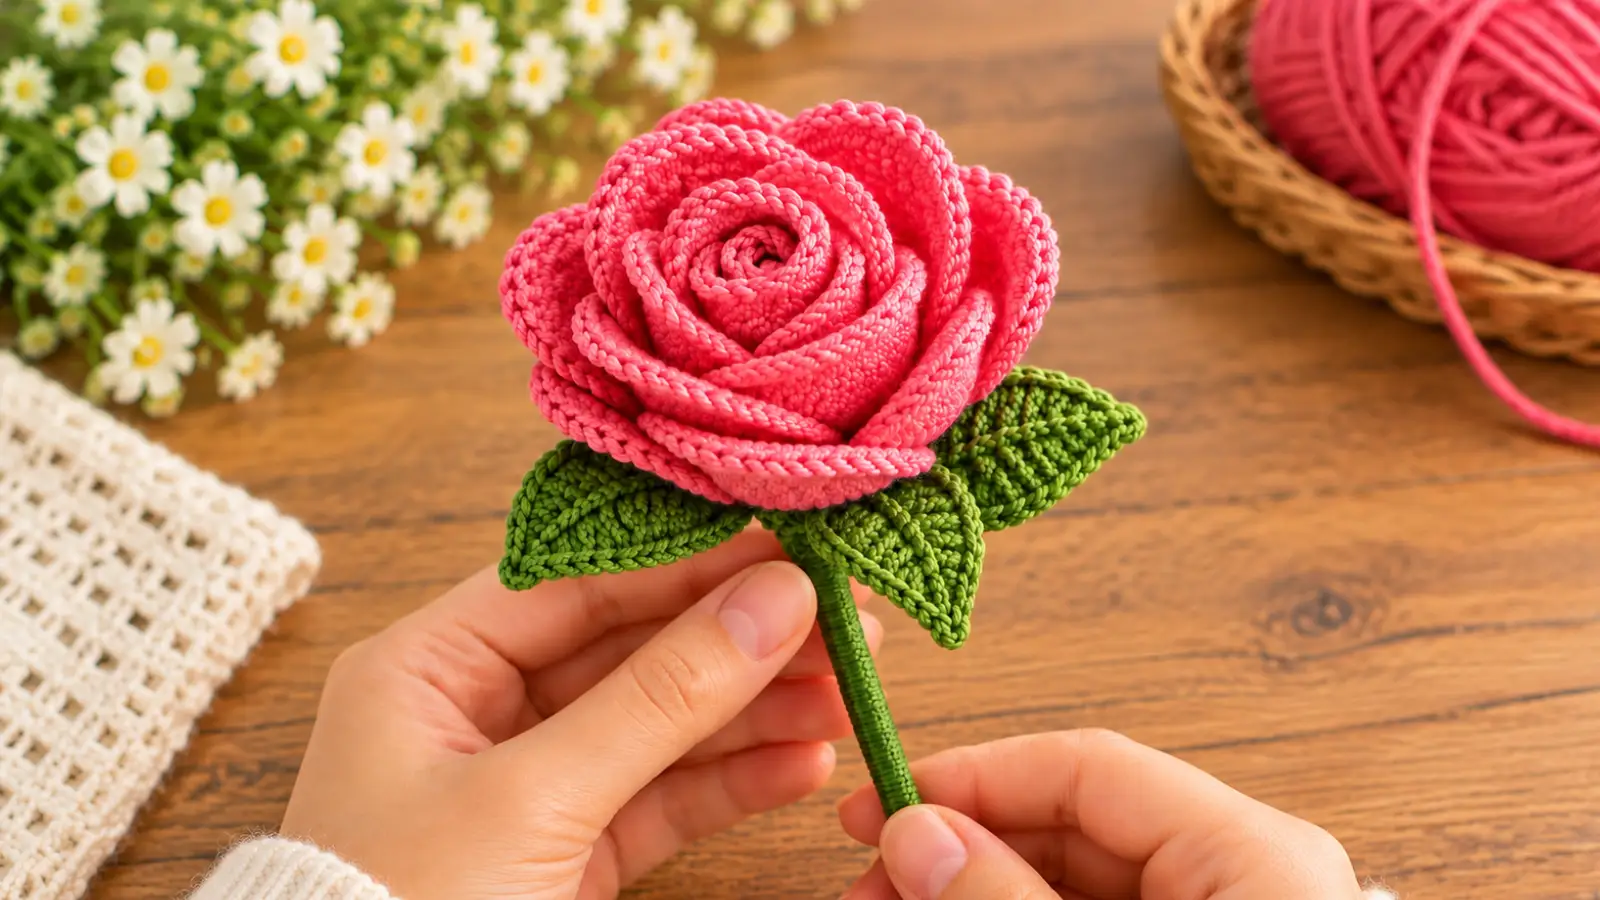
This crochet rose pattern turns one continuous strip of graduated petals into a dimensional rose with a compact center and fuller outer layers. Instead of crocheting and sewing together many individual petals, you work the flower as one piece, roll it from the smallest petals to the largest, and secure the base with a few firm stitches.
The tutorial also includes a simple green calyx, a supported stem, and one pointed leaf so you can finish the rose as a complete standing flower. Follow the checkpoints as you work, especially before rolling, because the direction and tension you use when shaping the strip have a big effect on the final bloom.
Table of Contents
Crochet Rose Pattern at a Glance
| Pattern detail | Information |
|---|---|
| Crochet terms | US terminology |
| Construction | One continuous petal strip, rolled and sewn at the base |
| Petals | 15 graduated petals |
| Petal progression | 5 small, 5 medium, 5 large |
| Flower style | Dimensional rolled rose |
| Green finishing | Separate 5-point calyx |
| Stem support | Required for a standing rose |
| Leaf | One separate pointed leaf |
| Main stitches | ch, sl st, sc, hdc, dc, inc |
| Gauge | Not critical, but the strip should stay flexible enough to roll smoothly |
The finished size will depend on your yarn, hook, tension, and how tightly you roll the bloom.
What You’ll Need
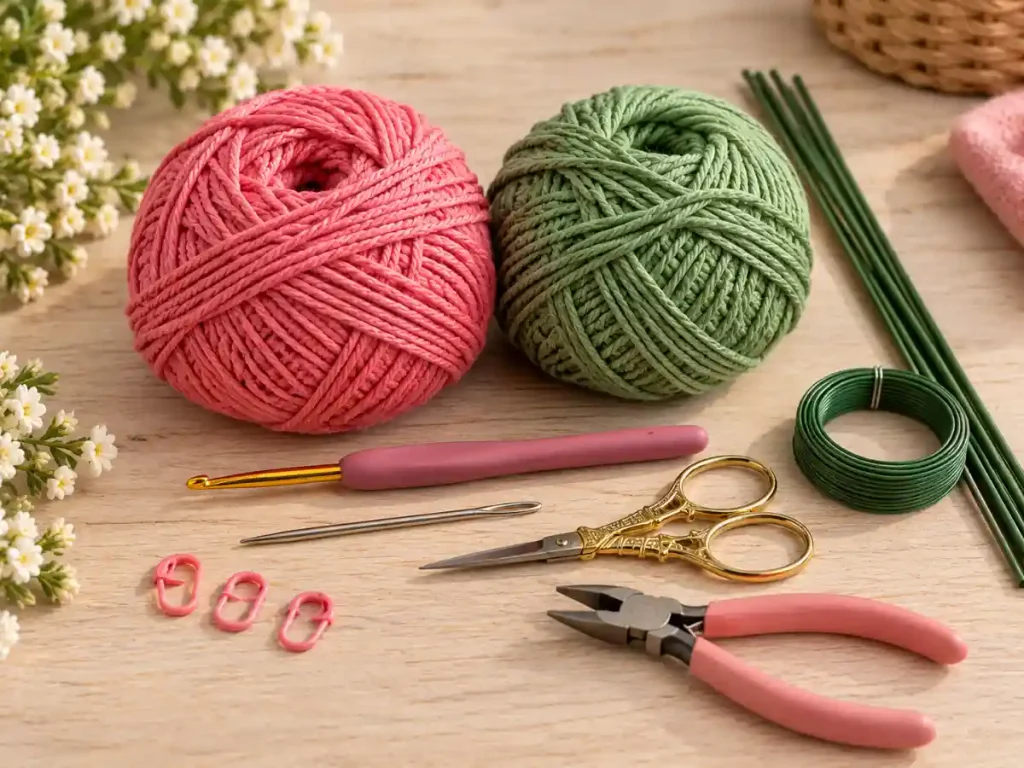
For one rose, prepare:
- smooth yarn in your chosen rose color;
- green yarn for the calyx, leaf, and stem finishing;
- a crochet hook that works comfortably with your yarn;
- a yarn needle;
- scissors;
- a sturdy floral stem or suitable craft wire;
- pliers or wire cutters if your stem material requires them.
Choose a smooth yarn with clear stitch definition for your first rose. It is easier to see the petal transitions and the straight foundation edge when the yarn is not very fuzzy.
The flower strip should feel flexible rather than stiff. If the fabric is so tight that the petals do not bend naturally, try relaxing your tension or using a slightly larger hook.
A Note About the Stem
The bloom can be used without a stem, but a standing rose needs internal support. Choose a floral stem or craft wire that is firm enough to hold the finished flower without drooping.
If you cut wire, bend the end that will sit beneath the rose into a small closed loop. Do not leave a sharp cut end exposed inside the crochet work.
Crochet Stitches and Abbreviations
This pattern uses US crochet terminology.
For a broader reference, see the Craft Yarn Council’s standard crochet abbreviations.
- ch — chain
- sl st — slip stitch
- sc — single crochet
- hdc — half double crochet
- dc — double crochet
- inc — work 2 single crochets in the same stitch
- st / sts — stitch / stitches
Before You Start
This crochet rose pattern begins as a flat strip. The strip contains three groups of petals:
- 5 small inner petals
- 5 medium petals
- 5 large outer petals
The small petals become the center of the rose, while the larger petals create the fuller outside layers.
The most important shaping rule is simple:
Roll from the small-petal end toward the large-petal end.
Keep the straight foundation edge aligned along the bottom as you roll. The petal edges should stay free at the top.
New to crochet flowers? Start with our easy crochet flower pattern for a smaller five-petal project with simpler shaping.
How to Crochet a Rose Step by Step
Follow this crochet rose pattern in order so the petal sizes progress correctly from the center of the bloom to the outside.
Step 1: Crochet the Foundation Strip
With your rose-color yarn:
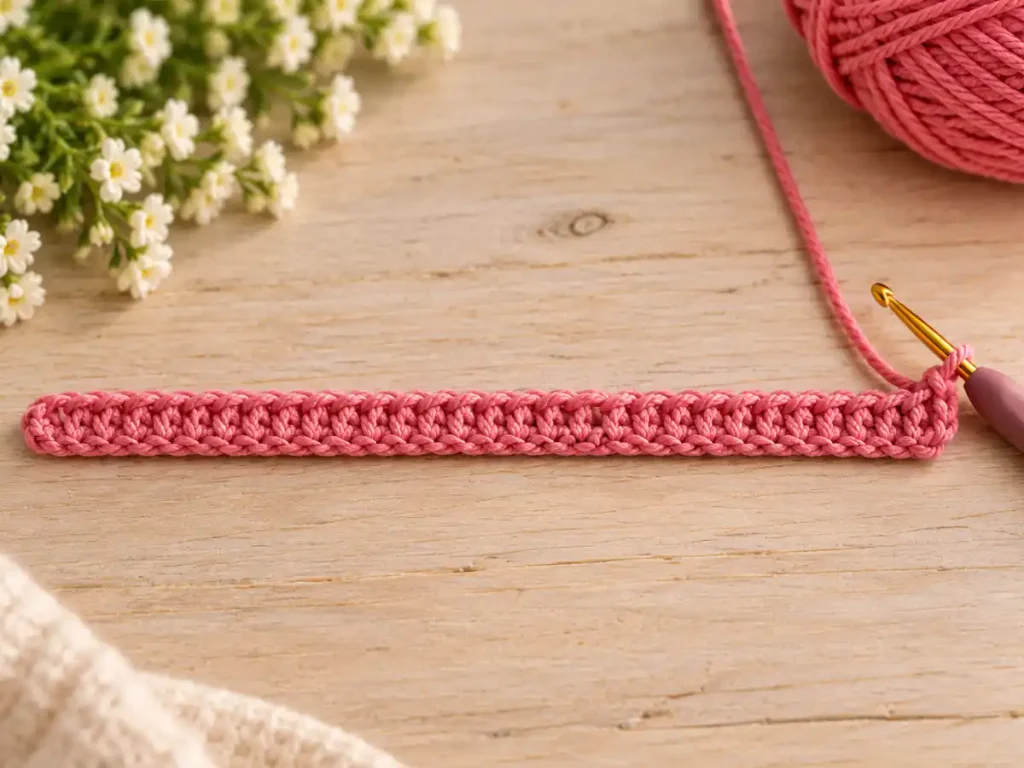
Ch 46.
Starting in the second chain from the hook:
Sc in each chain across.
You should have:
45 sc.
Turn your work.
Foundation checkpoint
Before starting the petals, count the row.
You need exactly:
45 stitches.
The strip should look straight and flexible. A little natural curve is fine, but it should not be twisted.
The 45 stitches are divided evenly across 15 petals, with each petal using three base stitches.
Step 2: Crochet the 5 Small Inner Petals
These first five petals will become the tight center of the rose.
For each small petal:
Sl st in the next st.
Work:
5 hdc in the next st.
Then:
Sl st in the next st.
Repeat that sequence 5 times.
You will use:
15 base stitches total.
Small-petal checkpoint
You should now have 5 compact petals.
These petals should look smaller and less open than the petals you will make later. That is intentional. They need to roll closely together to form the center of the bloom.
Step 3: Crochet the 5 Medium Petals
Continue directly into the next section of the strip.
For each medium petal:
Sl st in the next st.
Work:
5 dc in the next st.
Then:
Sl st in the next st.
Repeat 5 times.
This uses the next 15 base stitches.
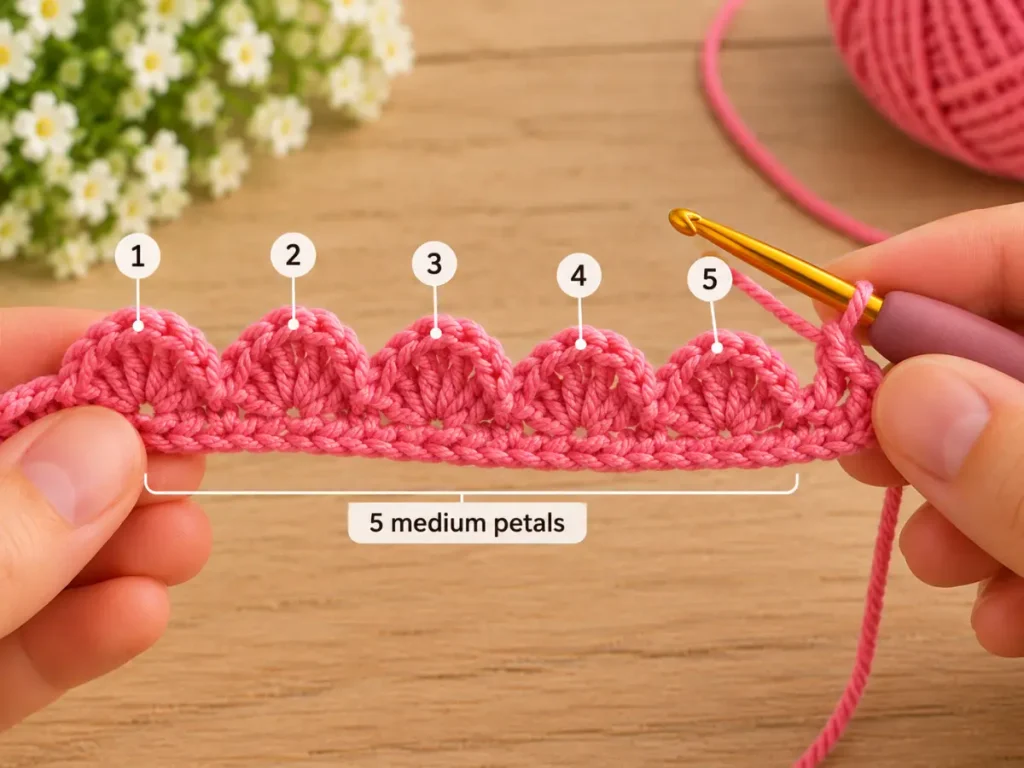
Medium-petal checkpoint
You should now have:
- 5 small hdc petals;
- 5 medium dc petals.
The medium petals should stand a little taller and look fuller than the first group.
Step 4: Crochet the 5 Large Outer Petals
Continue into the final section of the strip.
For each large petal:
Sl st in the next st.
Work:
7 dc in the next st.
Then:
Sl st in the next st.
Repeat 5 times.
This uses the final 15 base stitches.
Fasten off, leaving a long yarn tail for sewing the rose together.
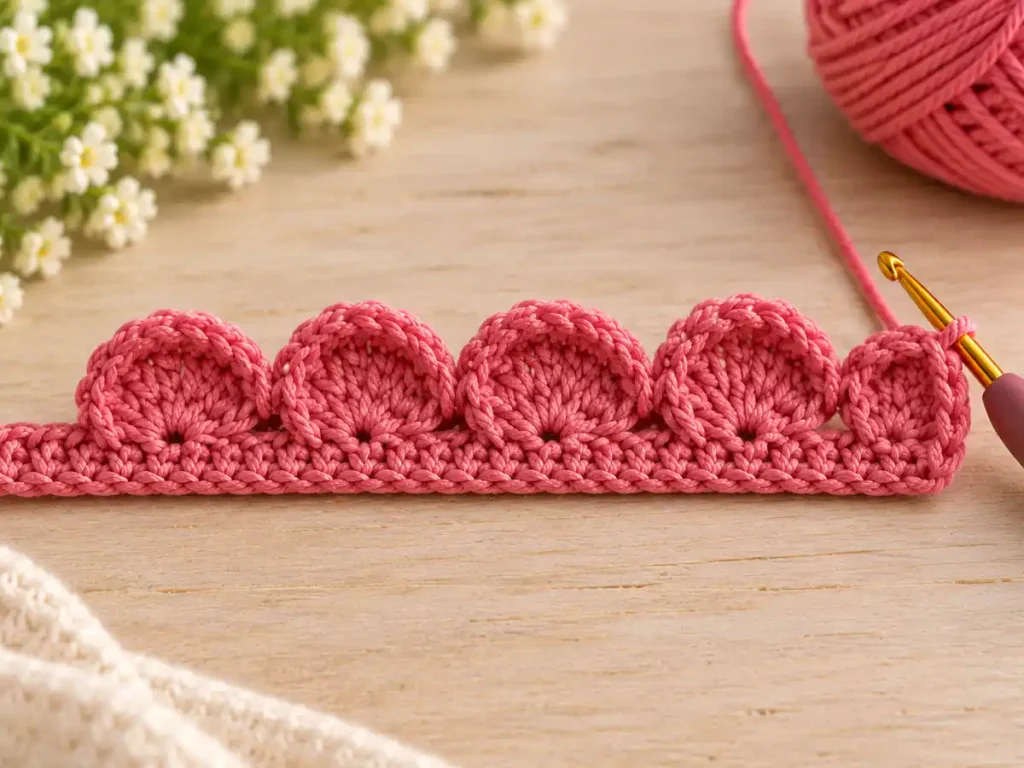
Full petal-strip checkpoint
Before rolling, count the petals.
You should have:
- 5 small petals
- 5 medium petals
- 5 large petals
Total:
15 petals.
The smallest petals should be at one end of the strip and the largest petals at the other.
Step 5: Check the Strip Before Rolling
Lay the strip flat with the petals facing upward.
Check three things before shaping the rose:
- the petal sizes progress from small to medium to large;
- the foundation edge forms one continuous line beneath the petals;
- the small-petal end is easy to identify.
Do not start rolling from the large petals.
If you roll in the wrong direction, the larger petals will crowd the center and the bloom will lose the gradual rose shape.
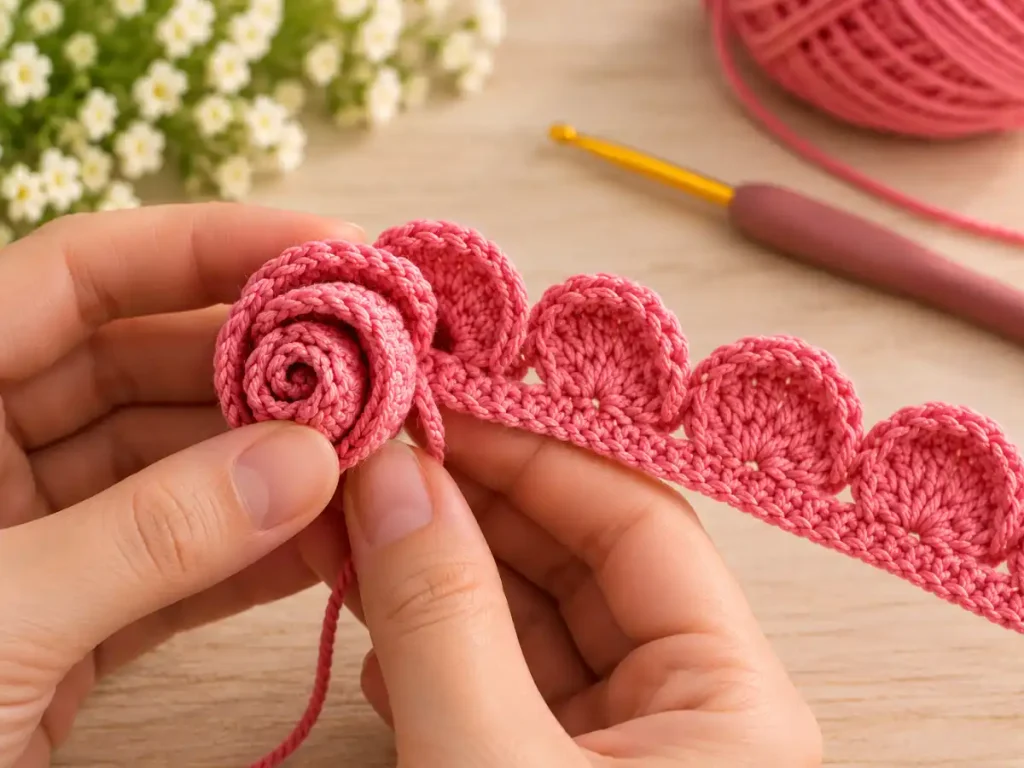
Step 6: Roll the Crochet Rose
This is the most important shaping step in the tutorial.
Start at the small-petal end.
Roll the first five petals snugly. They should form a compact spiral in the center.
When you reach the five medium petals, loosen your grip slightly and continue rolling with moderate tension.
For the final five large petals, roll more gently so the outer layer can open instead of being compressed tightly against the center.
As you work, keep the straight foundation edge aligned along the bottom.
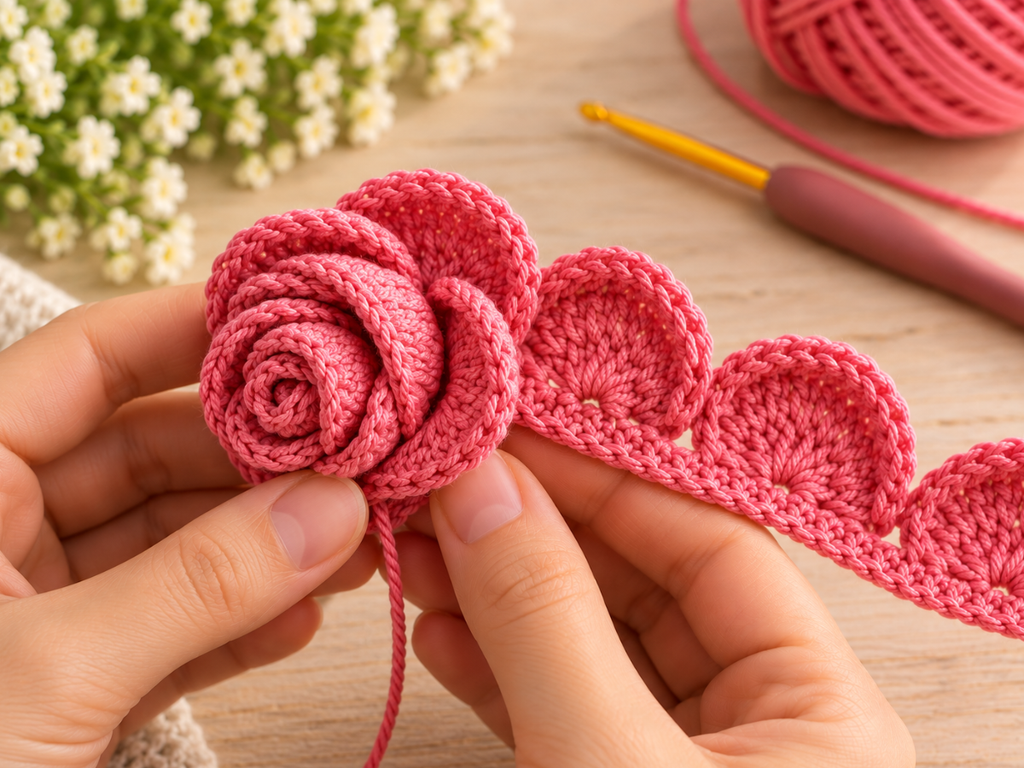
How tight should the rose be?
Think of the bloom in three zones:
- inner petals: snug;
- middle petals: secure but not compressed;
- outer petals: slightly looser.
The rose should hold its shape in your hand without looking like a hard ball.
If you are learning how to crochet a rose for the first time, shaping is more important than trying to make every petal sit perfectly before the base is sewn. You can adjust the outer petals gently after the bloom is secure.
Step 7: Sew the Rose Securely
Thread the long yarn tail onto a yarn needle.
Hold the rolled rose firmly with the foundation edge facing you.
Pass the needle through several layers of the foundation/sc base, moving from one side of the rolled flower to the other.
Repeat in a few directions until the base feels secure.
Do not sew through the visible petal faces. The petals should remain free so they can open naturally.
Secure the yarn and weave the tail into the base.
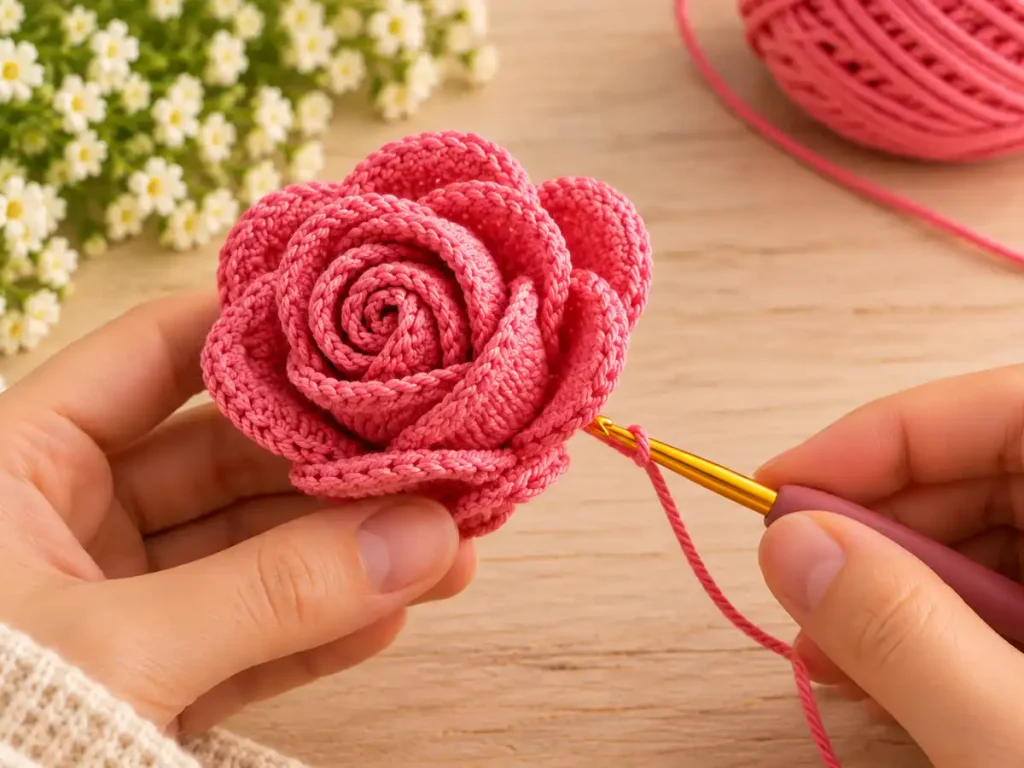
Rose-shaping checkpoint
Look at the bloom from above.
You should see:
- a compact center;
- medium petals opening around it;
- fuller outer petals around the edge.
Now check the base.
It should feel compact and stable. The strip should not begin to unroll when you release your grip.
If the center feels too open, add another securing stitch through the innermost foundation layers.
Step 8: Crochet the Green Calyx
The calyx covers the sewn base of the rose and gives you a clean place to anchor the stem.
With green yarn, make a magic ring.
Round 1: Work 5 sc into the ring. [5]
Pull the ring closed.
Round 2: Inc in each stitch around. [10]
Now make the five pointed sepals.
For each sepal:
Sl st in the next st. Ch 4.
Starting in the second chain from the hook, work:
- sl st;
- sc;
- hdc.
Then:
Sl st in the next base stitch.
Repeat around until you have 5 sepals.
Fasten off, leaving a long tail for attaching the calyx beneath the rose.
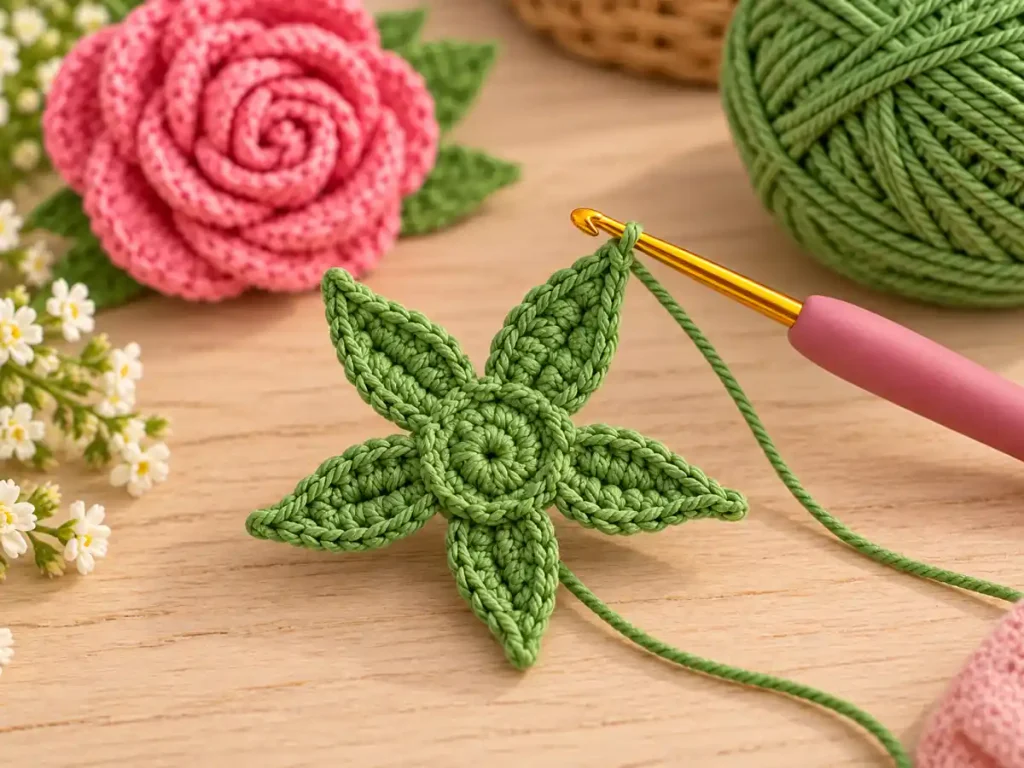
Calyx checkpoint
You should have:
- a small green circular center;
- 5 pointed sepals spaced around it.
The calyx should be large enough to cover the sewn rose base without extending far beyond the bloom.
Step 9: Add the Stem
Prepare your floral stem or craft wire.
If necessary, bend the upper end into a small closed loop with suitable pliers.
Bring the stem through the center of the green calyx so the loop rests against the inside of the calyx.
Use green yarn and a yarn needle to stitch securely around the loop.
Test the stem gently before attaching the calyx to the rose. It should not slide freely through the center.
Step 10: Attach the Calyx Under the Rose
Position the calyx directly beneath the rose.
The circular green center should cover the sewn base, while the five sepals remain free around the outside.
Using the long green yarn tail, stitch the calyx securely to the underside of the flower.
Work around the base with small stitches.
Avoid stitching high into the visible petals.
From the front, the green calyx should be mostly hidden beneath the bloom.
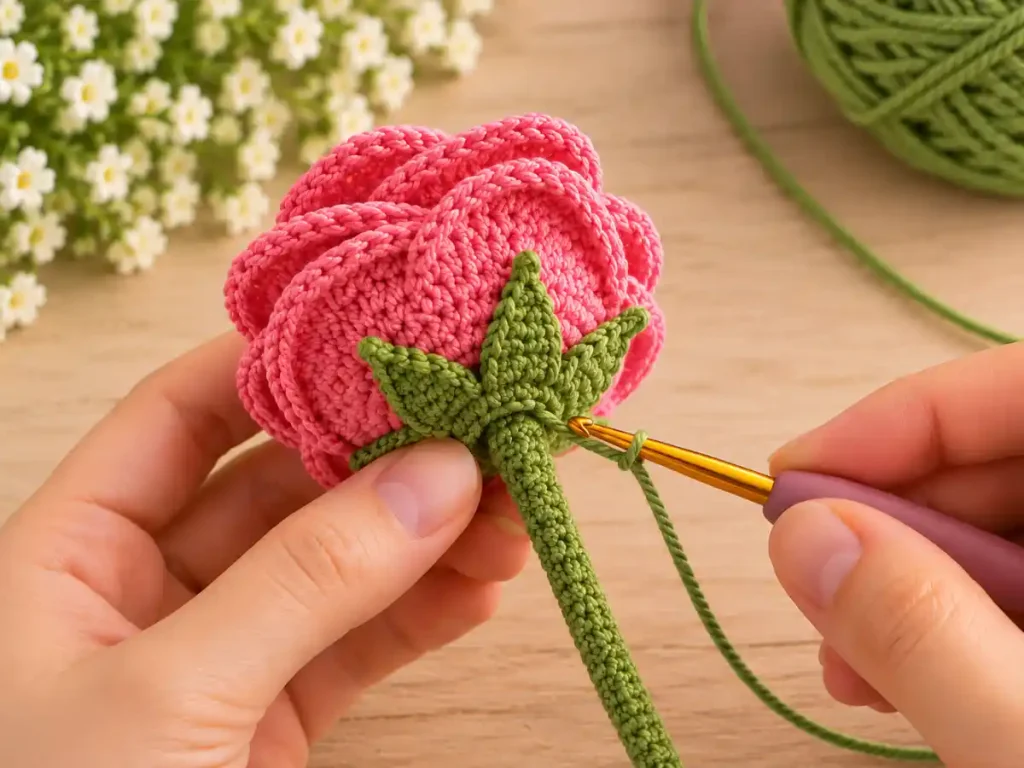
Assembly checkpoint
Hold the rose upright by the stem.
The flower should:
- sit centered over the stem;
- remain securely rolled;
- not spin loosely around the stem;
- show little or no green calyx from the front.
Step 11: Crochet the Rose Leaf
With green yarn:
Ch 16.
Starting in the second chain from the hook, work along the first side of the foundation chain:
- sl st in the next ch;
- sc in the next 2 ch;
- hdc in the next 3 ch;
- dc in the next 4 ch;
- hdc in the next 2 ch;
- sc in the next 2 ch.
You should now have one chain remaining at the tip.
In the final chain, work:
sc, ch 1, sc
This creates the pointed turn.
Now work back along the opposite side of the foundation chain:
- sc in the next 2 loops;
- hdc in the next 2 loops;
- dc in the next 4 loops;
- hdc in the next 3 loops;
- sc in the next 2 loops;
- sl st in the final loop at the base.
Fasten off, leaving a tail long enough to attach the leaf.
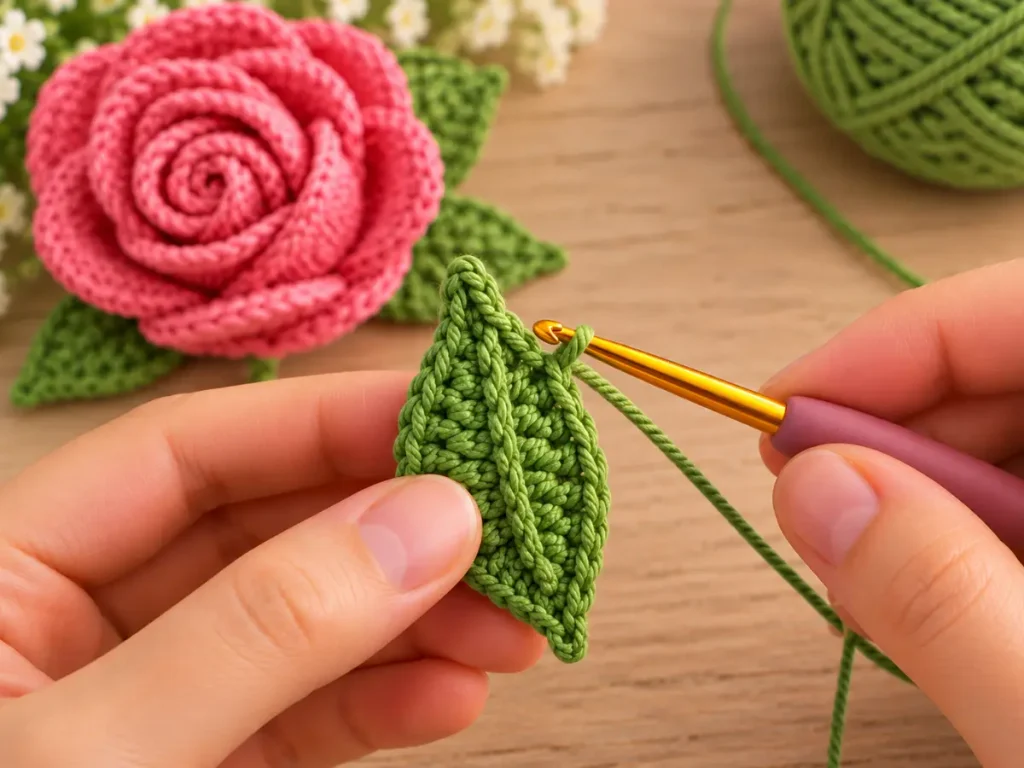
Leaf checkpoint
The finished leaf should be:
- narrow at the base;
- fuller through the middle;
- pointed at the tip.
It should look more compact than a long tulip leaf and less broad than the leaf used for the sunflower pattern.
Step 12: Attach the Leaf and Finish the Stem
Choose a position around the upper-middle part of the stem.
Use the leaf tail to sew only the base of the leaf securely around the stem.
Leave most of the leaf free so it can angle naturally away from the flower.
Finish covering the visible stem with green yarn or floral tape, depending on the stem material you are using.
Secure all remaining yarn ends.
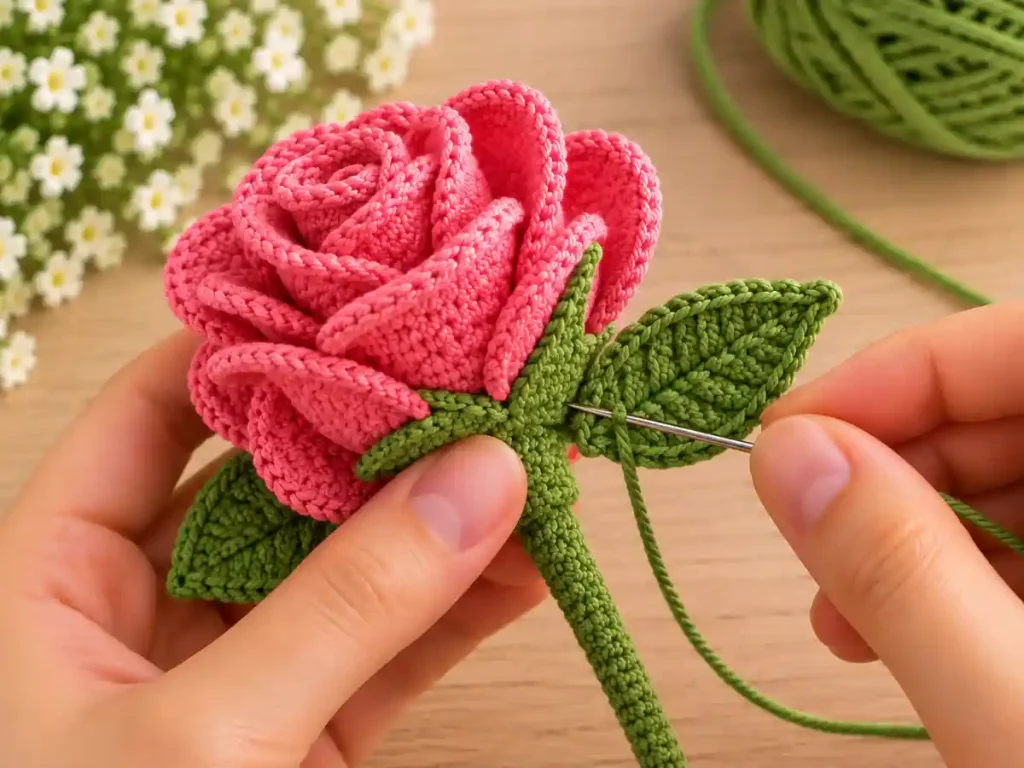
Final Rose Check
Before you finish, check the flower from the front, side, and back.
The rose should have:
- a compact central spiral;
- visible progression from small to larger petals;
- outer petals that are open rather than crushed;
- a secure base that does not unroll;
- a calyx that stays mostly hidden from the front;
- a stable stem;
- one pointed green leaf.
Gently adjust the outer petals with your fingers if needed.
What Should the Finished Crochet Rose Look Like?
The finished flower from this rose crochet pattern should have a clear layered shape rather than looking like a flat spiral.
The center should be compact, but it should not be squeezed so tightly that the inner petals disappear.
The middle of the flower should gradually widen, and the largest outer petals should create an open edge around the bloom.
From the side, the flower should have visible depth without becoming a tight ball.
The calyx belongs under the bloom rather than around the visible petal edge, and the stem should sit close to the center of the rose.
The leaf should angle away from the stem instead of being sewn flat along its entire length.
Common Crochet Rose Problems and How to Fix Them
Why Does My Crochet Rose Look Flat?
The first part of the strip was probably rolled too loosely.
The small petals need to form a snug center. If they are left open from the beginning, the rest of the bloom spreads outward instead of building upward.
Re-roll the flower from the small-petal end and keep the first five petals closer together.
Why Does My Rose Look Like a Tight Ball?
The outer petals were probably rolled with the same tight tension as the center.
Keep the center snug, but loosen your grip as you move through the medium and large petals.
The outer five petals should sit more freely around the bloom.
Why Does the Center Keep Opening?
The innermost foundation layers may not be secured firmly enough.
Add one or two stitches through several layers of the base near the center.
Do not pull through the petal faces. Secure the lower edge instead.
Why Are the Outer Petals Hidden?
Check how tightly you rolled the final section.
The largest petals need more room to open.
Gently loosen the outside of the roll and reposition the outer petals before adding another securing stitch to the base.
Why Does the Rose Keep Unrolling?
Your sewing may only be catching the outside layer.
Pass the needle through several foundation layers at the bottom of the rose.
A few strong stitches crossing the base in different directions are more useful than many shallow stitches that only catch the outer edge.
Why Is My Rose Leaning to One Side?
The foundation edge may have shifted upward or downward while you rolled the strip.
When rolling, keep the straight sc edge aligned along the bottom.
If the bloom is already sewn, you can sometimes improve the angle by repositioning the calyx and stem beneath the center, but a severely uneven base is easier to correct by re-rolling.
Why Can I See Too Much of the Green Calyx?
The calyx may be positioned too high or may be sitting off-center.
Move it directly beneath the bloom and keep the pointed sepals underneath the outer petals.
From the front, only a small amount of green should be visible, if any.
Why Is the Stem Loose?
Add more green securing stitches around the closed loop at the top of the stem.
If the calyx is already attached, you can also add a few discreet stitches through the underside of the rose base and the calyx near the stem anchor.
Can I Use a Different Yarn?
Yes.
You can make this crochet rose pattern with different yarn weights, but the final scale and structure will change.
A finer yarn generally creates a smaller, more delicate rose. A thicker yarn produces a larger and heavier bloom.
Use a hook that gives you flexible fabric rather than a very stiff strip. The petals need enough movement to roll and open naturally.
If you make a much larger rose, choose a stronger stem support so the flower does not droop.
Can I Make the Crochet Rose Without a Stem?
Yes.
The bloom can be used on its own without the calyx and floral stem.
A stemless rose can work as:
- an appliqué;
- a bag or pouch decoration;
- a gift topper;
- a wreath accent;
- a garland detail;
- a decorative element on another crochet project.
If you plan to attach the rose to something washable, choose yarn and finishing methods that suit the care requirements of the base project.
How to Make a Crochet Rose Bouquet
Once you are happy with one completed flower, repeat the same free crochet rose pattern in several colors.
You can keep all the roses the same size for a coordinated arrangement or vary the yarn shades for more contrast.
Slight differences in stem length can make a bouquet look more natural.
Before making several flowers at once, finish one complete rose first. That gives you a chance to check the roll, calyx size, stem strength, and leaf proportions with your chosen materials.
More Crochet Flower Patterns
For a flatter flower with a completely different petal construction, try our crochet daisy pattern.
For another dimensional flower with a structured stem and leaf, follow our crochet tulip pattern.
For a bolder flower with a broad dark center and pointed golden petals, make our sunflower crochet pattern.
Frequently Asked Questions
Is This Crochet Rose Pattern Suitable for Beginners?
This crochet rose pattern uses familiar stitches, but the shaping requires more attention than a basic flat flower.
The crochet itself uses chains, slip stitches, single crochet, half double crochet, double crochet, and simple increases for the calyx.
The most important skills are keeping the petal strip organized, rolling from the correct end, and sewing several foundation layers together securely.
How Many Petals Does This Crochet Rose Have?
This version has 15 petals:
5 small inner petals;
5 medium petals;
5 large outer petals.
The graduated sizes help the bloom widen naturally from the center toward the outside.
Which End of the Strip Should I Roll First?
Always start with the small hdc petals.
Those petals form the compact center.
Roll toward the medium petals and finish with the large outer petals.
Do I Need Wire to Make the Rose?
You need a floral stem or suitable craft wire if you want the rose to stand upright.
For an appliqué, wreath accent, or other stemless decoration, you can omit the wire.
Can I Make the Rose Larger or Smaller?
Yes.
Changing the yarn and hook is the simplest way to change the overall scale without rewriting the petal counts.
Remember that a heavier bloom may need stronger stem support.
Can I Make Several Roses Into a Bouquet?
Yes.
Repeat the same pattern and vary the yarn colors or stem lengths slightly.
Finish one full rose first so you can confirm the proportions before making the remaining flowers.
Finished Crochet Rose
This crochet rose pattern creates a dimensional flower without requiring you to crochet and assemble many individual petals.
The key is the gradual progression from small to larger petals and the way the strip is shaped afterward: roll the center snugly, give the outer petals more room, keep the foundation edge level, and sew through several base layers so the bloom stays secure.
Once you are comfortable with the shaping method, you can repeat the same rose for bouquets, gifts, wreaths, or other handmade floral projects.
Pattern Notes
This crochet rose pattern was created for Small Crochet Ideas with a focus on clear shaping, manageable construction, practical checkpoints, and step-by-step visual guidance.
The pattern uses US crochet terminology. Follow the stitch counts carefully, roll from the small-petal end toward the large-petal end, and keep your sewing focused on the foundation edge so the petals remain free.
