
Easy crochet patterns, cute projects, and beginner-friendly ideas to inspire your next make.


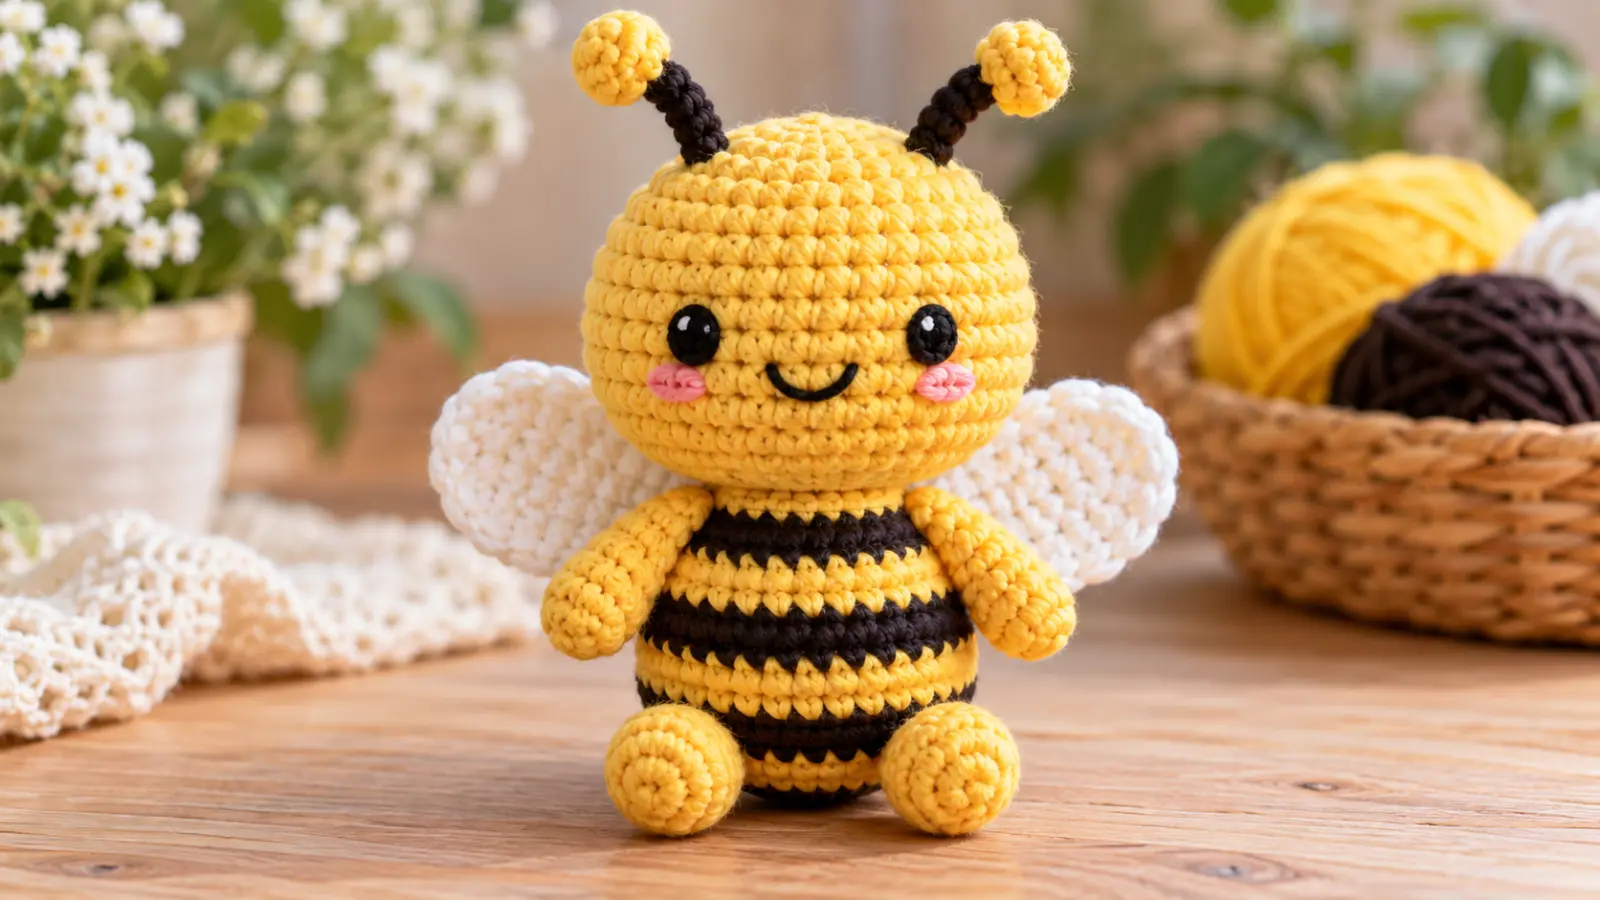
This crochet bee pattern shows you how to make a small striped amigurumi bee with a round head, compact body, two white wings, simple arms and legs, and an embroidered face. The pieces are worked separately and then assembled carefully so the head sits straight, the stripes stay level, and the wings look balanced from the back.
The pattern uses basic crochet stitches, straightforward shaping, and clear stitch-count checkpoints. The head and body both finish with 12 open stitches, which makes the final join easier to align and helps support the larger head.
You can keep the finished bee as a small amigurumi project or add a reinforced hanging loop later if you want to turn it into a keychain or bag charm.
Table of Contents
Crochet Bee Pattern at a Glance
| Pattern detail | What to expect |
|---|---|
| Project | Small crochet bee amigurumi |
| Construction | Separate head and striped body |
| Wings | 2 flat white or cream wings |
| Arms | 2 small crochet tubes |
| Legs | 2 slightly longer crochet tubes |
| Face | Embroidered by default |
| Main stitches | ch, sl st, sc, hdc, dc, inc, dec |
| Terminology | US crochet terms |
| Head/body join | 12 head stitches sewn to 12 body stitches |
| Optional use | Can be adapted into a keychain or bag charm |
| Finished size | Depends on yarn, hook, tension, stuffing, and assembly |
This free crochet bee pattern focuses on stitch counts and visual checkpoints rather than one fixed finished measurement, because the final proportions will change with your yarn and tension.
What You’ll Need
For this crochet bee pattern, prepare:
- smooth yellow yarn;
- black or dark-brown yarn for the stripes;
- white or cream yarn for the wings;
- black embroidery yarn or thread for the eyes and smile;
- a crochet hook that gives you a dense amigurumi fabric with your chosen yarn;
- polyester stuffing;
- a yarn needle;
- scissors;
- a stitch marker;
- a few pins for positioning the pieces before sewing;
- optional pink embroidery yarn for small cheek details;
- optional split key ring or lobster/swivel clasp if you later turn the bee into a keychain or bag charm.
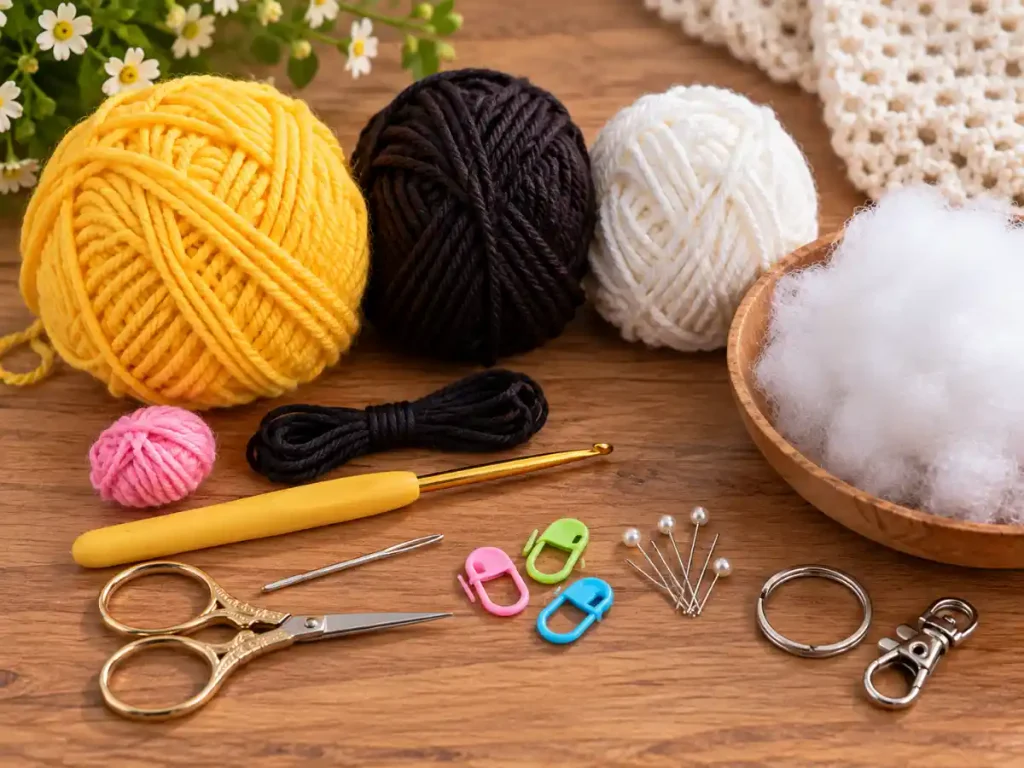
A smooth cotton or cotton-blend yarn is a practical choice because the stitches, color changes, and shaping are easy to see. If you use a different fiber, choose a hook that creates a dense enough fabric that the stuffing does not show through.
Crochet Stitches and Abbreviations
This pattern uses US crochet terminology.
For a broader reference, see the Craft Yarn Council’s standard crochet abbreviations.
- MR — magic ring
- ch — chain
- sl st — slip stitch
- sc — single crochet
- hdc — half double crochet
- dc — double crochet
- inc — work 2 single crochets in the same stitch
- dec — single crochet decrease, working two stitches together
- st / sts — stitch / stitches
The head and body are worked in continuous rounds. Move your stitch marker to the first stitch of each new round so you do not lose your place.
Before You Start
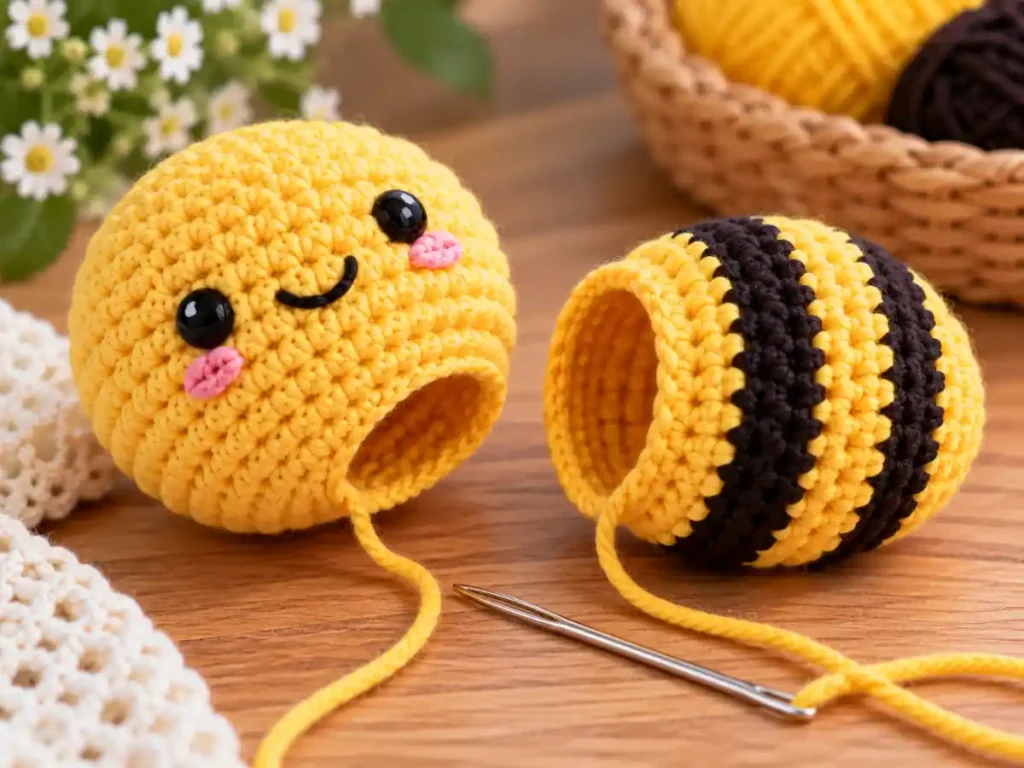
In this crochet bee pattern, the head and body are crocheted separately, but both stop with 12 stitches around the opening. Instead of closing each piece to a tiny point, the two 12-stitch openings are sewn together. This creates a wider, more stable connection for the larger round head.
The basic construction order is:
- crochet the head;
- add the embroidered face;
- crochet the striped body;
- stuff both pieces;
- sew the 12-stitch openings together;
- crochet two arms;
- crochet two legs;
- crochet two wings;
- pin all pieces in place;
- sew the limbs and wings securely.
When changing colors on the body, work the final yarn-over of the last stitch with the new color. This keeps the new color ready for the next stitch and gives a cleaner transition than changing after the stitch is complete.
A small jog where the stripe changes color can still appear when working in continuous rounds. That is normal for this simple construction.
How to Crochet the Bee Head
Step 1: Start the Head
The head is the largest piece in this crochet bee pattern.
With yellow yarn, make a magic ring.
Round 1: Work 6 sc into the magic ring. [6]
Pull the ring closed and place a stitch marker in the first stitch.
Round 2: Inc in each stitch around. [12]
Head checkpoint
At this stage, you should have a small flat circle.
Count the stitches before continuing. On a small amigurumi project, one missed increase can change the final shape noticeably.
Step 2: Widen the Head
Round 3: (sc, inc) ×6. [18]
Round 4: (2 sc, inc) ×6. [24]
Shape checkpoint
The circle should now be wider and may begin to curve slightly as you continue working.
Keep your tension even. You want dense fabric, but not stitches so tight that the hook becomes difficult to insert.
Step 3: Build the Round Head
Rounds 5–7: Sc in each stitch around. [24]
These even rounds give the head its depth.
By the end of Round 7, the piece should look more like a shallow cup than a flat circle.
Step 4: Shape the Lower Head
Round 8: (2 sc, dec) ×6. [18]
Round 9: (sc, dec) ×6. [12]
Fasten off, leaving a long tail for joining.
Do not close the opening.
Add stuffing gradually through the 12-stitch opening. Shape the head with your fingers as you fill it.
The head should feel firm enough to keep a rounded shape, but the stitches should not stretch open.
Final head checkpoint
You should now have:
- a rounded yellow head;
- a 12-stitch opening at the bottom;
- smooth stuffing with no visible gaps;
- enough structure to hold its shape without feeling hard.
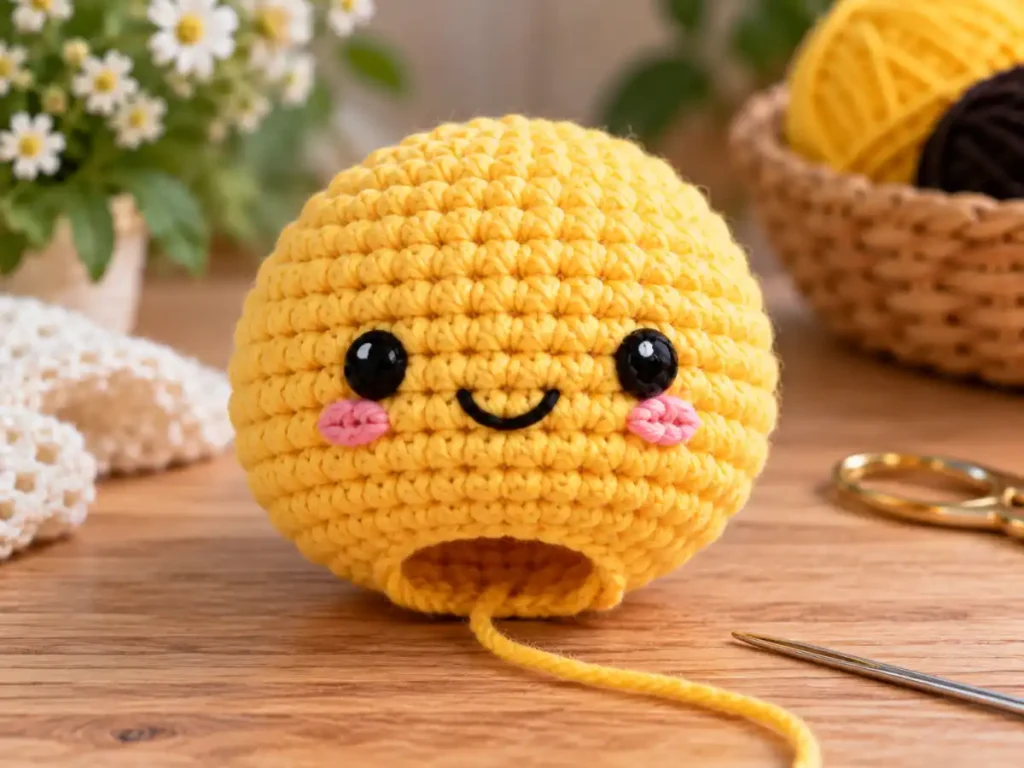
Set the head aside while you add the face.
Add the Bee Face
The face is easiest to position before the head is attached to the body.
Use black embroidery yarn or thread to create two simple eyes on the front of the head.
Mark both eye positions first rather than finishing one eye before checking the second. This helps keep the face balanced.
Add a small embroidered smile below the eyes.
If you want a little more color, add short pink stitches for cheeks.
Avoid pulling the embroidery yarn too tightly. Tight embroidery can dent the stuffed head and distort the stitches around the face.
Plastic safety eyes can be used as an optional alternative, but the embroidered version keeps the pattern simple and avoids adding small plastic components.
How to Crochet the Striped Bee Body
Step 5: Start the Body
The striped body gives this crochet bee pattern its classic bee look.
With yellow yarn, make a magic ring.
Round 1: 6 sc in MR. [6]
Round 2: Inc in each stitch around. [12]
Round 3: (sc, inc) ×6. [18]
The body will stay at 18 stitches for several rounds while the stripes are formed.
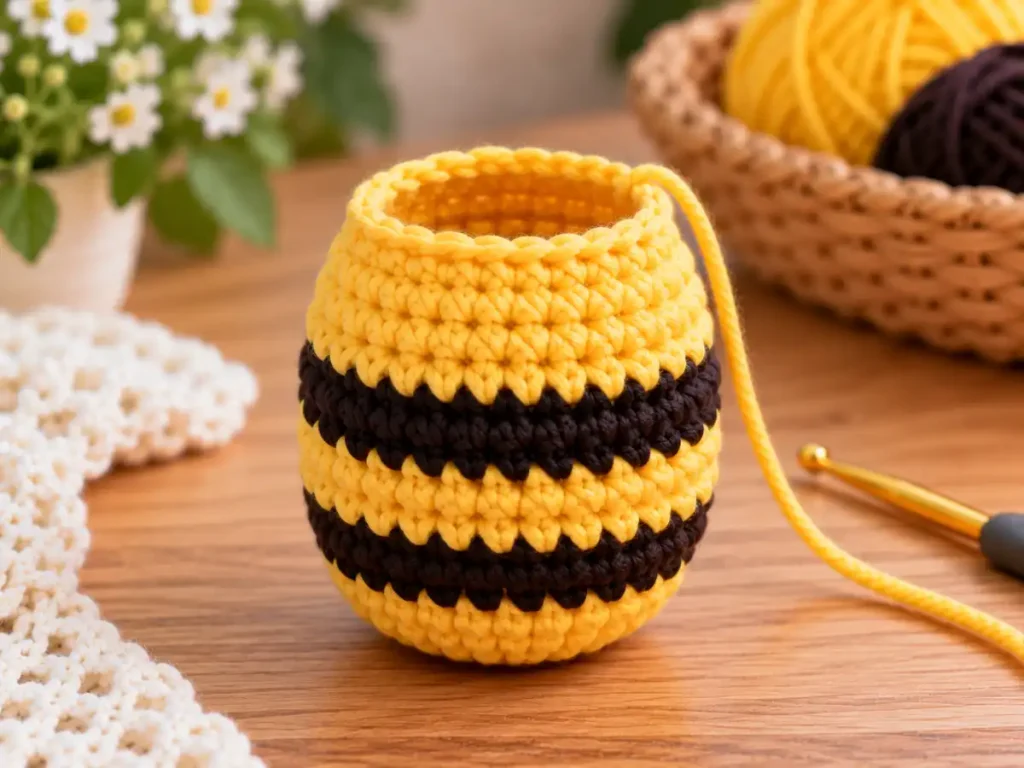
Step 6: Crochet the Bee Stripes
Round 4: Sc around in yellow. [18]
Change to black or dark brown.
Rounds 5–6: Sc around. [18]
Change back to yellow.
Rounds 7–8: Sc around. [18]
Change to black or dark brown.
Rounds 9–10: Sc around. [18]
Change back to yellow.
Round 11: Sc around. [18]
Stripe checkpoint
The body should now have a clear sequence of yellow and dark stripes.
Check that each round still has 18 stitches.
If one stripe looks noticeably higher on one side, make sure you have not accidentally added or skipped a stitch near the color change.
Step 7: Shape the Top of the Body
Round 12: (sc, dec) ×6. [12]
Fasten off, leaving the 12-stitch opening unclosed.
Add stuffing through the top. Fill the lower body first, then add smaller amounts near the opening.
The body should be firm enough to keep its compact oval shape, but do not overstuff it. Keep the stuffing slightly below the open edge so it does not interfere with the head-to-body seam.
Body checkpoint
Before assembly, check that:
- the body has 12 stitches around the opening;
- the stripes are easy to distinguish;
- the stuffing is hidden;
- the body is smaller than the head;
- the opening is still easy to access for sewing.
Join the Head to the Body
The 12-to-12 join is an important construction feature of this crochet bee pattern.
Place the stuffed head above the body.
Align the 12 head stitches with the 12 body stitches.
Before sewing, make sure:
- the face points directly forward;
- the body stripes look level from the front;
- the head is not twisted to one side.
Thread a yarn needle with the long yellow tail from the head, or use a fresh length of matching yellow yarn if needed.
Sew one stitch from the head opening to one stitch from the body opening, continuing all the way around.
Because both openings have 12 stitches, the pieces can be matched evenly:
12 head stitches ↔ 12 body stitches
Do not pull the seam excessively tight. The goal is a secure connection without pinching the neck.
After the first seam is complete, check the bee from the front and both sides.
If the larger head still feels loose, make a light second reinforcing pass through nearby stitches around the neck.
Neck checkpoint
The head should sit firmly above the body without leaning strongly forward, backward, or to one side.
If it tilts, adjust the seam before weaving in the yarn end.
Crochet the Bee Arms
Make 2 in yellow.
Round 1: 5 sc in MR. [5]
Rounds 2–4: Sc around. [5]
Fasten off, leaving a long tail for sewing.
The arms do not need stuffing for the default version. Flatten the open end gently before attachment.
Make the second arm the same way.
Crochet the Bee Legs
Make 2 in yellow.
Round 1: 5 sc in MR. [5]
Rounds 2–5: Sc around. [5]
Fasten off, leaving a long sewing tail.
The legs are one round longer than the arms so the finished silhouette is easier to read.
Keep both legs the same length by counting the rounds carefully.
Crochet the Bee Wings
The simple flat wings keep this crochet bee pattern manageable while still giving the bee a recognizable silhouette.
Make 2 in white or cream yarn.
Ch 6.
Row 1
Starting in the second chain from the hook, work:
sc, hdc, dc, hdc, sc. [5]
Ch 1 and turn.
Row 2
Work:
sc, hdc, 3 dc in the next stitch, hdc, sc. [7]
Fasten off, leaving a long tail for sewing.
The extra double crochets in the center of Row 2 help create a rounded outer edge.
Wing checkpoint
Each wing should have:
- a narrower base;
- a fuller rounded edge;
- a flat shape that can be sewn to the back of the bee.
Make the second wing using the same stitch sequence.
The exact shape can vary slightly with yarn and tension, so compare the two wings before assembly. If one looks noticeably different, remake it before sewing.
How to Assemble the Crochet Bee
Assembly is what turns the separate pieces into a balanced finished bee. For this crochet bee pattern, avoid sewing everything on immediately.
Step 8: Pin the Pieces First
Place the bee on a flat surface.
Pin the arms, legs, and wings into position before sewing.
Check the project from:
- the front;
- the back;
- the left side;
- the right side.
This simple step makes it much easier to catch an uneven arm, crooked wing, or off-center leg before the stitches are permanent.
Step 9: Attach the Arms
Place one arm on each side of the upper or middle body.
The two arms should sit at approximately the same height.
Sew the flattened open edge of each arm through several body stitches.
Do not rely on one stitch alone to hold the arm.
After attaching the first arm, pin the second one again and compare both sides before sewing it permanently.
Step 10: Attach the Legs
Position one leg on the lower-left side of the body and one on the lower-right side.
Angle them slightly downward so they are clearly separate from the arms.
Check the bee from the front.
If one leg begins noticeably higher or lower than the other, reposition it before sewing.
Secure each leg through several body stitches and weave the yarn tails into the body.
Step 11: Attach the Wings
Turn the bee so the back faces you.
Place one wing on the upper-left side of the back and the second on the upper-right side.
The narrow wing bases should sit relatively close together near the center back, while the rounded ends point outward and slightly upward.
Pin both wings before sewing.
Compare them from the back and from above.
Once the placement looks balanced, sew mainly around the narrow base of each wing. Leaving most of the rounded wing free helps it keep a more dimensional shape.
Final Bee Check
Before weaving in the last yarn ends, inspect the finished bee carefully.
Check that:
- the head is centered over the body;
- the face points forward;
- the neck seam feels secure;
- the dark and yellow stripes are easy to distinguish;
- the arms are placed at similar heights;
- the legs are balanced;
- the wings sit symmetrically on the back;
- no stuffing is visible;
- loose yarn tails are secured.
If anything looks uneven, it is easier to correct it before every end is woven in.
What Should the Finished Crochet Bee Look Like?
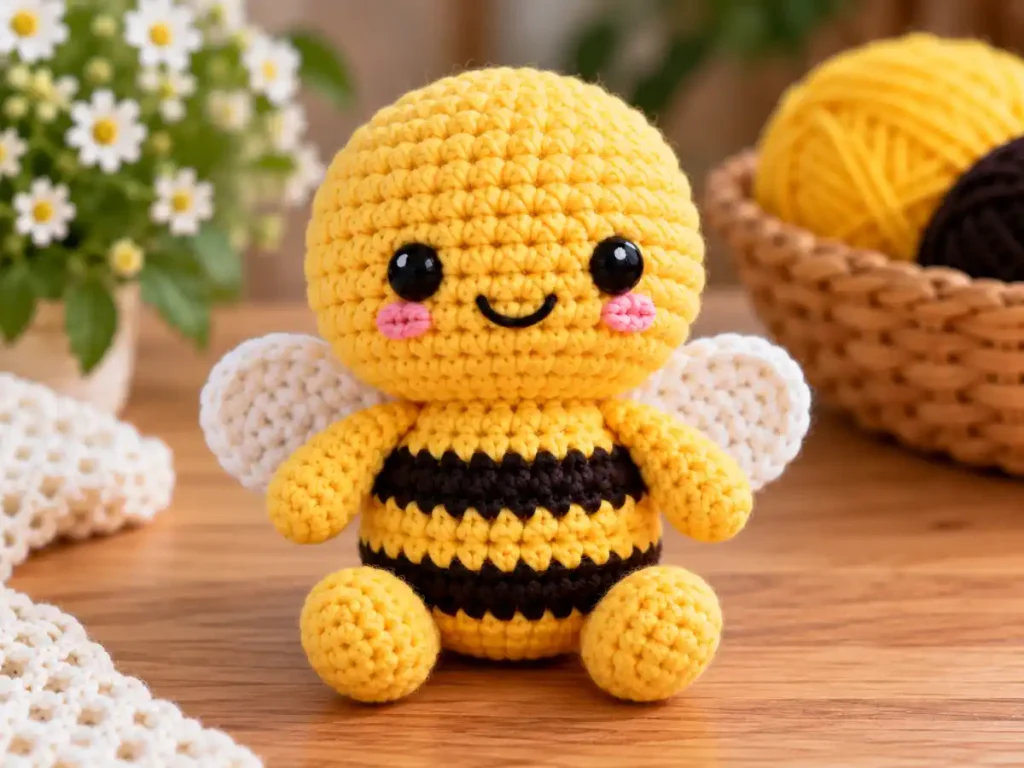
The finished bee from this crochet bee pattern should have a slightly larger round head above a smaller striped body.
The embroidered face should sit near the center of the head, while the arms and legs create a simple character-like shape without making the project overly complicated.
From the back, the two white wings should sit close to the center and spread outward.
The overall result should look compact, balanced, and clearly recognizable as a bee.
Common Crochet Bee Problems and How to Fix Them
Why Does My Bee Head Look Flat?
The head may be under-stuffed or the fabric may be too loose.
Add stuffing in small amounts and shape the head with your fingers.
If the stitches are very open, use a hook that gives you denser fabric with your yarn on the next version.
Why Does the Head Tilt After Sewing?
The head and body openings may not have been aligned evenly, or the seam may be tighter on one side.
Check that the 12 head stitches are matched evenly to the 12 body stitches.
If necessary, remove part of the seam and resew the tilted section.
Why Do My Bee Stripes Look Uneven?
First, confirm that each stripe round has the correct stitch count.
When changing colors, complete the final yarn-over of the last stitch with the new color.
A small jog in continuous rounds is normal, but a large diagonal shift can indicate an added or skipped stitch.
Why Can I See Stuffing Through the Crochet?
The fabric may be too loose or the piece may be overstuffed.
Remove a little filling if the gaps appeared after stuffing.
For future versions, choose a hook that gives you a denser amigurumi fabric with the same yarn.
Why Do the Wings Point Downward?
The wing bases may be attached too low on the back.
Pin both wings again slightly higher and angle the rounded ends outward and upward before sewing.
Why Is One Wing Larger Than the Other?
Compare the chain count and both rows.
Each wing starts with Ch 6, gives 5 stitches in Row 1, and 7 stitches in Row 2.
If the stitch counts match but one wing still looks larger, tension may have changed between the two pieces.
Why Are the Arms or Legs Uneven?
Always pin the matching pair before sewing.
Look at the bee from the front and compare the attachment height on both sides.
A difference of even one round can be noticeable on a small project.
Why Does the Body Look Twisted?
Check your stitch marker and make sure the beginning of the round has not shifted because of accidental extra stitches.
Color changes can also make the spiral construction more visible, so use the stitch count—not the stripe edge alone—to judge where the round begins.
Can I Use Different Yarn?
Yes.
This bee crochet pattern can be made with different yarns, but changing the yarn changes the overall size, weight, and appearance.
A thinner yarn generally creates a smaller bee.
A thicker yarn creates a larger and heavier bee.
Smooth yarn is especially useful for a first attempt because the rounds and color changes are easy to count.
Whatever yarn you use, pair it with a hook that produces dense fabric suitable for stuffing.
Can I Turn This Crochet Bee Into a Keychain?
Yes.
If you want another use for this crochet bee pattern, the finished bee can be adapted into a keychain or bag charm by adding a reinforced hanging loop.
Do not attach a metal key ring directly through one crochet stitch.
Instead, make a short reinforced crochet cord, fold it into a loop, and anchor both ends through several stitches across the top/back of the head. The load should be spread across multiple stitches rather than pulling on one surface loop.
Once the crochet loop is secure, attach a split key ring for a traditional keychain or a lobster/swivel clasp for a removable bag charm.
For more small accessory ideas, explore our Crochet Keychains & Bag Charms collection.
Frequently Asked Questions
Is This Crochet Bee Pattern Beginner-Friendly?
The pattern uses basic stitches, simple increases and decreases, color changes, stuffing, and sewing.
The parts that need the most attention are counting continuous rounds, matching the 12-stitch head and body openings, and positioning the wings and limbs evenly.
If you are comfortable making a magic ring and following stitch counts, the construction is designed to stay manageable.
Is This a Free Crochet Bee Pattern?
Yes. The complete written instructions are provided in this article.
You can follow the head, striped body, arms, legs, wings, face, and assembly steps from beginning to end.
What Yarn Works Best for a Crochet Bee?
A smooth yarn that gives clear stitch definition is useful, especially when learning the pattern.
Cotton or cotton-blend yarn is one practical option, but you can use another yarn as long as your hook creates a dense fabric that holds stuffing securely.
How Do I Keep the Head From Tilting?
Stop both the head and body at 12 stitches and align those openings evenly before sewing.
Pin or hold the head in position, check the face from the front, then sew one head stitch to one body stitch around the seam.
A light reinforcing pass can help stabilize the larger head.
Can I Embroider the Eyes Instead of Using Safety Eyes?
Yes.
This pattern uses embroidered eyes by default.
Embroidery keeps the face simple and lets you adjust the expression without adding plastic components.
Can I Make This Into a Bumble Bee Crochet Pattern?
Yes.
The same basic construction already uses the classic visual features associated with a bumblebee-style amigurumi: a yellow head, dark body stripes, and pale wings.
You can use black stripes for stronger contrast or dark brown for a softer handmade look.
Can I Turn the Bee Into a Keychain?
Yes.
Add a reinforced hanging loop anchored through several stitches, then attach a split key ring or removable clasp.
Avoid pulling metal hardware directly through one crochet stitch.
Finished Amigurumi Bee
This crochet bee pattern combines simple round shaping with a striped body, small limbs, flat wings, and an embroidered face.
The 12-stitch head-to-body join gives the larger head a wider connection point, while pinning the arms, legs, and wings before sewing helps keep the finished bee balanced.
Use yellow and black for a classic look or swap the black for dark brown if you prefer softer contrast.
Keep the bee as a small amigurumi project, or add a reinforced hanging loop if you want to turn it into a keychain or bag charm.
Pattern Notes
This crochet bee pattern was created for Small Crochet Ideas with a focus on clear stitch-count checkpoints, a stable head-to-body join, simple shaping, and beginner-friendly assembly guidance.
The pattern uses US crochet terminology. Finished size and proportions will vary with yarn, hook, tension, stuffing, and assembly.
