Easy crochet patterns, cute projects, and beginner-friendly ideas to inspire your next make.


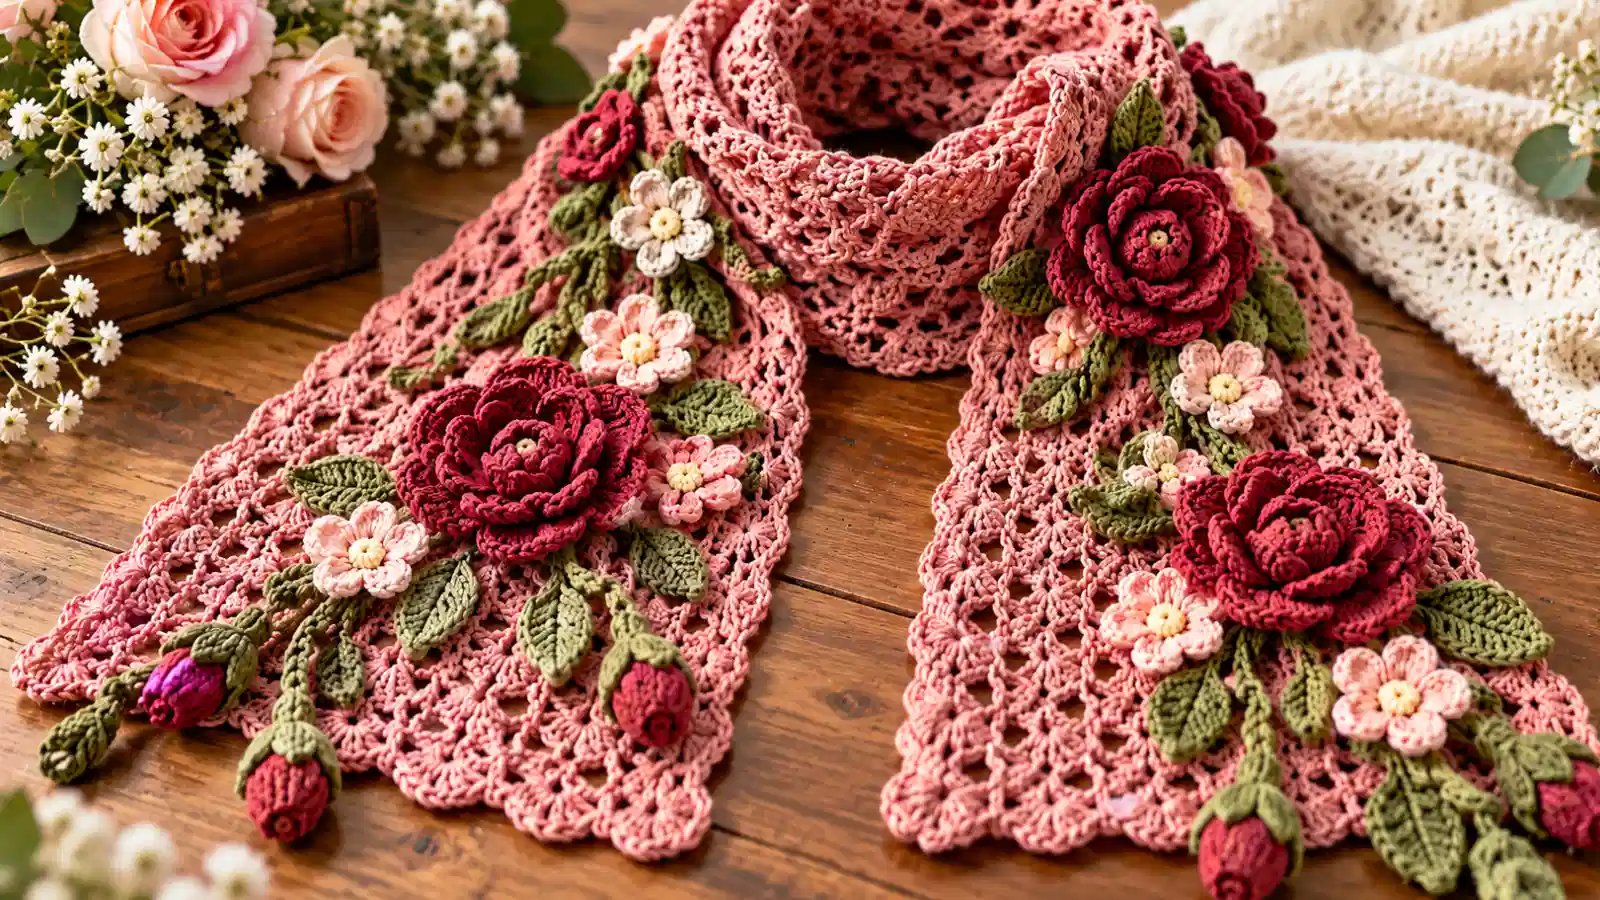
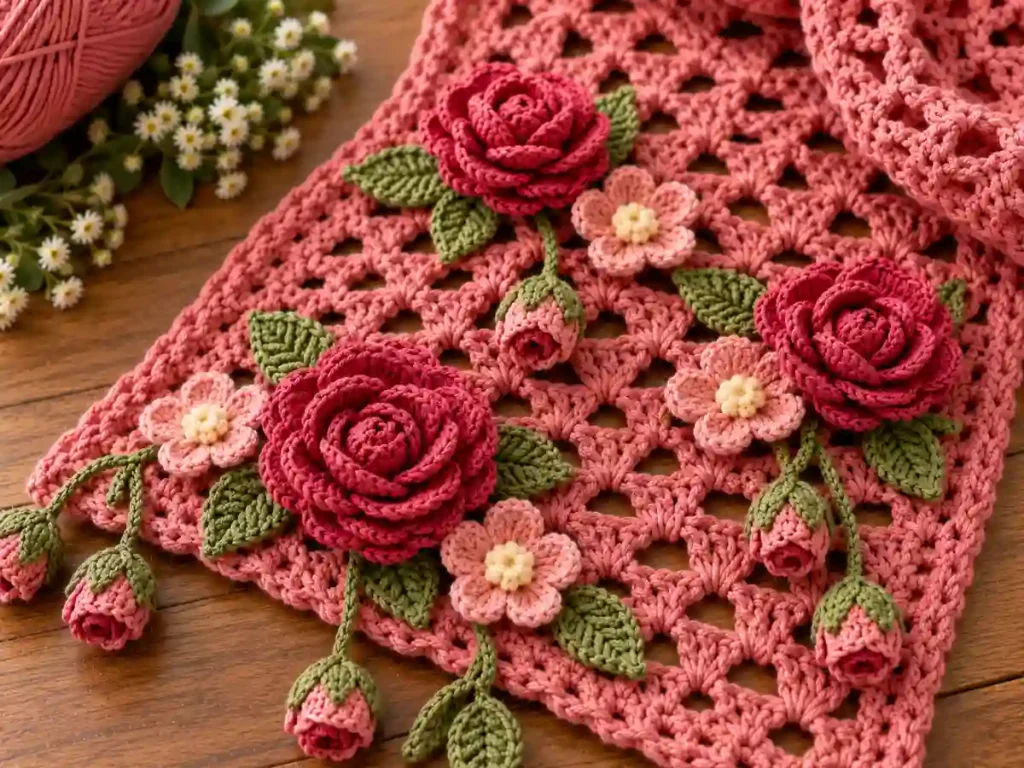
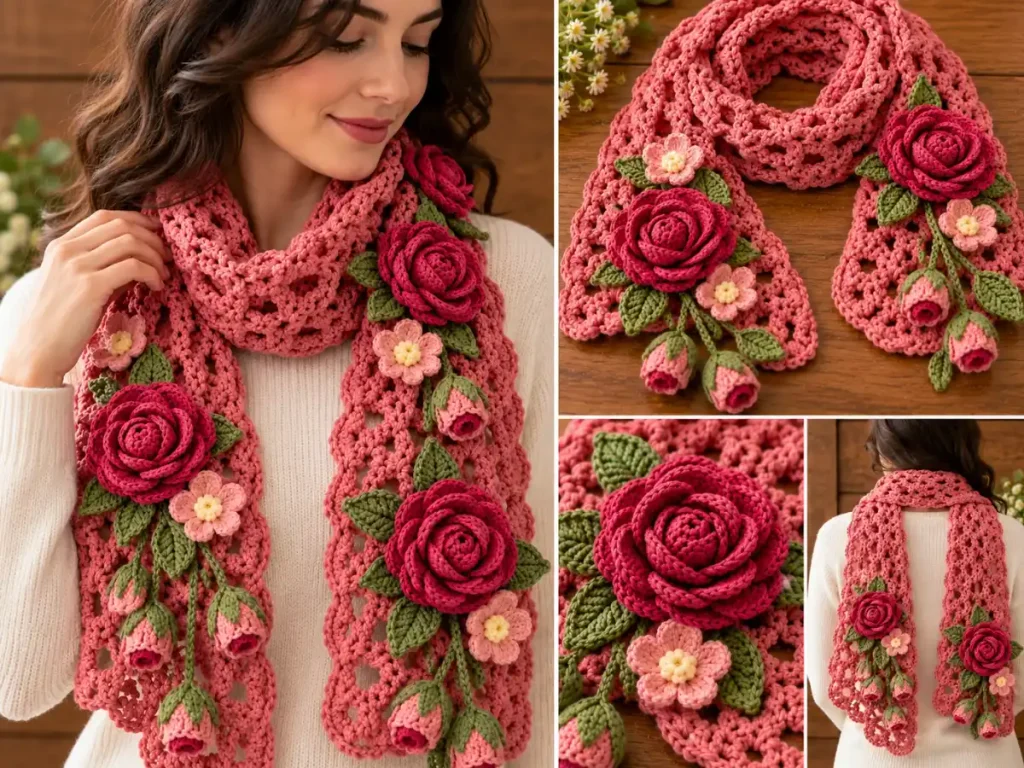
This crochet rose scarf pattern combines an openwork lace scarf with dimensional roses, small blossoms, crochet leaves, and optional hanging rosebuds. The floral pieces are crocheted separately and sewn onto the finished scarf, giving you control over the final arrangement while keeping the center section comfortable to wear.
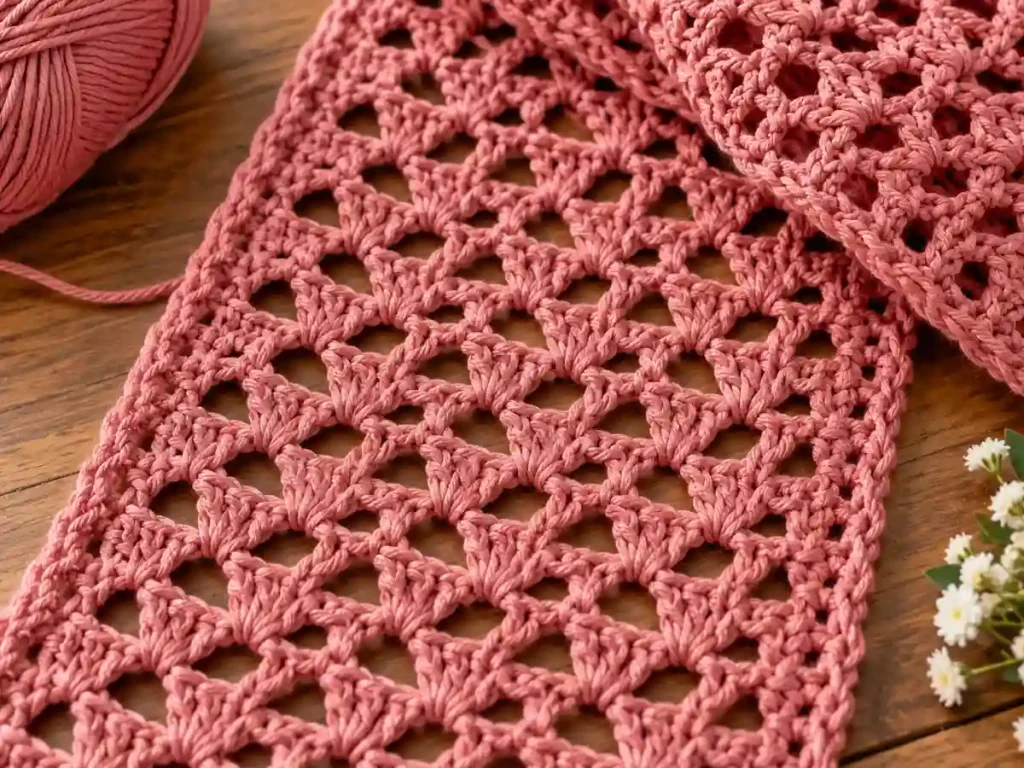
The scarf base uses a repeating V-stitch pattern, while the flowers add texture and color without changing the main lace construction. Make one sample of each motif first, arrange them on the scarf, and repeat only the pieces that suit your yarn, scarf size, and preferred amount of decoration.
Table of Contents
Crochet Rose Scarf Pattern at a Glance
| Detail | Pattern |
|---|---|
| Project | 3D floral crochet scarf |
| Skill level | Intermediate |
| Terms | US crochet terminology |
| Scarf construction | Flat V-stitch lace |
| Flowers | Sewn-on motifs |
| Main rose | Rolled shell-petal strip |
| Additional details | Small flowers, leaves, rosebuds, vines |
| Sizing | Adjustable |
| Motif quantity | Adjust after checking placement and weight |
This crochet rose scarf pattern combines a lightweight lace base with separately crocheted floral motifs, so you can adjust the decoration without changing the scarf construction.
Materials
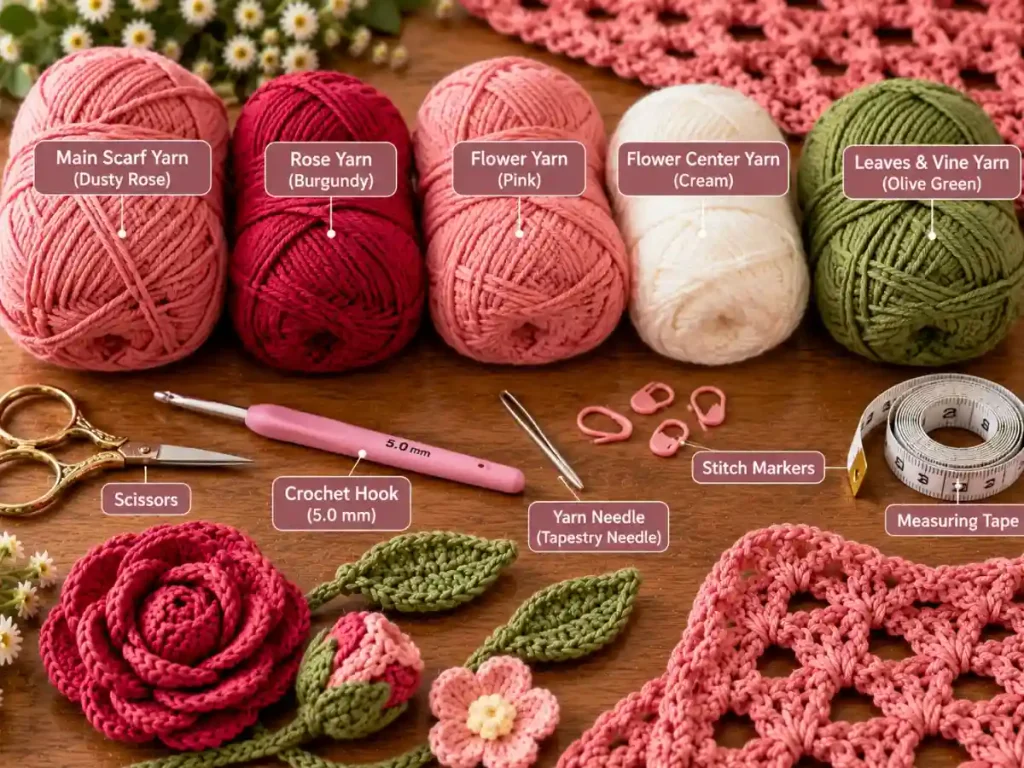
You will need:
- yarn for the scarf base;
- contrasting yarn for the roses and small flowers;
- green yarn for leaves, calyx pieces, and vines;
- a small amount of contrast yarn for flower centers;
- crochet hooks that produce a comfortable scarf fabric and firm floral motifs with your chosen yarn;
- yarn needle;
- scissors;
- stitch markers;
- blocking supplies if appropriate for your yarn.
Avoid yarn that makes the large roses excessively stiff or heavy. The scarf base needs enough drape to sit comfortably while still supporting the attached motifs.
If you want to practice the flower construction separately, see our crochet rose pattern.
Crochet Stitches and Abbreviations
This pattern uses US crochet terminology.
- ch — chain
- sc — single crochet
- hdc — half double crochet
- dc — double crochet
- sl st — slip stitch
- sk — skip
- st / sts — stitch / stitches
- sp — space
- rnd — round
V-stitch: Work (dc, ch 1, dc) in the same designated stitch or chain-1 space.
Picot: Ch 3, then sl st into the first of those three chains.
You can review standard crochet terminology in the Craft Yarn Council crochet abbreviation guide.
Before You Start This Crochet Rose Scarf Pattern
Before starting the full crochet rose scarf pattern, make a small lace swatch and one sample rose to check the fabric drape and flower weight with your chosen yarn.
The scarf is worked separately from the decorative motifs. Complete the lace base first, then make the roses, smaller flowers, leaves, and optional vines.
Do not commit to a fixed number of flowers before checking how one finished motif behaves on your scarf fabric. Dimensional flowers can add noticeable weight to openwork crochet.
Step 1: Crochet the Lace Scarf Base
The scarf is worked flat in turned rows.
Foundation
Ch 32.
Row 1
Sc in the second chain from the hook and in each remaining chain.
[31 sc]
Turn.
Row 2
Ch 3. This counts as the first dc above the first sc.
Ch 1, sk next 2 sc, V-st in next sc.
Repeat:
Ch 1, sk next 2 sc, V-st in next sc
eight more times.
Ch 1, sk next 2 sc, dc in final sc.
Turn.
You should have:
- 9 V-stitches;
- 2 edge dcs;
- 10 connecting ch-1 spaces.
Row 3
Ch 3, counting as the first dc.
Ch 1.
Work a V-st in the ch-1 space at the center of each V-st from the previous row, then ch 1.
Repeat across all 9 V-stitches.
Dc in the top of the previous row’s beginning ch-3.
Turn.
You should still have 9 V-stitches, 2 edge dcs, and 10 connecting ch-1 spaces.
Continue the Scarf
Repeat Row 3 until the scarf reaches the length you want.
Check the V-stitch count regularly. If the scarf begins getting wider or narrower, a V-stitch was probably added or missed.
If you want to change the scarf width, adjust the foundation chain in increments of three and make a swatch before starting the full scarf.
Step 2: Add the Optional Border
Join the scarf yarn at one corner.
Work sc evenly around the outer edge, placing stitches into the row-end spaces along the sides.
Add enough stitches at the corners to turn smoothly without creating a ruffle.
The exact number of side stitches depends on your row gauge, so focus on keeping the fabric flat rather than forcing a predetermined count.
For a more decorative finish, add occasional picots along exposed sections of the border.
Keep areas that will sit underneath large flowers relatively simple.
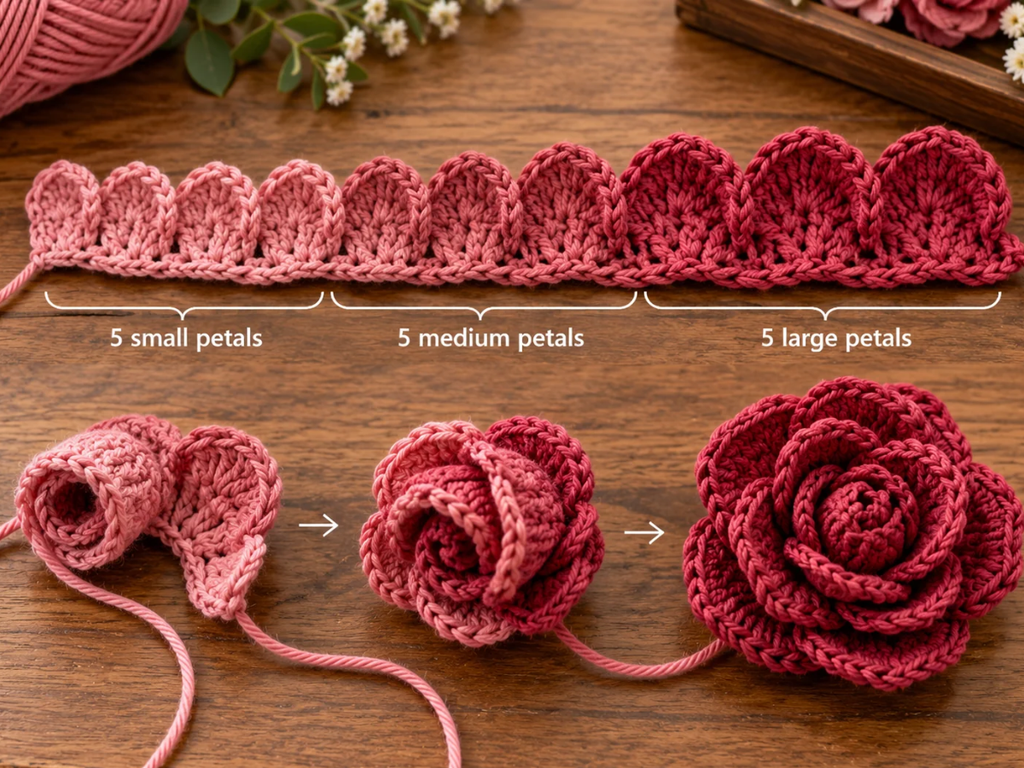
Step 3: Crochet a Large 3D Rose
The large rose starts as a long strip of shell petals that is rolled into shape.
Foundation
Ch 62.
Row 1
Sc in the second chain from the hook and across.
[61 sc]
Ch 1 and turn.
Small Inner Petals
Repeat 5 times:
Sl st in next sc, sk next sc, 5 dc in next sc, sk next sc.
Medium Petals
Repeat 5 times:
Sl st in next sc, sk next sc, 7 dc in next sc, sk next sc.
Large Outer Petals
Repeat 5 times:
Sl st in next sc, sk next sc, 9 dc in next sc, sk next sc.
Sc in the final remaining foundation stitch.
Fasten off, leaving a long sewing tail.
Rose Stitch Check
Each petal repeat uses four foundation stitches:
- 5 small petals = 20 stitches;
- 5 medium petals = 20 stitches;
- 5 large petals = 20 stitches;
- final sc = 1 stitch.
Total: 61 stitches.
Shape the Rose
Begin rolling from the small-petal end.
Keep the inner petals relatively snug to form the center.
Relax the roll slightly through the medium petals, then allow the larger outer petals to sit more openly.
Use the long tail to sew securely through several layers across the underside.
Avoid pulling so tightly that the petals become flattened.
Make one finished rose first and check its weight against the scarf before making additional flowers.
Step 4: Crochet a Small Five-Petal Flower
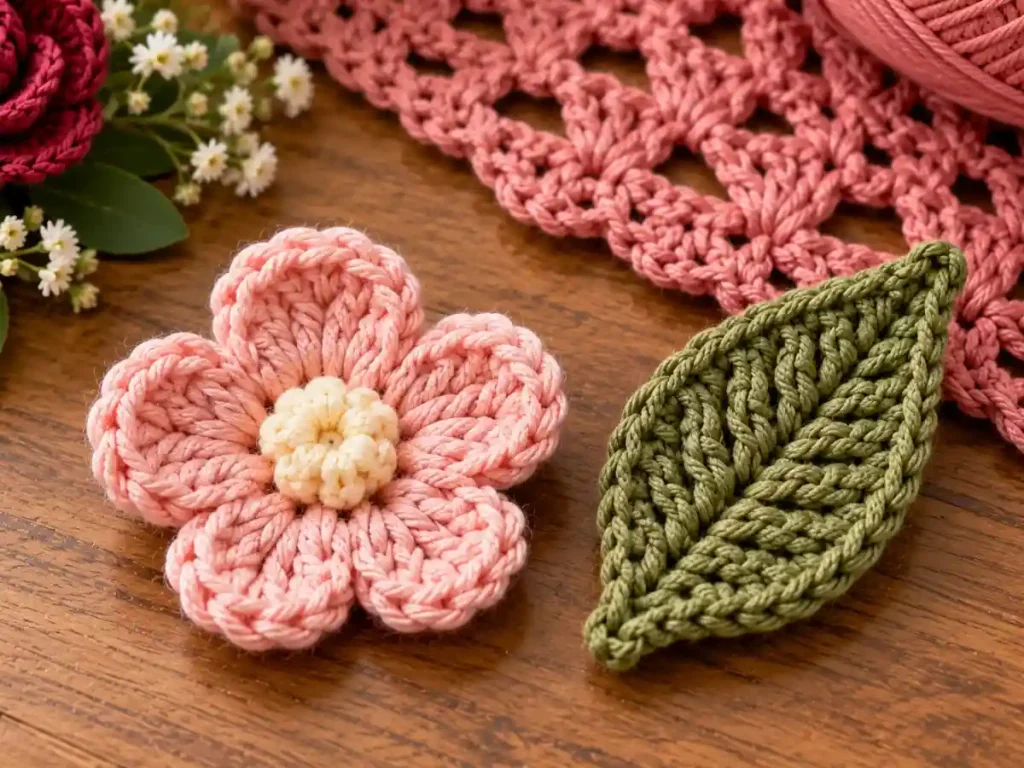
Ch 4 and join with sl st to form a ring.
Repeat 5 times:
Ch 2, 3 dc into ring, ch 2, sl st into ring.
Fasten off.
If desired, add a small embroidered center using short stitches in a contrasting color.
Step 5: Crochet a Green Leaf
Ch 13.
Starting in the second chain from the hook:
- sl st in next ch;
- sc in next ch;
- hdc in next ch;
- dc in each of next 6 ch;
- hdc in next ch;
- sc in next ch;
(sc, ch 2, sc)in final ch.
Rotate the work and crochet into the unused loops on the opposite side of the foundation chain:
- sc;
- hdc;
- dc in each of next 6 positions;
- hdc;
- sc;
- sl st in final available position.
Fasten off, leaving a sewing tail.
You can embroider a loose central vein after finishing. Do not pull the embroidery tightly enough to distort the leaf.
Step 6: Crochet a Small Rosebud
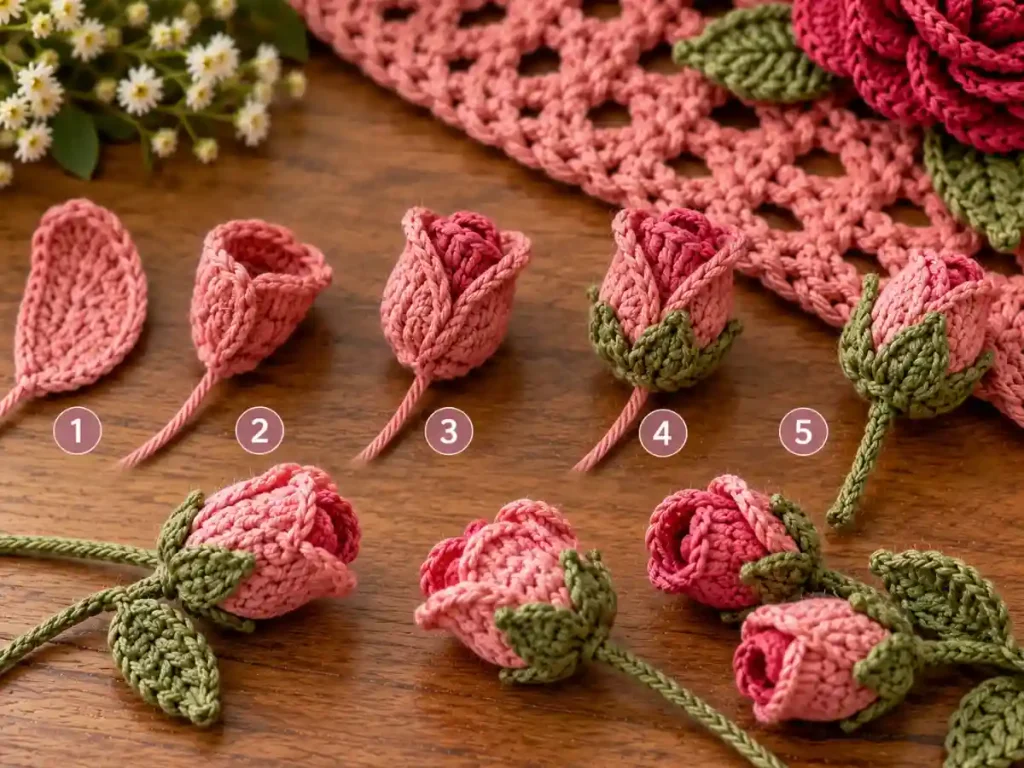
Ch 7.
Sc in the second chain from the hook and across.
[6 sc]
Ch 1 and turn.
Repeat 3 times:
Sl st in next sc, 3 dc in following sc.
Fasten off with a sewing tail.
Roll the three shells into a compact spiral and sew securely across the lower edge.
Optional Green Base
Work 5 sc into a magic ring.
Close the ring and fasten off with a sewing tail.
Sew this small green circle beneath the rosebud as a simple attachment base.
Step 7: Crochet a Hanging Vine
With green yarn:
Ch 23.
Sl st in the second chain from the hook and across.
[22 sl sts]
Fasten off with a sewing tail.
For a shorter branch:
Ch 12, then sl st back across.
[11 sl sts]
Sew the shorter branch securely onto the main vine.
Add a rosebud at the end if desired.
Check how each vine hangs before attaching it permanently. A long or heavy vine can pull on open lace.
Step 8: Crochet a Reinforcement Disc
A backing disc can help spread the weight of a large dimensional rose across more of the scarf fabric.
With scarf-colored yarn:
Rnd 1: 6 sc in magic ring. [6]
Rnd 2: Inc in each st. [12]
Rnd 3: (sc, inc) ×6. [18]
Rnd 4: (2 sc, inc) ×6. [24]
Fasten off, leaving a long sewing tail.
Test one rose-and-disc combination before making several. The backing should support the flower without creating an uncomfortable bulky area.
Step 9: Arrange the Flowers on the Scarf
Lay the finished scarf flat before sewing anything in place.
Position the large roses first.
Add smaller flowers and leaves around them, then place the hanging vines last.
Keep most dimensional decoration toward the scarf ends rather than in the middle section that sits around the neck.
Instead of committing to a fixed number of motifs, check:
- whether both ends feel reasonably balanced;
- whether the lace stretches beneath the flowers;
- whether the scarf still drapes comfortably.
Take a photograph of your arrangement before sewing so you can refer back to the placement.
For more floral arrangement ideas, explore our crochet bouquet tutorial.
Step 10: Attach the Flowers Securely
Place a large rose on the front of the scarf and its reinforcement disc behind the lace.
Using matching yarn, sew through the rose base, scarf, and reinforcement disc at several spaced anchor points.
Avoid relying on one open chain space to carry the flower’s weight.
For smaller flowers, sew through the center and lower portions while leaving the petals slightly raised.
Attach leaves mainly at their bases so some outer edges remain free.
Secure vines at several points where they meet the scarf while allowing the lower sections and rosebuds to hang naturally.
Check the reverse side for long loose loops before finishing.
Finishing the Crochet Rose Scarf
Weave in every yarn end securely.
If blocking is suitable for your yarn, gently shape the lace portion according to the yarn manufacturer’s care instructions.
Avoid flattening the dimensional roses.
Once dry, drape the scarf and check how the decorated ends behave.
If the motifs pull noticeably on the lace, reduce the decoration or redistribute the attachment points before wearing the scarf.
Common Crochet Rose Scarf Problems
Why Is My Scarf Getting Wider or Narrower?
Recount the V-stitches.
Each pattern row should retain 9 V-stitches and 2 edge dcs.
Adding or missing a V-stitch will gradually change the width.
Why Do My Crochet Roses Look Flat?
Keep the small inner petals relatively snug and allow the larger outer petals to open gradually.
Also check that the sewing stitches across the rose base are not pulled too tightly.
Why Are My Leaves Curling?
Tight tension can distort the leaf.
If you add an embroidered vein, make sure it is not pulling the center of the leaf inward.
Why Are the Flowers Stretching the Lace?
The motifs may be too heavy or attached over too small an area.
Try a reinforcement disc, spread the attachment points across several solid stitch intersections, or reduce the number of heavier flowers.
Why Is My Border Wavy?
Too many edge stitches can create a ruffle.
Remove some stitches from the affected section and rework the border until the fabric lies flat.
Frequently Asked Questions
Is This Crochet Rose Scarf Pattern Beginner-Friendly?
This crochet rose scarf pattern uses familiar stitches, but the lace repeats, dimensional flowers, and detailed assembly make it better suited to intermediate crocheters or confident beginners.
Can I Use a Different Yarn?
Yes.
Your yarn choice will affect the scarf’s drape, flower size, weight, and finished dimensions.
Make a lace swatch and one sample rose before committing to the full project.
How Many Roses Should I Make?
There is no fixed number in this version.
Make and position the motifs gradually, stopping when the scarf has the look you want without becoming too heavy.
Can I Make a Lighter Version?
Yes.
Use fewer large roses, rely more on lightweight leaves and small flowers, or leave out some or all of the hanging vines.
Can I Use Another Crochet Rose Design?
Yes, provided the finished flower is light enough for the scarf fabric.
You can also use our separate crochet rose pattern.
How Should I Wash a Crochet Scarf With 3D Flowers?
Follow the care instructions for the yarn you actually use.
Handle dimensional flowers gently and avoid twisting or wringing them.
Final Thoughts
This crochet rose scarf pattern combines a repeatable V-stitch lace base with dimensional flowers that can be arranged gradually rather than forced into one fixed layout.
The key is balance: keep the scarf flexible, support heavier roses across several attachment points, and test the arrangement before sewing every motif permanently.
By making one sample of each component first, you can adjust the flowers, leaves, and vines to suit your yarn while keeping the finished scarf comfortable and visually balanced.
