Easy crochet patterns, cute projects, and beginner-friendly ideas to inspire your next make.

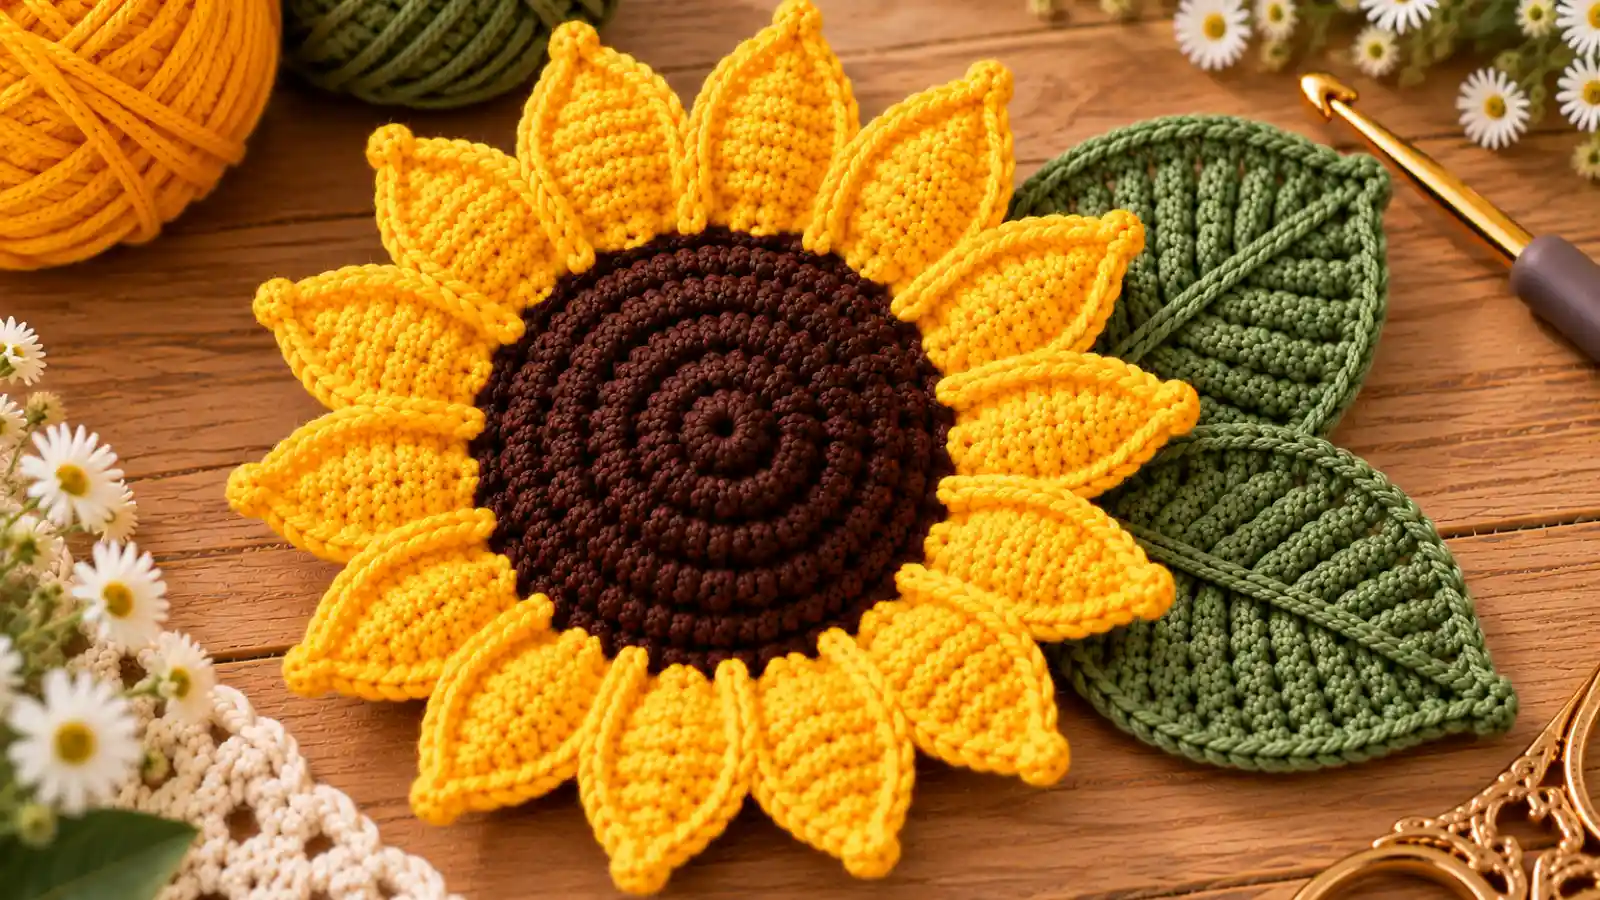
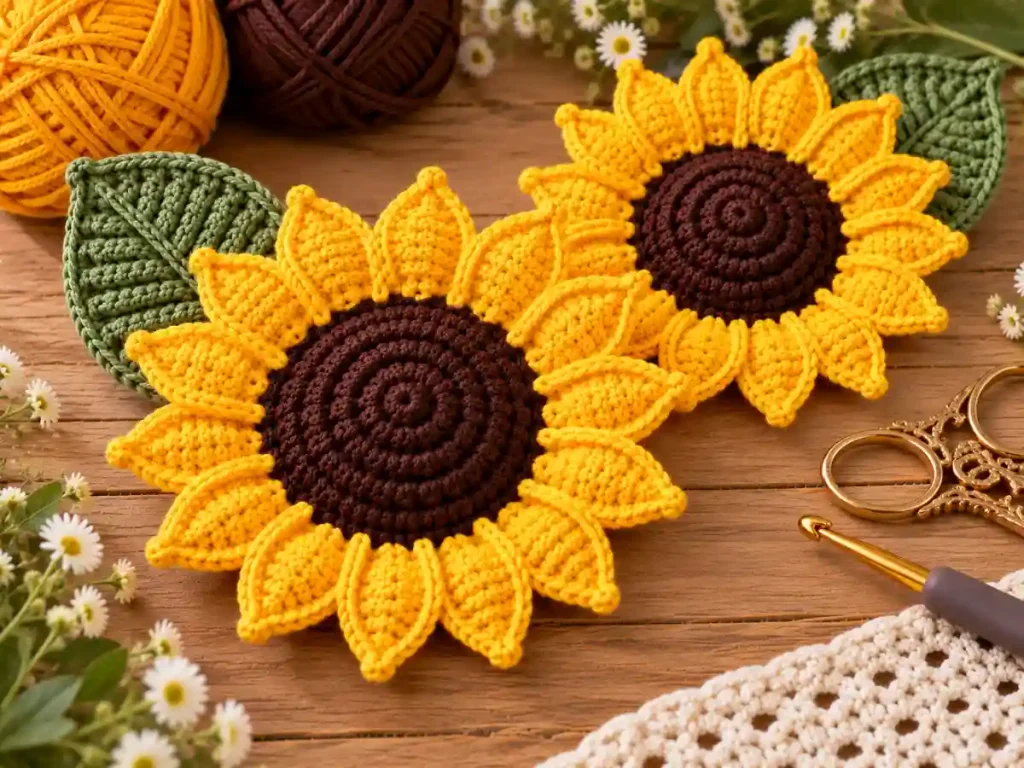
This sunflower crochet pattern makes a dimensional flower with a broad dark center, a ring of pointed yellow petals, a clean green backing, a supported stem, and one simple leaf. The petals are worked directly around the center, so you do not need to crochet and sew on a pile of separate pieces.
The construction is straightforward once you see how the parts fit together: make the brown center first, add the petals, crochet a smaller green backing, secure the stem, then finish with the leaf. Use the checkpoints throughout the tutorial to compare your work before moving to the next step.
Table of Contents
Sunflower Crochet Pattern at a Glance
| Pattern detail | Information |
|---|---|
| Crochet terms | US terminology |
| Construction | Brown center, integrated petals, green backing, stem, and separate leaf |
| Flower style | Dimensional standing sunflower |
| Center | Worked in rounds |
| Petals | 15 pointed petals worked directly around the center |
| Backing | Separate 24-stitch green disk |
| Stem support | Required for a standing flower |
| Main stitches | ch, sl st, sc, hdc, dc, tr, inc |
| Gauge | Not critical, but the fabric should be neat and stable |
The finished size will depend on your yarn, hook, tension, petal length, and stem choice.
What You’ll Need
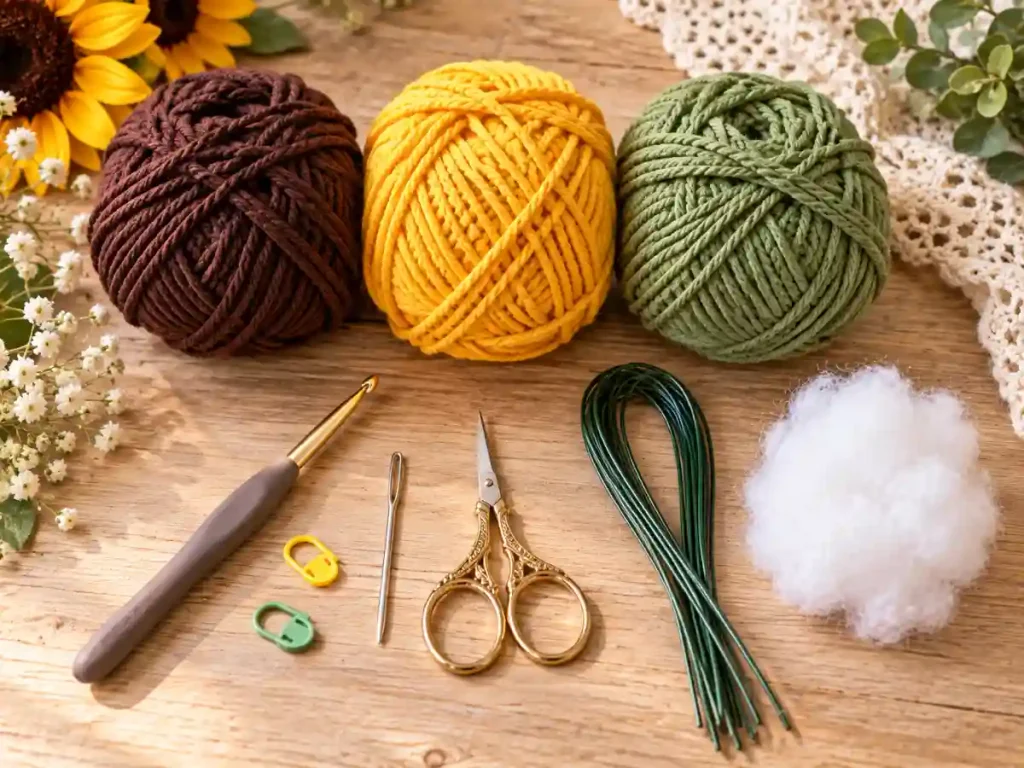
For one sunflower, prepare:
- smooth yarn in dark brown for the center;
- smooth yarn in sunflower yellow or golden yellow for the petals;
- green yarn for the backing, leaf, and stem finishing;
- a crochet hook that works comfortably with your yarn and gives you a neat, stable fabric;
- a stitch marker;
- a yarn needle;
- scissors;
- a sturdy floral stem or suitable craft wire;
- wire cutters or pliers if your stem material requires them;
- a small amount of polyester stuffing, optional.
A smooth yarn is easier to work with than a very fuzzy yarn because the center stitches and petal anchors remain easier to see. Try to use yarns of a similar thickness for the brown center, yellow petals, and green backing so the proportions stay balanced.
If the center fabric feels loose or shows large gaps, try a slightly smaller hook. If it feels stiff enough that the circle will not lie flat, loosen your tension or move up slightly in hook size.
A Note About the Stem
A standing crochet sunflower needs internal support because the flower head is wider than the stem. Choose a floral stem or craft wire firm enough to support the finished flower without drooping.
If you cut wire, bend the end that will sit inside the flower into a small closed loop. Do not leave a sharp cut end exposed inside the crochet work.
Crochet Stitches and Abbreviations
This pattern uses US crochet terminology.
For a broader reference, see the Craft Yarn Council’s standard crochet abbreviations.
- ch — chain
- sl st — slip stitch
- sc — single crochet
- hdc — half double crochet
- dc — double crochet
- tr — treble crochet
- inc — work 2 single crochets in the same stitch
- st / sts — stitch / stitches
How the Petal Shape Works
Each yellow petal begins with a short chain. You then work back down that chain using progressively taller stitches:
sl st → sc → hdc → dc → tr
That progression makes the petal narrow near the tip and wider where it joins the center. The result is more pointed than a rounded daisy-style petal.
Before You Start
This sunflower crochet pattern is built in five main parts:
- a dark brown center;
- a ring of yellow petals worked directly around the center;
- a smaller green backing disk;
- a supported stem;
- one broad green leaf.
The brown center ends with 30 stitches. Those stitches are used in pairs to create 15 petals, which keeps the spacing even all the way around.
If you want to practice a smaller flower before working the sunflower petals, start with our easy crochet flower pattern.
This sunflower is intentionally different from a daisy: the center is larger and darker, while the petals are denser and more pointed. For a lighter flower shape with a different petal construction, see our crochet daisy pattern.
The green backing is smaller than the brown center on purpose. It attaches behind the flower around the 24-stitch round, leaving the outer brown round free for the yellow petals.
How to Crochet a Sunflower Step by Step
Follow this sunflower crochet pattern in order so the center, petals, backing, stem, and leaf come together cleanly.
Step 1: Crochet the Brown Sunflower Center
With dark brown yarn, make a magic ring.
Round 1: Work 6 sc into the magic ring. [6]
Pull the ring closed.
Round 2: Inc in each stitch around. [12]
Round 3: (1 sc, inc) repeat around. [18]
Round 4: (2 sc, inc) repeat around. [24]
Round 5: (3 sc, inc) repeat around. [30]
Fasten off the brown yarn only if that makes your color change easier. Otherwise, leave the final loop secure while you prepare to join the yellow yarn.
Center checkpoint
Count the outer edge carefully.
You should have:
30 stitches after Round 5.
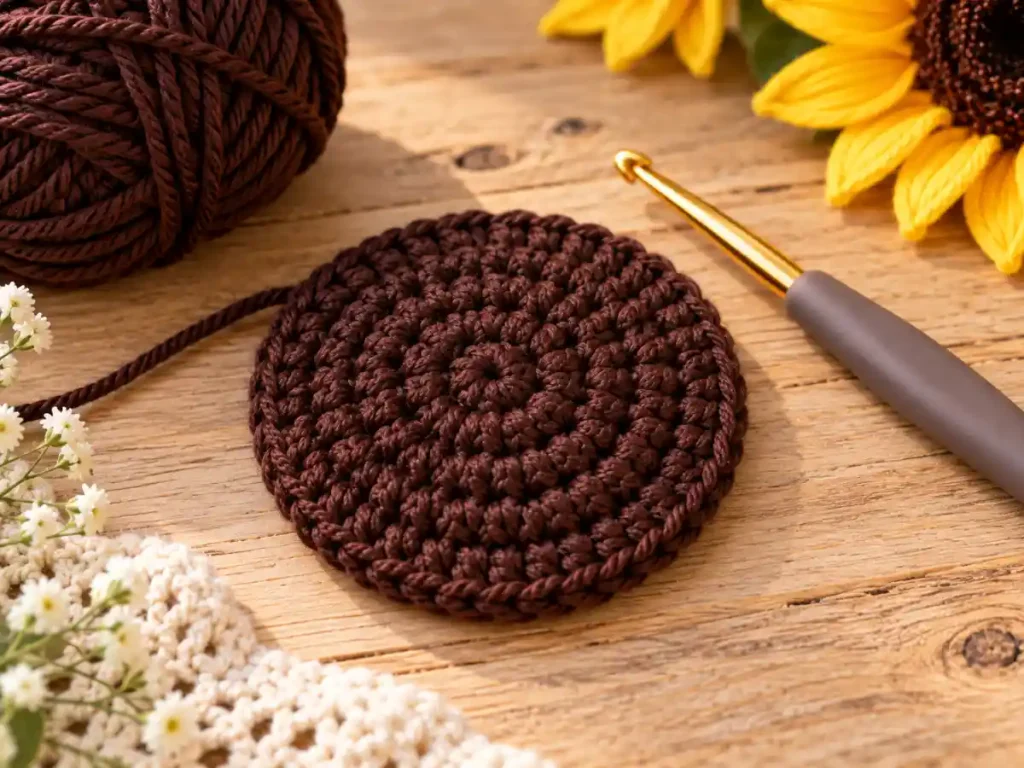
The center should sit mostly flat. A slight natural curve is fine, but it should not form a deep bowl and it should not have obvious waves around the edge.
If the center cups sharply, first check that you did not miss any increases. If the stitch count is correct, your tension may be very tight.
If the edge ruffles, recount the round before changing hook size. Accidental extra increases can create the same look as loose tension.
Step 2: Crochet the First Sunflower Petal
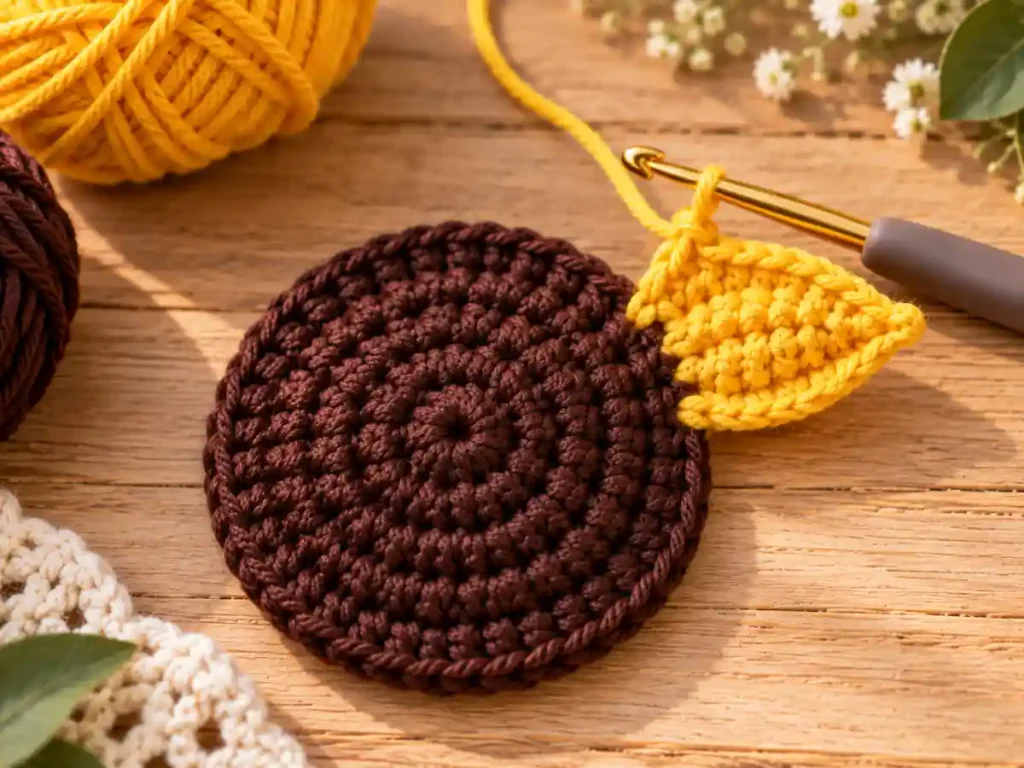
Join the yellow yarn with a slip stitch in any stitch of Round 5.
Ch 6.
Starting in the second chain from the hook, work back down the chain as follows:
- sl st in the first chain;
- sc in the next chain;
- hdc in the next chain;
- dc in the next chain;
- tr in the final chain.
You are now back at the base of the petal.
Sl st in the next brown stitch.
That completes the first petal.
First-petal checkpoint
The petal should look narrow at the outer tip and gradually widen toward the brown center. It does not need to lie perfectly flat while you are still working around the flower.
If the petal is badly twisted, make sure you worked back down the chain in order and did not rotate the chain while inserting the hook.
Step 3: Crochet the Remaining Petals
After completing the first petal, your hook is anchored in the second brown stitch used by that petal.
To begin the next petal:
Sl st in the next brown stitch. Ch 6.
Starting in the second chain from the hook, work:
sl st, sc, hdc, dc, tr
Then:
Sl st in the next brown stitch.
Repeat that sequence around the center until you have made 15 petals.
Each petal uses two brown edge stitches:
- one stitch as the starting anchor;
- the next stitch as the closing anchor.
Because the center has 30 stitches, 15 petals should fit around the flower without leftover stitches.
Fasten off the yellow yarn after the final petal and weave the tail securely into the back of the work.
Petal-round checkpoint
Before moving on, count the petals.
You should have:
15 pointed yellow petals.
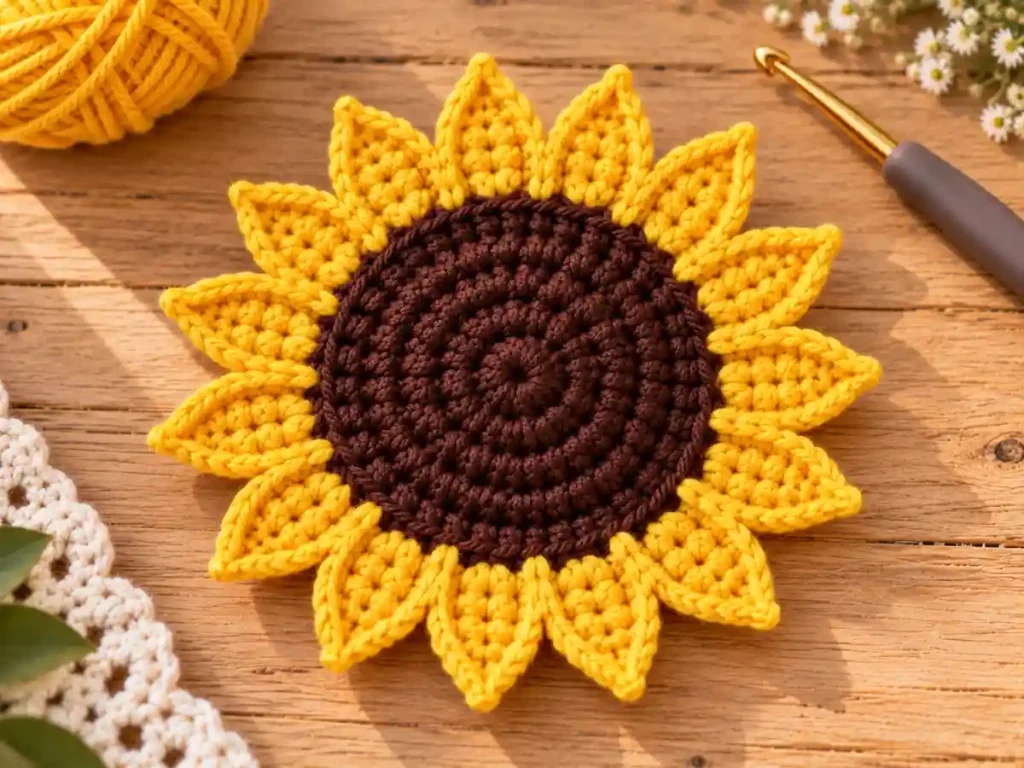
Look around the flower from the front. The petals should be distributed evenly rather than clustered on one side.
Do not worry if a few petals lean slightly to the left or right. Gently shaping them with your fingers at the end is better than pulling hard on individual stitches now.
Step 4: Make the Green Backing
With green yarn, make a magic ring.
Round 1: 6 sc in the magic ring. [6]
Round 2: Inc in each stitch around. [12]
Round 3: (1 sc, inc) repeat around. [18]
Round 4: (2 sc, inc) repeat around. [24]
Fasten off, leaving a long tail for sewing.
The backing is intentionally smaller than the brown center. It should cover the middle of the flower from behind without reaching the yellow petal bases.
Backing checkpoint
The green disk should have:
24 stitches around its outer edge.
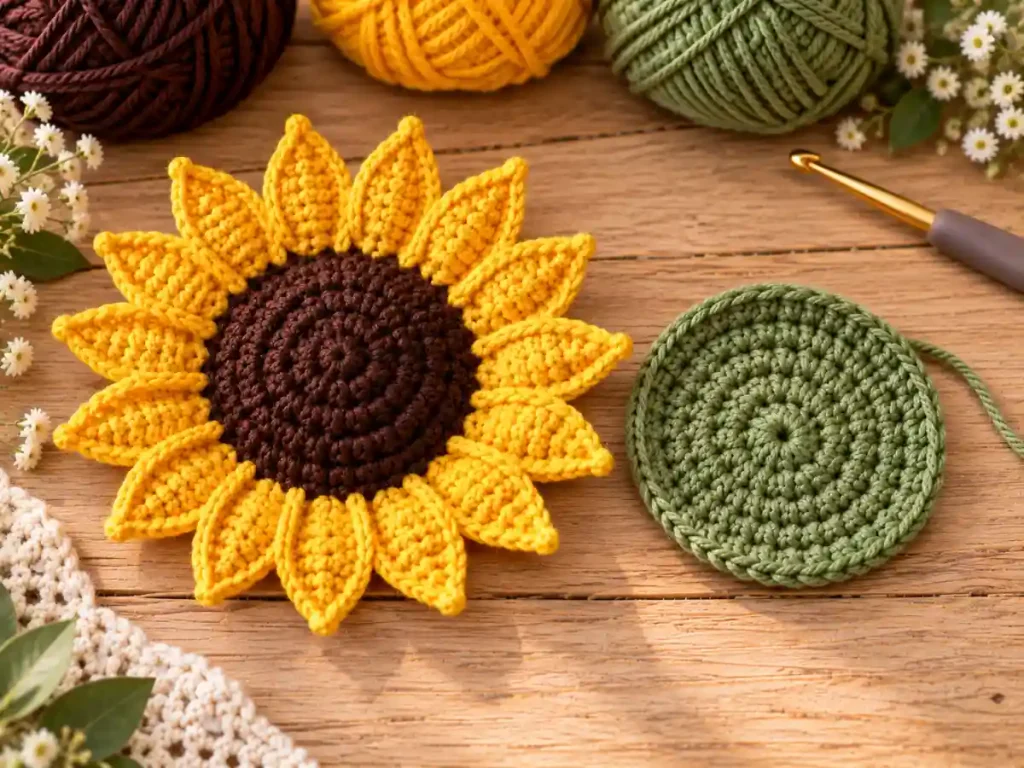
Place it behind the sunflower center without sewing yet. From the front, the green should stay mostly hidden.
Step 5: Prepare and Anchor the Stem
Prepare your floral stem or craft wire before attaching the backing.
If the stem has a cut wire end, bend that end into a small closed loop with suitable pliers. The loop gives the yarn something to hold and keeps a sharp end from pointing directly into the flower.
Bring the stem through the center of the green backing so the loop sits against the inside surface of the disk.
Use green yarn and a yarn needle to stitch around the loop several times until the stem feels secure against the backing.
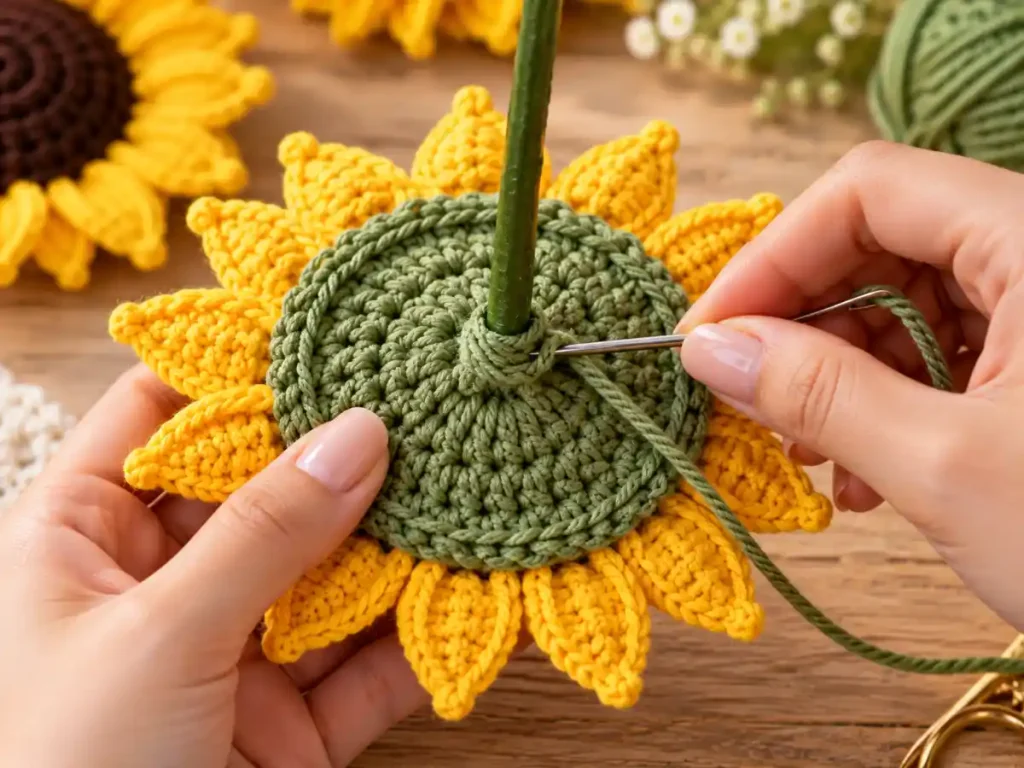
Test it gently before continuing. The stem should not slide freely through the center of the green disk.
Step 6: Join the Backing to the Sunflower
Place the green backing against the back of the brown center with the stem pointing away from the flower.
Center the green disk carefully.
The 24 stitches of the green backing correspond to the 24-stitch area of Brown Round 4, so the backing can sit inside the outermost brown round. This keeps the 30-stitch petal round free.
Using the long green yarn tail, sew the backing to the underside of the brown center with small, even stitches.
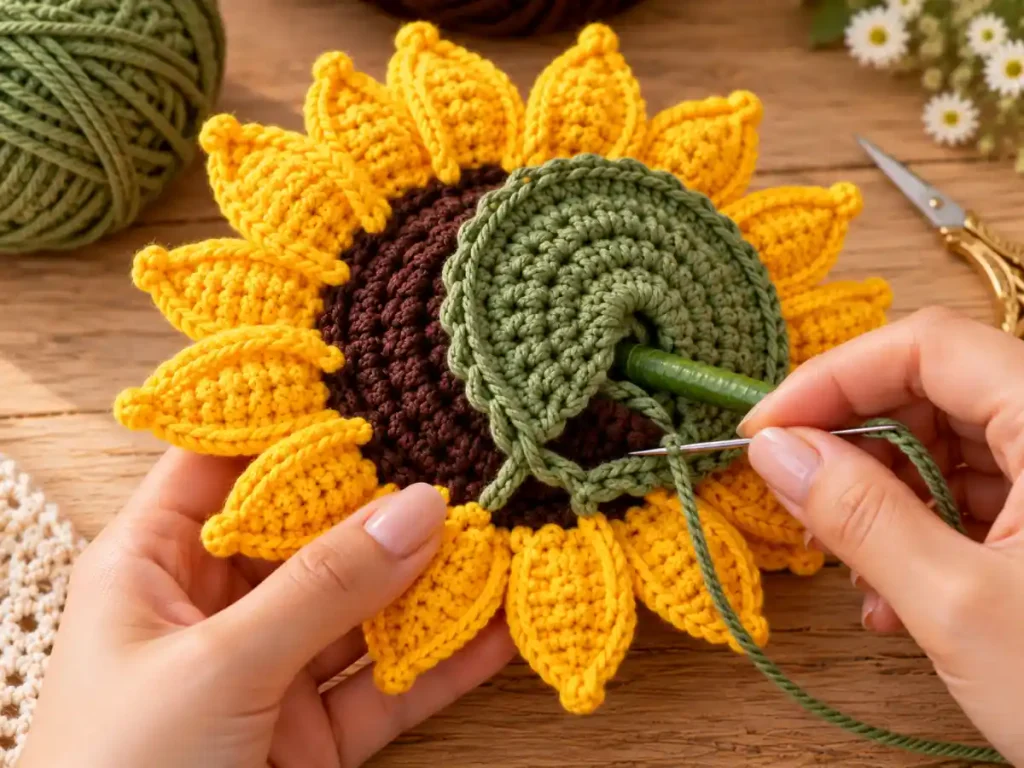
Work around most of the circle, leaving a small opening.
If you want a slightly raised center, add only a small amount of stuffing through the opening. The center should have gentle depth, not the firm round shape of an amigurumi head.
If the flower already holds its shape well without stuffing, you can leave the stuffing out.
Finish sewing the opening closed and secure the yarn tail.
Assembly checkpoint
Look at the flower from the front.
You should see:
- the dark brown center;
- all 15 yellow petals;
- little or no green backing.
None of the yellow petals should be trapped in the backing seam.
Hold the flower by the stem and gently turn it. The head should feel secure rather than spinning loosely around the stem.
Step 7: Crochet the Sunflower Leaf
With green yarn:
Ch 18.
Starting in the second chain from the hook, work along the first side of the foundation chain:
- sl st in the next ch;
- sc in the next 2 ch;
- hdc in the next 3 ch;
- dc in the next 6 ch;
- hdc in the next 2 ch;
- sc in the next 2 ch.
You should now have one chain remaining at the tip.
Work 3 sc in the final chain to turn around the end.
Now work back along the opposite side of the foundation chain:
- sc in the next 2 loops;
- hdc in the next 2 loops;
- dc in the next 6 loops;
- hdc in the next 3 loops;
- sc in the next 2 loops;
- sl st in the final loop at the base.
Fasten off, leaving a tail long enough to attach the leaf to the stem.
Leaf checkpoint
The leaf should be broader through the middle and narrower toward both ends.
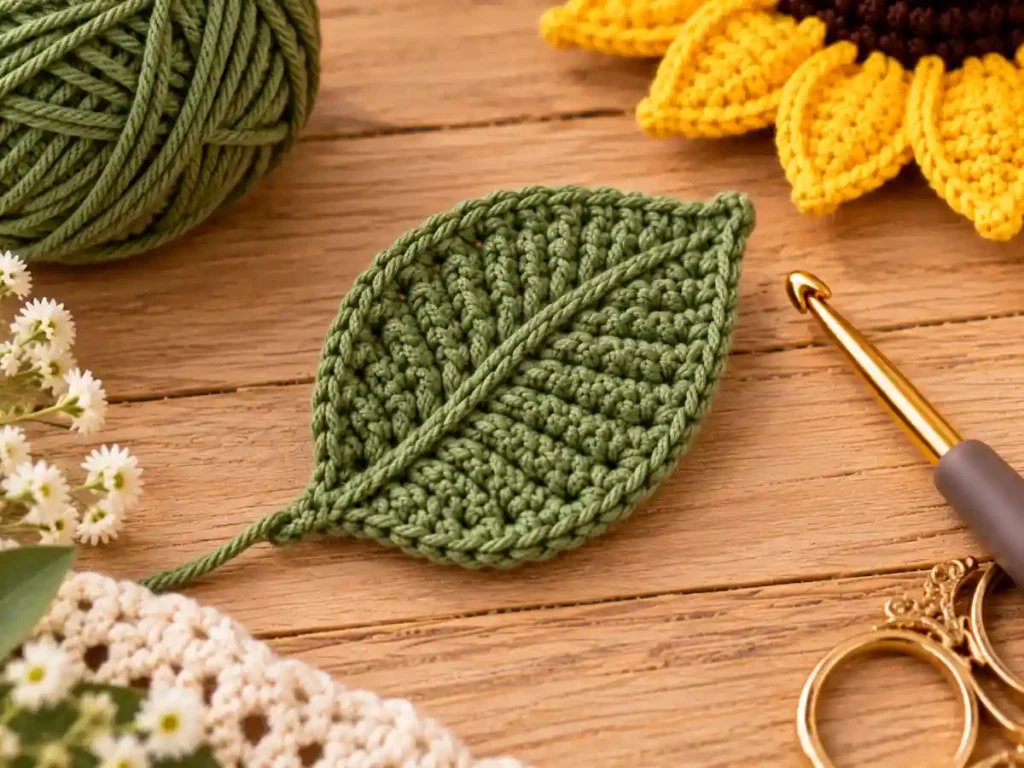
It should look fuller than a long, narrow tulip leaf. If the edges curl slightly, lay the leaf flat and gently shape it before attaching it.
Step 8: Attach the Leaf and Finish the Stem
Choose where you want the leaf to sit on the stem. A position around the upper-middle part of the stem usually keeps the leaf visible without crowding the flower head.
Use the yarn tail to sew the base of the leaf securely around the stem.
You do not need to sew the entire leaf flat against the stem. Leaving most of it free allows the leaf to angle naturally away from the flower.
Finish covering the visible stem with green yarn or floral tape, depending on the material you are using.
Secure all remaining yarn ends.
Final Sunflower Check
Before calling the project finished, check five things:
- the brown center sits evenly;
- there are 15 petals around the flower;
- the green backing is mostly hidden from the front;
- the stem supports the flower without obvious wobbling;
- the leaf is secure but still able to sit at a natural angle.
Gently separate or straighten individual petals with your fingers if needed.
What Should the Finished Sunflower Look Like?
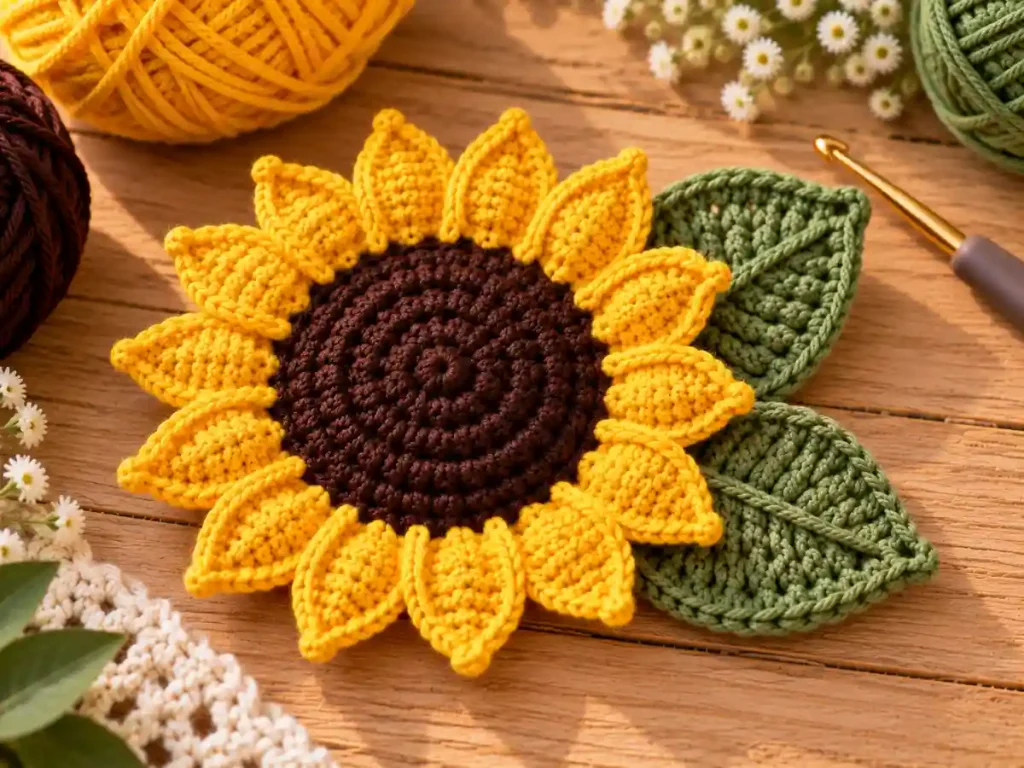
The finished flower in this sunflower crochet pattern should read clearly as a sunflower even from a quick glance.
The dark center is intentionally broad compared with the petals. The yellow petals should form a dense ring around it rather than looking like five or six oversized lobes.
The petals are pointed rather than rounded, which helps keep the flower visually distinct from a crochet daisy.
A little dimension in the brown center is useful, but the middle should not become a stuffed ball. From the side, the flower head can have a shallow profile while still facing mostly forward.
The green backing should support the center from behind without becoming a visible border around the front.
The leaf should look broader through the middle than a tulip leaf, and the stem should be strong enough to hold the flower head at the angle you choose.
Common Problems and How to Fix Them
Why Is My Sunflower Center Curling?
First, check the stitch count at the end of every round:
6, 12, 18, 24, 30.
A missed increase can make the center pull inward.
If the counts are correct but the center still cups strongly, your tension may be tight for the hook size you are using. Try relaxing your tension or using a slightly larger hook.
A very small amount of natural curve is not a problem because the backing and optional light stuffing will add some dimension later.
Why Is the Center Ruffling?
A wavy outer edge can happen if you accidentally added extra increases.
Count the final round before changing anything else.
If the stitch count is exactly 30 and the fabric still ruffles noticeably, your hook may be large for the yarn or your tension may be very loose.
The center should be flexible, but it should not form deep waves around the edge.
Why Are My Petals Twisting?
A little turning is normal with narrow chain-based petals.
Severe twisting usually comes from rotating the chain as you work back toward the center or from very uneven tension along the chain.
When you make each new chain, keep the front of the chain facing the same direction while you work the slip stitch, single crochet, half double crochet, double crochet, and treble crochet back toward the flower.
Shape the petals gently after the full round is complete rather than repeatedly pulling on them while you work.
Why Are My Petals Different Sizes?
Each petal should begin with the same ch 6 and use the same stitch progression.
If one petal looks noticeably shorter, check whether you missed a chain stitch while working back down.
If one looks wider, make sure you did not place two stitches into the same chain by mistake.
Consistent tension also matters. Try not to make the starting chains very tight on some petals and loose on others.
Why Did I Get the Wrong Number of Petals?
The brown center should have 30 stitches in the outer round.
Each petal uses two brown stitches: one starting anchor and one closing anchor.
If you finish with fewer or more than 15 petals, recount the outer brown stitches and check that you are not reusing an anchor stitch.
Why Can I See the Green Backing From the Front?
The backing may be off-center or sewn too close to the outer edge of the brown center.
Reposition it so the 24-stitch green disk sits behind the 24-stitch area of Brown Round 4.
Keep the outer brown Round 5 and the yellow petal bases free.
Why Is the Flower Head Rotating on the Stem?
The stem anchor needs more support.
Add a few additional green stitches around the closed loop inside the backing. If the backing is already attached, you can also make a few discreet securing stitches through the green backing and the underside of the brown center near the stem.
The goal is to stabilize the base without pulling the center out of shape.
Why Is the Stem Drooping?
The flower head may be too heavy for the support you chose.
A thicker yarn, large hook, or too much stuffing can all increase the weight of the flower.
Use a firmer floral stem or suitable craft wire, and keep the center lightly stuffed rather than densely filled.
Can I Use a Different Yarn?
Yes.
You can use this sunflower crochet pattern with different yarn weights, but the finished size and stem requirements will change.
Changing the yarn is the simplest way to change the overall scale of the flower without rewriting the stitch counts.
A finer yarn will generally produce a smaller, more delicate sunflower. A thicker yarn will create a larger and heavier flower.
Keep the brown, yellow, and green yarns reasonably similar in thickness so the center, petals, and backing remain proportional.
If you make the flower much larger, remember that the stem support may also need to be stronger.
Can I Make the Sunflower Without a Stem?
Yes.
If you want a flat decorative sunflower rather than a standing flower, you can omit the floral stem.
You can still attach the green backing for a clean finish, or leave the back simpler if the flower will be sewn directly onto another project.
A stemless sunflower can work as:
- an appliqué;
- a wreath accent;
- a bag decoration;
- a wall-hanging detail;
- a gift topper;
- part of another crochet project.
If the flower will be attached to something washable, choose yarn and finishing methods that suit the care requirements of the base project.
Simple Ways to Use Your Crochet Sunflower
Once you finish this sunflower crochet pattern, you can repeat the same flower for bouquets, wreaths, gifts, or seasonal decorations.
You could use it as:
- a single decorative flower in a small vase;
- part of a handmade flower bouquet;
- a seasonal wreath accent;
- a gift decoration;
- a bag or pouch embellishment;
- a floral detail in a wall display.
If you plan to make several flowers, complete one sunflower from beginning to end first. That gives you a chance to check the proportions of your chosen yarn, hook, stem, and leaf before repeating the project.
More Crochet Flower Patterns
If you want to make another standing flower next, try our crochet tulip pattern with its shaped flower head, stem, and long leaf.
You can also browse more crochet flower patterns for additional small floral projects and step-by-step tutorials.
Frequently Asked Questions
Is This Sunflower Crochet Pattern Suitable for Beginners?
This sunflower crochet pattern is approachable if you are comfortable counting stitches and working basic crochet stitches.
The pattern uses chains, slip stitches, single crochet, half double crochet, double crochet, treble crochet, and simple increases.
The parts that require the most attention are keeping the 15 petals evenly spaced and securing the stem inside the green backing.
If you are already comfortable working around a foundation chain and following stitch counts carefully, the construction should feel manageable.
Do I Need Wire to Make the Sunflower?
You need some form of firm internal support if you want the sunflower to stand on a long stem.
A floral stem or suitable craft wire works well.
If you are making the sunflower as a flat appliqué or decoration without a stem, you can leave the wire out.
Does the Sunflower Center Need Stuffing?
Not necessarily.
A small amount of stuffing can add gentle depth to the center and help support the stem anchor, but the flower should not be packed firmly.
If the center already holds its shape well after the backing is attached, you can omit the stuffing.
Can I Make the Sunflower Larger or Smaller?
Yes.
Use a thicker yarn and appropriately sized hook for a larger flower, or a finer yarn and smaller hook for a smaller one.
Keep in mind that changing yarn thickness also changes the weight of the flower, so you may need to adjust the stem support.
Can I Make a Crochet Sunflower Bouquet?
Yes.
Repeat the same sunflower pattern several times and vary the stem lengths slightly before arranging the flowers together.
You can also change the shades of yellow or brown while keeping the same construction.
Make one complete flower first so you can confirm that the stem strength and proportions work well with your chosen materials.
Finished Sunflower
This sunflower crochet pattern combines a bold dark center, pointed yellow petals, a clean green backing, and a supported stem without requiring dozens of separately crocheted petals.
The most important points are simple: keep the center counts accurate, use two brown edge stitches for each petal, keep the backing inside the outer petal round, and secure the stem before closing the flower.
Once you are comfortable with the construction, you can repeat the same flower in different shades of golden yellow for bouquets, seasonal decorations, gifts, or other handmade floral projects.
Pattern Notes
This sunflower crochet pattern was created for Small Crochet Ideas with a focus on clear construction, strong sunflower shape, manageable assembly, and useful visual checkpoints.
The pattern uses US crochet terminology. Follow the stitch counts carefully, keep the yellow petals free when attaching the backing, and compare each completed section with the tutorial images as you work.
