
Easy crochet patterns, cute projects, and beginner-friendly ideas to inspire your next make.

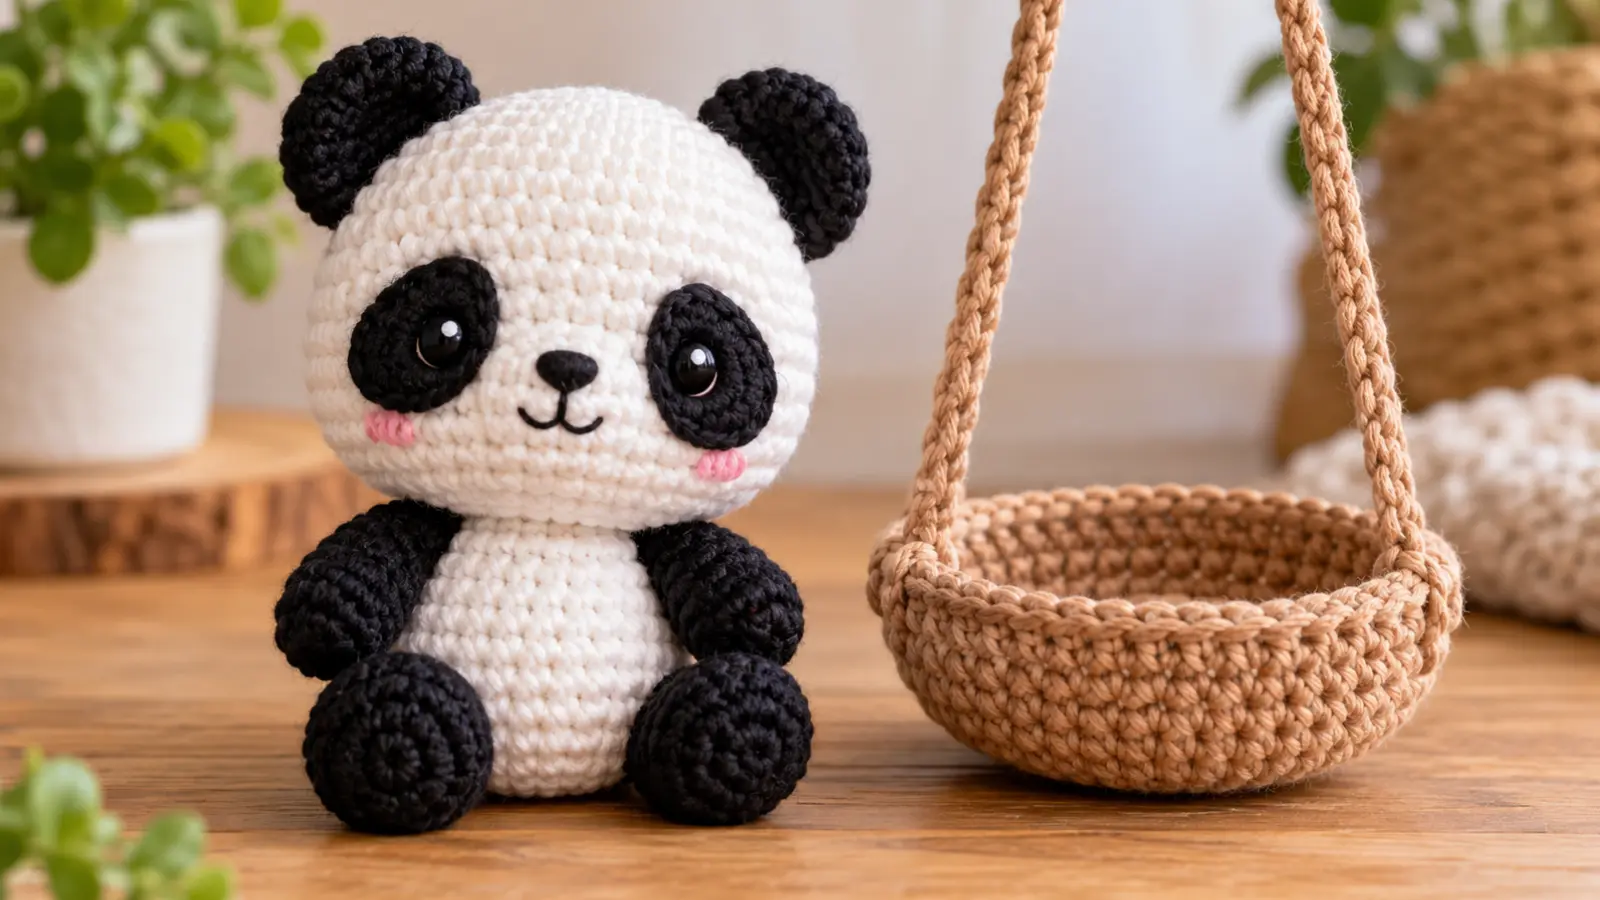
This crochet panda pattern shows you how to make a small seated amigurumi panda with a round white head, black ears and eye patches, a compact body, slim black arms, rounded feet, and a simple embroidered face. The panda is designed as a complete standalone project, so you can stop once the amigurumi is assembled or continue with the optional crochet swing at the end.
If you are looking for a free crochet panda pattern with a clear assembly sequence and an optional hanging display, this tutorial walks through each part from the first magic ring to the final balance check.
Table of Contents
Crochet Panda Pattern at a Glance
| Pattern detail | What to expect |
|---|---|
| Project | Seated crochet panda amigurumi |
| Construction | Separate head and body |
| Head/body join | 12 head stitches sewn to 12 body stitches |
| Ears | 2 flat black circles |
| Eye patches | 2 small black oval patches |
| Arms | 2 slim black tubes |
| Feet | 2 short rounded black pieces |
| Face | Embroidered by default |
| Optional accessory | Crochet swing hanger |
| Terminology | US crochet terms |
| Finished size | Depends on yarn, hook, tension, stuffing, and assembly |
What You’ll Need
For this crochet panda pattern, prepare:
- smooth white yarn;
- smooth black yarn;
- brown or beige yarn for the optional swing;
- black embroidery yarn or thread for the face;
- optional pink embroidery yarn for small cheek details;
- a crochet hook that gives you a dense amigurumi fabric with your chosen yarn;
- polyester stuffing;
- a yarn needle;
- scissors;
- a stitch marker;
- a few pins for positioning the pieces before sewing;
- optional hanging hardware if you want to adapt the swing for a particular display setup.
A smooth cotton or cotton-blend yarn is a practical choice because the stitch definition is easy to see while you shape the head, body, ears, and smaller pieces. You can use another fiber if you prefer, but choose a hook that keeps the fabric dense enough that the stuffing does not show through.
Crochet Stitches and Abbreviations
This pattern uses US crochet terminology.
For a broader reference, see the Craft Yarn Council’s standard crochet abbreviations.
- MR — magic ring
- ch — chain
- sl st — slip stitch
- sc — single crochet
- hdc — half double crochet
- dc — double crochet
- inc — work 2 single crochets in the same stitch
- dec — single crochet decrease, working two stitches together
- BLO — back loop only
- st / sts — stitch / stitches
The head and body are worked in continuous rounds. Move your stitch marker to the first stitch of each new round so you can keep the count accurate.
Before You Start
The head and body both stop with 12 stitches around the opening. Instead of closing each piece completely, you sew the two openings together. This gives the slightly larger head a wider connection point and makes it easier to keep the face centered above the body.
The basic order is:
- crochet the head;
- crochet and attach the ears and eye patches;
- embroider the face;
- crochet the body;
- stuff both pieces;
- join the 12-stitch head opening to the 12-stitch body opening;
- crochet and attach the arms and feet;
- check the seated pose;
- optionally crochet the swing and hanging cords.
How to Crochet the Panda Head
Step 1: Start the Head
With white yarn, make a magic ring.
Round 1: Work 6 sc into the magic ring. [6]
Pull the ring closed and place a stitch marker in the first stitch.
Round 2: Inc in each stitch around. [12]
Head checkpoint
You should have a small flat white circle.
Count the stitches before moving on. The head widens evenly from this point, so a missed increase can affect the final shape.
Step 2: Widen the Head
Round 3: (sc, inc) ×6. [18]
Round 4: (2 sc, inc) ×6. [24]
Round 5: (3 sc, inc) ×6. [30]
Step 3: Build the Round Head
Rounds 6–9: Sc in each stitch around. [30]
These even rounds add depth without increasing the circumference.
Shape checkpoint
By the end of Round 9, the head should look like a rounded bowl rather than a flat circle.
Step 4: Shape the Lower Head
Round 10: (3 sc, dec) ×6. [24]
Round 11: (2 sc, dec) ×6. [18]
Round 12: (sc, dec) ×6. [12]
Fasten off, leaving a long tail for joining.
Do not close the opening.
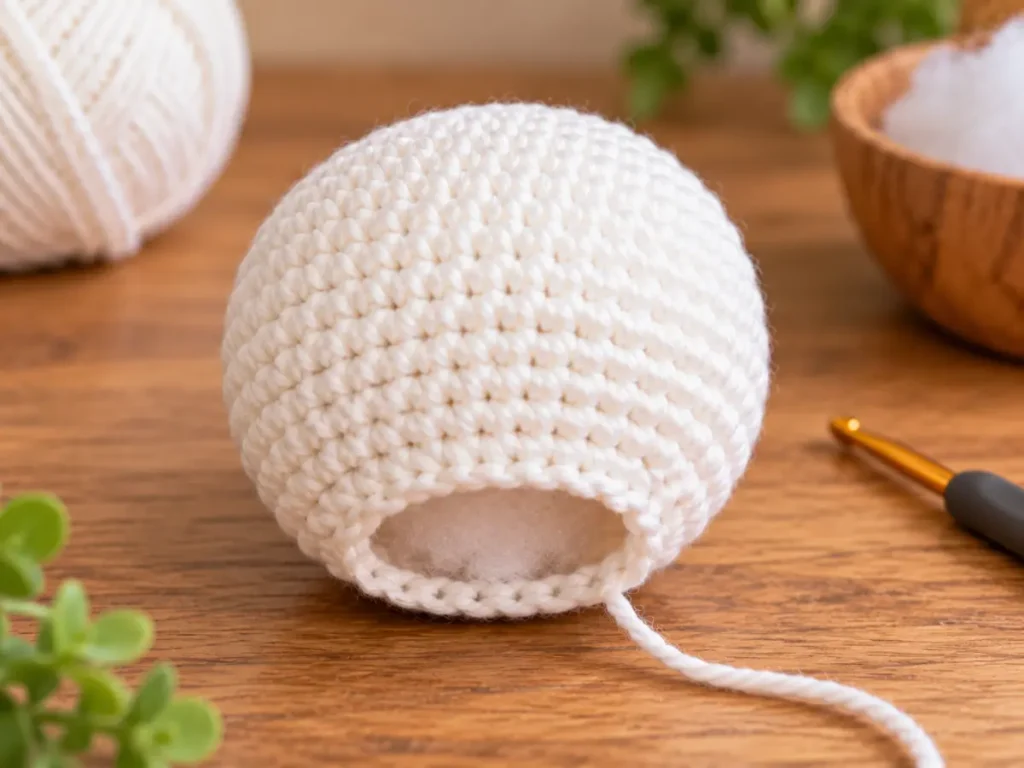
Add stuffing gradually through the 12-stitch opening. Shape the head with your fingers as you fill it.
Keep the stuffing slightly below the open edge so it does not get caught in the head-to-body seam.
Final head checkpoint
You should have:
- a rounded white head;
- a 12-stitch opening at the bottom;
- smooth stuffing with no visible gaps;
- enough structure to hold its shape without feeling hard.
Crochet the Panda Ears
Make 2 in black.
Step 5: Crochet the Ears
Round 1: 6 sc in MR. [6]
Round 2: Inc in each stitch around. [12]
Fasten off, leaving a long tail for sewing.
Make the second ear the same way.
Do not sew the ears on immediately. Place both on the head first so you can compare the height and angle.
The ears should sit high on the left and right sides of the head, slightly toward the sides rather than directly on top.
When the placement looks balanced, sew mainly along the lower portion of each ear. Leaving the upper part less tightly attached helps the round ear shape remain visible.
Crochet the Panda Eye Patches
Make 2 in black.
Step 6: Crochet a Small Oval Patch
Ch 5.
Starting in the second chain from the hook, work:
sc, hdc, dc, 3 dc in the last chain.
Continue along the opposite side of the foundation chain:
dc, hdc, sc.
Sl st to the first sc to close the patch, then fasten off, leaving a sewing tail. The patch contains 9 worked stitches; the joining slip stitch is not included in that count.
Make the second patch the same way.
Add the Panda Face
Before joining the head to the body, finish the face while the head is easy to hold and turn.
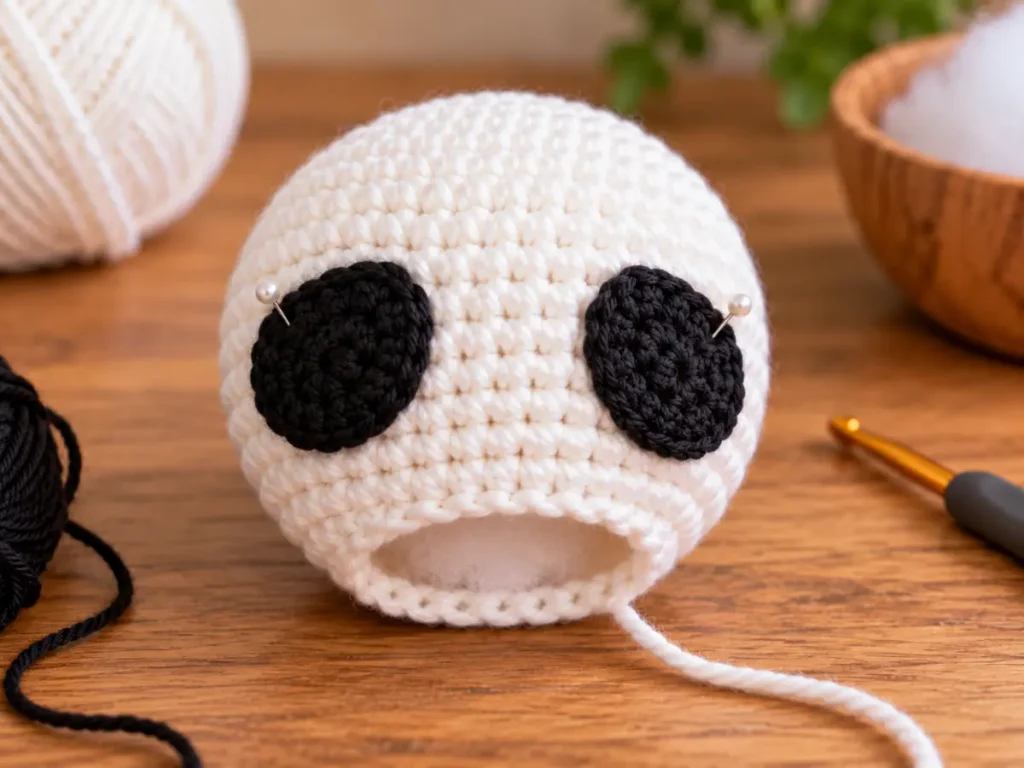
Step 7: Position the Eye Patches
Pin the two black eye patches on the front of the head.
Place them symmetrically around the face center.
Check the panda from the front before sewing. If one patch sits higher or angles differently, reposition it first.
Once the placement looks balanced, sew each patch securely around its edge.
Step 8: Embroider the Eyes, Nose, and Mouth
Use black embroidery yarn or thread.
Add one small embroidered eye inside each black patch.
Then embroider a small nose between and slightly below the eyes.
Add a short, simple mouth beneath the nose.
If you want extra color, use pink yarn for two small cheek stitches.
Keep the embroidery tension light. Pulling too tightly can dent the stuffed head and distort the face.
Plastic safety eyes can be used as an optional alternative, but embroidered eyes keep the project simple and avoid adding small plastic components.
How to Crochet the Panda Body
Step 9: Start the Body
With white yarn, make a magic ring.
Round 1: 6 sc in MR. [6]
Round 2: Inc in each stitch around. [12]
Round 3: (sc, inc) ×6. [18]
Round 4: (2 sc, inc) ×6. [24]
Step 10: Build the Seated Body
Rounds 5–7: Sc in each stitch around. [24]
Body checkpoint
The body should look compact and slightly smaller than the head.
The lower section should have enough volume to support the seated pose once the feet are attached.
Step 11: Shape the Upper Body
Round 8: (2 sc, dec) ×6. [18]
Round 9: (sc, dec) ×6. [12]
Fasten off, leaving the 12-stitch opening unclosed.
Stuff the body gradually.
Fill the lower section first, then add smaller amounts near the top.
Do not overstuff. Keep the stuffing slightly below the open edge so the join remains easy to sew.
Join the Head to the Body
The 12-to-12 join is one of the key construction points in this crochet panda pattern.
Place the stuffed head above the body.
Align the 12 head stitches with the 12 body stitches.
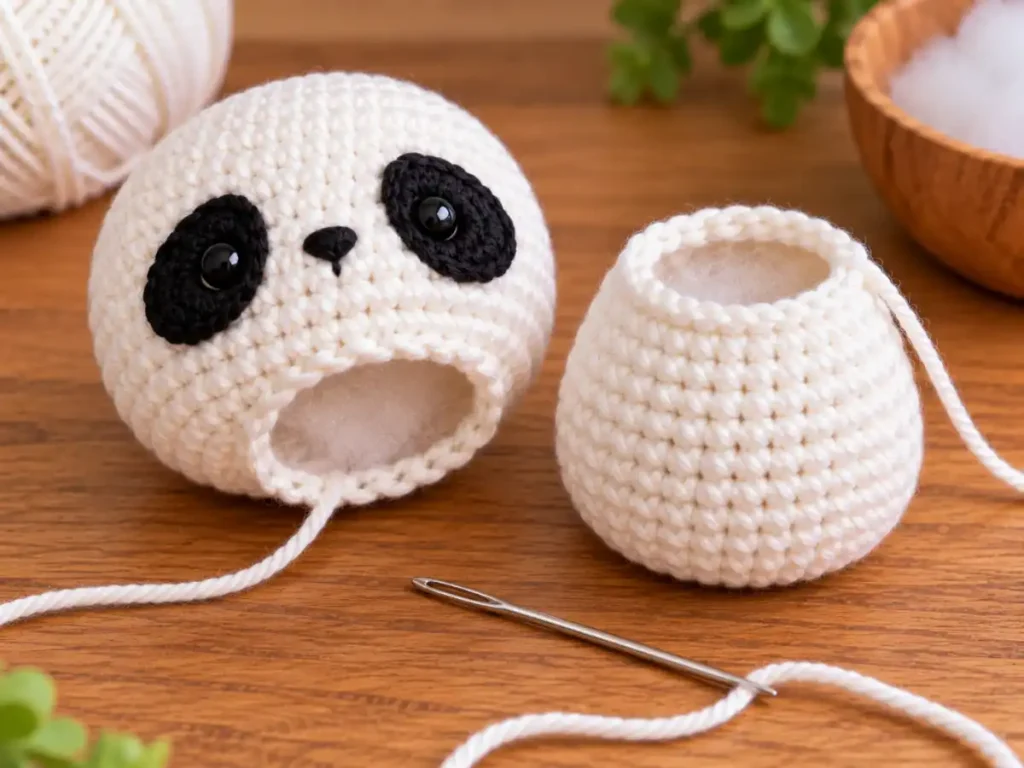
Before sewing, check that:
- the face points directly forward;
- the body sits upright;
- the head is not twisted to one side.
Thread a yarn needle with the long white joining tail.
Sew one stitch from the head opening to one stitch from the body opening, continuing around the full seam.
Because both openings contain 12 stitches, the pieces can be matched evenly:
12 head stitches ↔ 12 body stitches
Do not pull the seam excessively tight. A tight seam can pinch the neck and make the head tilt.
If the head still feels loose, make a light reinforcing pass through nearby stitches around the neck.
Neck checkpoint
The head should sit firmly over the body without leaning strongly forward, backward, or sideways.
Crochet the Panda Arms
Make 2 in black.
Step 12: Crochet the Arms
Round 1: 6 sc in MR. [6]
Rounds 2–5: Sc in each stitch around. [6]
Fasten off, leaving a long sewing tail.
Flatten the open end gently before sewing.
Make the second arm the same way.
Crochet the Panda Feet
Make 2 in black.
Step 13: Crochet the Feet
Round 1: 6 sc in MR. [6]
Round 2: Inc in each stitch around. [12]
Rounds 3–4: Sc in each stitch around. [12]
Add a small amount of stuffing.
Fasten off, leaving a long sewing tail.
How to Assemble the Panda
Step 14: Pin Everything First
Before sewing the arms and feet, pin all four pieces to the body.
Look at the panda from:
- the front;
- the back;
- the left side;
- the right side.
Step 15: Attach the Arms
Place one arm on each upper side of the body.
Angle them slightly inward rather than letting them point straight out.
Sew the flattened top of each arm through several body stitches.
After attaching the first arm, compare the second side before sewing the other one permanently.
Step 16: Attach the Feet
Place one foot on the lower front-left side and one on the lower front-right side of the body.
Angle them forward enough that the panda has a clear seated pose.
Check both feet from the front.
If one starts noticeably higher than the other, reposition it before sewing.
Secure each foot through several body stitches and weave the yarn tails into the body.
Final Panda Check
Before you move on to the optional swing, inspect the finished amigurumi.
Check that:
- the head is centered;
- the face looks straight;
- the ears sit at similar heights;
- the black eye patches look balanced;
- the arms sit at similar positions;
- the feet create a stable seated look;
- the neck seam feels secure;
- no stuffing is visible;
- loose yarn tails are woven in.
What Should the Finished Crochet Panda Look Like?
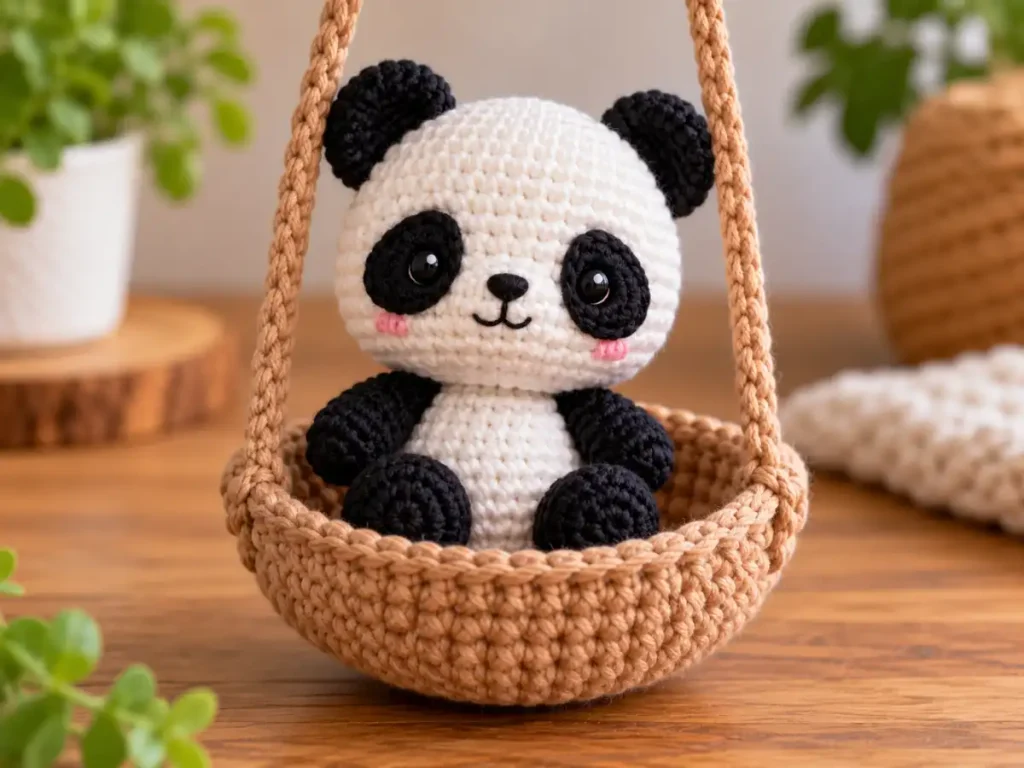
The finished panda should have a slightly oversized round head above a smaller compact body.
The black ears and eye patches should create the strongest panda features, while the slim arms and round feet keep the shape simple.
From the front, the feet should help the panda look seated rather than standing.
The head should sit straight over the body, and the face should remain centered.
How to Make the Optional Crochet Panda Swing
The swing is optional. The panda is already complete before this section.
Keeping the two pieces separate means you can use the panda as a standalone amigurumi or place it inside the swing when you want a hanging display.
Use brown or beige yarn for the swing.
Step 17: Crochet the Swing Base
Make a magic ring.
Round 1: 6 sc in MR. [6]
Round 2: Inc in each stitch around. [12]
Round 3: (sc, inc) ×6. [18]
Round 4: (2 sc, inc) ×6. [24]
Round 5: (3 sc, inc) ×6. [30]
Round 6: (4 sc, inc) ×6. [36]
You should now have a flat circular base.
If the circle begins cupping strongly before the wall round, check your stitch count.
Step 18: Build the Swing Walls
Round 7: Sc in BLO around. [36]
Working in the back loops creates a visible transition between the flat base and the side wall.
Rounds 8–9: Sc in each stitch around. [36]
Fasten off when the shallow basket shape is complete.
Swing checkpoint
The finished swing base should have:
- a flat or gently shaped bottom;
- a clear turn where the wall begins;
- a shallow 36-stitch wall;
- enough room for the panda and its rounded feet to sit inside without being tightly compressed.
Make the Hanging Cords
Make 2 identical cords.
Step 19: Crochet the First Cord
Chain until the cord reaches the hanging length you want.
Starting in the second chain from the hook, work slip stitches back along the chain.
Fasten off, leaving a long sewing tail.
Make the second cord the same way.
The two cords should be the same length. Compare them side by side before attachment.
Attach the Hanging Cords
The swing wall has 36 stitches.
Two points directly opposite each other are approximately:
36 ÷ 2 = 18 stitches apart
Step 20: Mark Opposite Attachment Areas
Choose one attachment area on the basket wall.
Count approximately 18 stitches around to locate the opposite side.
Mark both positions before sewing.
Step 21: Secure the Cords
Sew the end of the first cord across several basket stitches.
Do not anchor the entire load through one crochet stitch.
Attach the second cord at the opposite side in the same way.
Before weaving in the tails completely, place the panda in the swing and test the balance.
Balance the Panda Swing
Place the finished panda in the center of the crochet basket.
Hold the two cords together above the swing and lift slowly.
The basket should hang reasonably level.
If one side drops, check three things:
Cord length: One cord may be slightly longer.
Attachment points: The two cords may not be positioned opposite each other.
Panda position: The panda may be sitting too far toward one side.
Adjust the cords or panda placement before securing the final yarn tails.
Can I Use the Panda Swing as a Hanging Ornament?
Yes.
The swing can be used as a decorative hanging ornament in an appropriate location, such as a craft space, room display, or another secure place where the cords can hang freely.
If you adapt it for use inside a vehicle, only use it where permitted and where it does not obstruct visibility or interfere with safe operation.
Common Crochet Panda Problems and How to Fix Them
Why Does My Panda Head Look Too Flat?
The head may be under-stuffed, or the fabric may be too loose.
Add stuffing in small amounts and shape the head with your fingers.
If the stitch openings are large, use a hook that gives you denser fabric.
Why Does the Head Lean After Sewing?
The two 12-stitch openings may not have been aligned evenly, or one section of the seam may be tighter.
Check the head from the front and sides.
If necessary, resew the tilted section with more even tension.
Why Are the Eye Patches Uneven?
Pin both patches before sewing either one permanently.
Compare their height, angle, and distance from the center of the face.
A small difference is more noticeable because the patches are one of the panda’s strongest features.
Why Are the Ears at Different Heights?
The ears may have been attached before both positions were checked together.
Pin the second ear, look at the panda from the front, and adjust until the two sides feel balanced.
Why Do the Arms Look Too Bulky?
The arms are designed to stay slim.
If you added stuffing, remove some or leave them unstuffed on the next version.
Why Doesn’t the Panda Look Seated?
The feet may be attached too high or too far toward the sides.
Move them lower and slightly toward the front so their rounded shape is visible from the front.
Why Does the Panda Feel Too Tight Inside the Swing?
The finished size changes with yarn, hook, and stuffing.
If your panda is larger than the swing opening, avoid forcing it into the basket. You may need to adjust the swing scale when using substantially thicker yarn.
Why Does the Swing Tilt?
Compare the two cord lengths first.
Then check whether the attachment areas are approximately opposite each other.
Finally, make sure the panda is sitting near the center of the basket.
Why Do the Basket Walls Flare Outward?
Uneven tension can cause the walls to spread.
Make sure the BLO transition round and the following straight rounds remain at 36 stitches without accidental increases.
Can I Use Different Yarn?
Yes.
You can use this panda bear crochet pattern with different yarns, but the finished proportions will change.
A thinner yarn generally creates a smaller panda.
A thicker yarn creates a larger and heavier panda.
If you change the scale significantly, the swing and hanging cords may also need to be adjusted so the panda fits comfortably and the hanger remains balanced.
More Easy Crochet Amigurumi
If you enjoyed making this panda, try our crochet bee pattern for another small amigurumi project with clear shaping and assembly steps.
Frequently Asked Questions
Is This Crochet Panda Pattern Beginner-Friendly?
The pattern uses basic amigurumi shaping, simple increases and decreases, stuffing, embroidery, and sewing.
The parts that require the most attention are matching the 12-stitch head and body openings, positioning the eye patches evenly, and assembling the seated pose.
If you are comfortable making a magic ring and following stitch counts, the steps are designed to stay clear and manageable.
Is This a Free Crochet Panda Pattern?
Yes.
The complete written instructions for the panda and optional swing are included in this article.
You can make the panda by itself or continue with the swing after the amigurumi is finished.
How Do I Keep the Panda Head From Tilting?
Stop both the head and body at 12 stitches.
Align those openings evenly and check that the face points forward before sewing.
Match one head stitch to one body stitch around the seam and avoid pulling one side tighter than the other.
How Do I Make the Black Panda Eye Patches?
Chain 5, work across the foundation chain, place 3 double crochets in the last chain to turn the shape, then work back along the opposite side.
The result is a small oval patch with 9 worked stitches.
Make two and compare them before sewing.
Can I Use Safety Eyes Instead of Embroidered Eyes?
Yes, if that is your preferred finishing method.
This pattern uses embroidered eyes by default because they are easy to position inside the black patches and do not require plastic components.
Can I Make the Panda Without the Swing?
Yes. The panda crochet pattern is complete before the optional swing section begins.
How Do I Keep the Swing Level?
Make both cords the same length and attach them at approximately opposite points on the 36-stitch basket wall.
Then place the panda in the center and test the balance before weaving in the final tails.
Can I Use Thicker Yarn?
Yes, but the panda will become larger and heavier, so the swing may need to be scaled accordingly.
Finished Amigurumi Panda
This crochet panda pattern combines simple round shaping with the details that make a panda immediately recognizable: a white head and body, black ears, dark eye patches, slim arms, and rounded feet.
The 12-to-12 head and body join gives the larger head a stable connection point, while pinning the small pieces before sewing helps keep the finished face and seated pose balanced.
You can stop with the standalone amigurumi or continue with the optional crochet swing for a decorative hanging version.
Pattern Notes
This crochet panda pattern was created for Small Crochet Ideas with a focus on clear stitch-count checkpoints, a stable head-to-body join, a recognizable seated panda shape, and an optional removable swing accessory.
The pattern uses US crochet terminology. Finished size and proportions will vary with yarn, hook, tension, stuffing, and assembly.
