Easy crochet patterns, cute projects, and beginner-friendly ideas to inspire your next make.



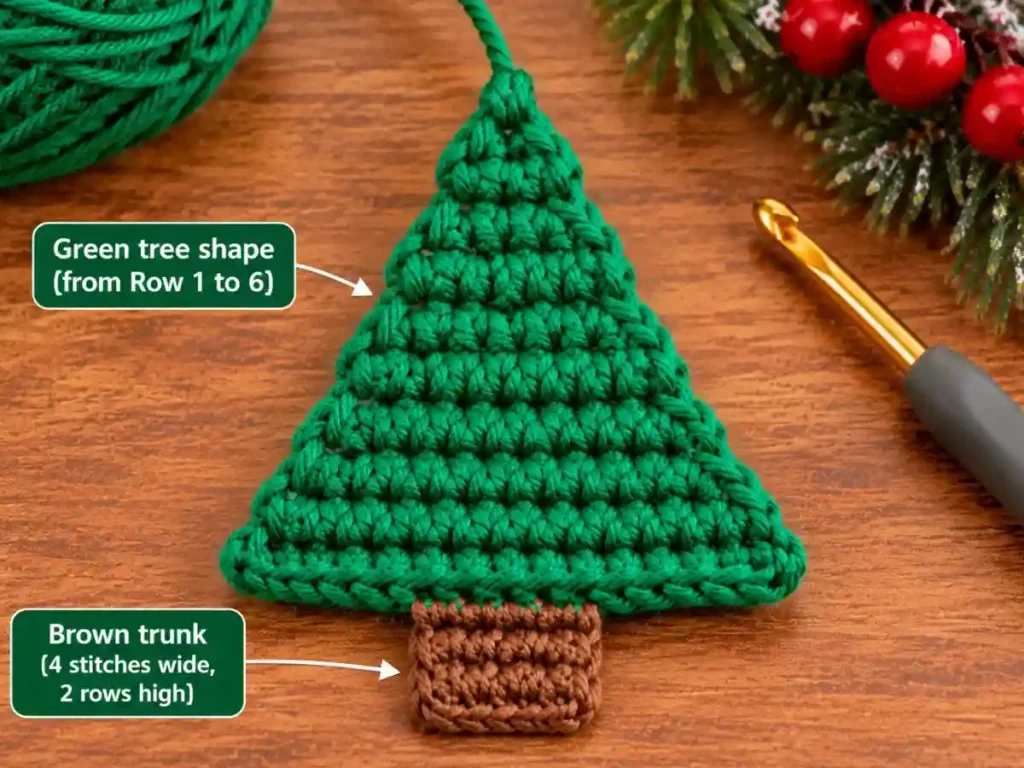
This crochet Christmas tree ornament pattern makes a simple flat tree using basic single crochet stitches and easy edge increases. The tree is worked from the top down in six short rows, then a small brown trunk is crocheted directly onto the bottom edge.
There are no separate tree pieces to sew together, no stuffing, and no complicated shaping. Finish the ornament with a centered hanging loop and add optional red, white, or gold yarn details if you want a more decorated Christmas tree.
Finished size will vary depending on your yarn, hook, tension, and finishing.
Table of Contents
Crochet Christmas Tree Ornament at a Glance
| Detail | Pattern |
|---|---|
| Style | Flat Christmas tree ornament |
| Construction | Top-down turned rows |
| Tree rows | 6 |
| Stitch counts | 2 → 4 → 6 → 8 → 10 → 12 |
| Trunk | Crocheted directly onto bottom edge |
| Hanging loop | Ch 12 |
| Stuffing | None |
| Assembly sewing | None |
| Decoration | Optional |
| Terminology | US crochet terms |
What You’ll Need
- green yarn for the tree;
- brown yarn for the trunk;
- optional red, white, or gold yarn or embroidery thread for decorations;
- crochet hook suitable for your chosen yarn;
- yarn needle;
- scissors;
- optional stitch marker or pins.
Choose a hook that gives you neat, even stitches. Because yarn and hook choices vary, this pattern does not use one fixed finished measurement.
Crochet Stitches and Abbreviations
This pattern uses US crochet terminology.
For a general stitch reference, see the Craft Yarn Council crochet abbreviations.
- ch — chain
- sl st — slip stitch
- sc — single crochet
- st / sts — stitch / stitches
Pattern note: The turning ch 1 does not count as a stitch.
Before You Start This Crochet Christmas Tree Ornament Pattern
This crochet Christmas tree ornament pattern is worked from the top down, with two stitches added on each shaping row to create the flat triangular tree.
The tree is worked from the narrow top toward the wider bottom.
Each shaping row increases at both edges, adding exactly two stitches:
2 → 4 → 6 → 8 → 10 → 12
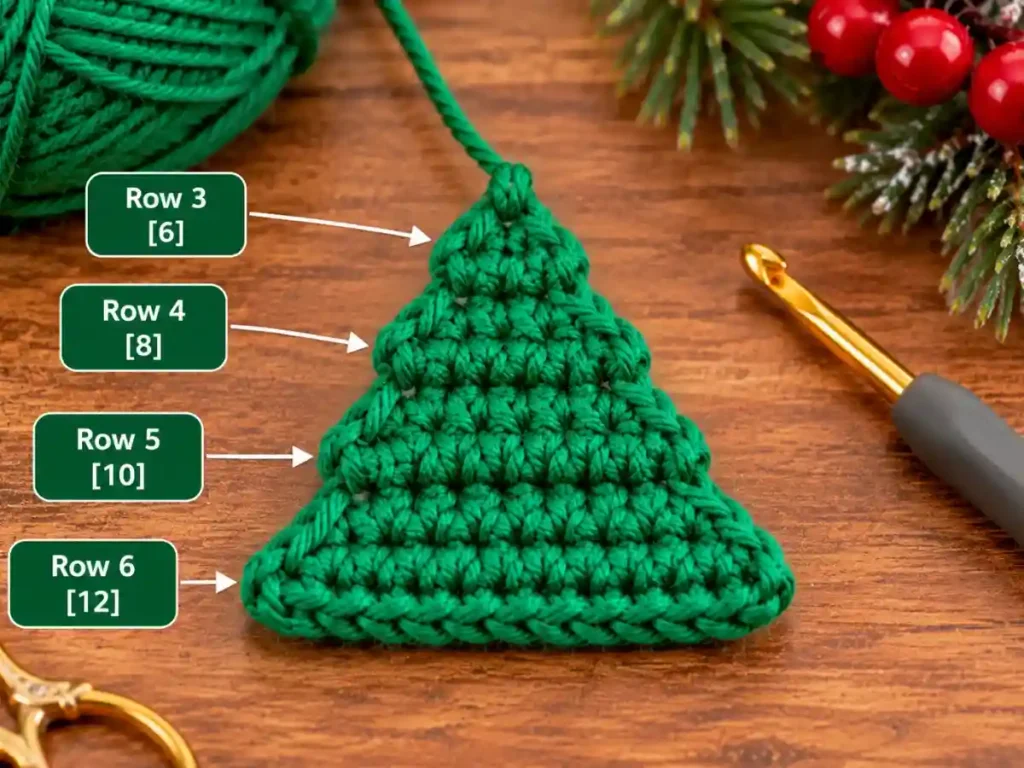
After Row 6, the brown trunk is worked directly into the four center stitches of the bottom edge. The hanging loop is added at the top after the main tree is finished.
Decorations are completely optional and do not change the construction of the ornament.
How to Crochet the Christmas Tree Ornament
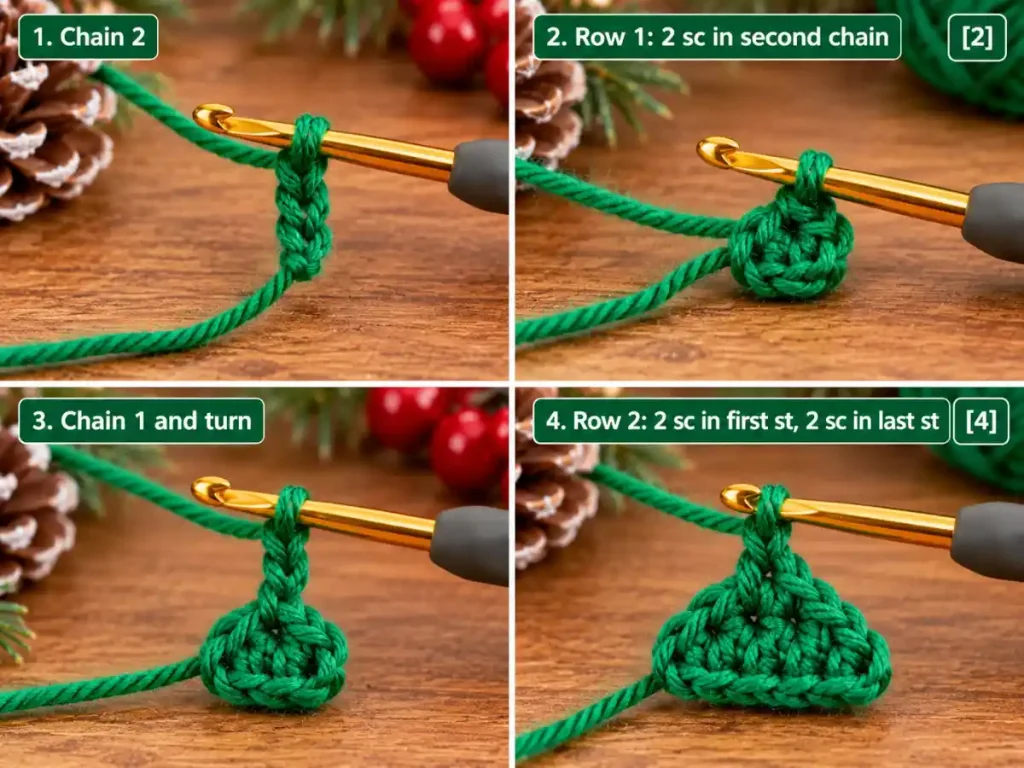
Step 1: Start the Tree Top
With green yarn:
Row 1: Ch 2.
Work 2 sc in the second chain from the hook. [2]
Ch 1 and turn.
Checkpoint
You should have a tiny two-stitch row. This becomes the top of the Christmas tree.
Step 2: Make the First Increase
Row 2: Work 2 sc in the first stitch and 2 sc in the last stitch. [4]
Ch 1 and turn.
Both stitches from the previous row have now been increased, giving you four stitches total.
Step 3: Continue Widening the Tree
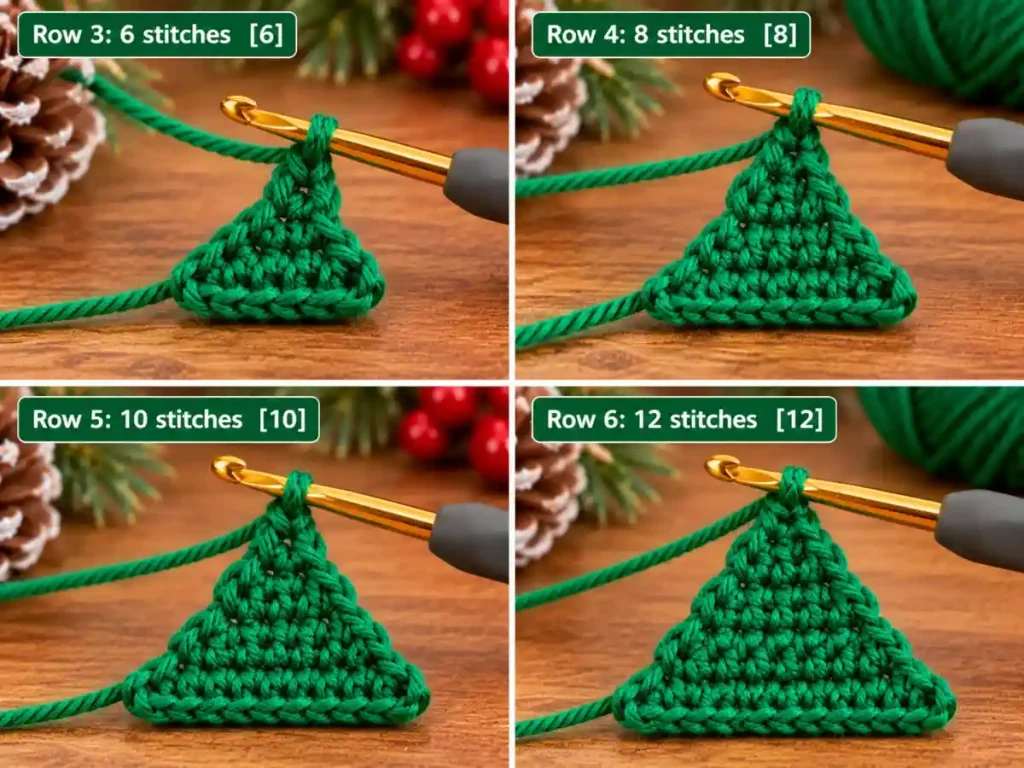
Row 3:
2 sc in first st, sc in next 2 sts, 2 sc in last st. [6]
Ch 1 and turn.
Row 4:
2 sc in first st, sc in next 4 sts, 2 sc in last st. [8]
Ch 1 and turn.
The tree should now be widening evenly on both sides.
Step 4: Finish the Triangle
Row 5:
2 sc in first st, sc in next 6 sts, 2 sc in last st. [10]
Ch 1 and turn.
Row 6:
2 sc in first st, sc in next 8 sts, 2 sc in last st. [12]
Fasten off.
Tree Shape Checkpoint
Your finished green section should be:
- flat;
- narrow at the top;
- wider at the bottom;
- reasonably symmetrical on both sides.
The final stitch sequence is:
2 → 4 → 6 → 8 → 10 → 12
If one edge looks noticeably steeper than the other, check whether an increase was missed at the beginning or end of one row.
Crochet the Brown Trunk
The bottom edge of Row 6 contains 12 stitches.
Count them across:
1 2 3 4 | 5 6 7 8 | 9 10 11 12
The trunk is worked into the center four stitches:
5–8
Join brown yarn at stitch 5.
Trunk Row 1: Sc across stitches 5–8. [4]
Ch 1 and turn.
Trunk Row 2: Sc across. [4]
Fasten off and weave in the yarn ends.
Working the trunk directly onto the tree keeps it centered and avoids making a separate piece that needs to be sewn on later.
Add the Hanging Loop
At the top of the tree, locate the small space between the two stitches of Row 1.
Join green yarn through this top-center space.
Ch 12.
Sl st back into the same top-center area to form the hanging loop.
Fasten off securely.
Before weaving in the final tail, hold the ornament by the loop and check that the tree hangs reasonably straight.
If it tilts strongly to one side, reposition the loop closer to the visual center.
Add Optional Christmas Decorations
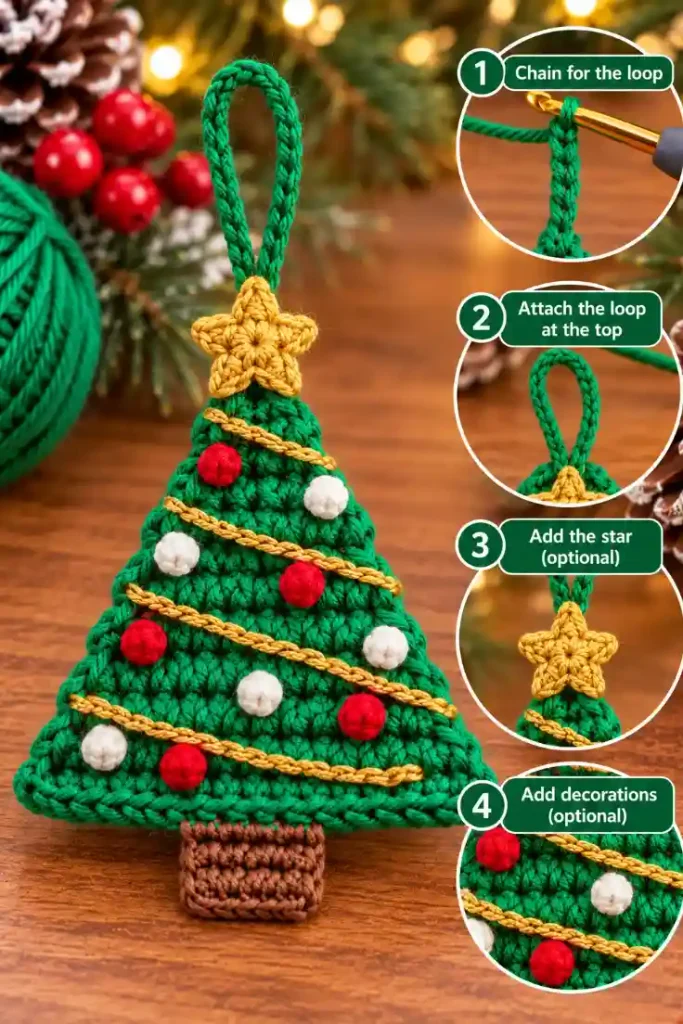
The plain green tree is complete as written, but you can add small yarn details after finishing.
Simple options include:
- small red embroidered dots;
- white stitched dots;
- short gold stitches;
- tiny contrasting yarn accents.
Keep decorative stitches light so they do not pull or distort the flat crochet fabric.
You do not need beads, wire, glue, or a separate star topper to complete this free crochet Christmas tree ornament pattern.
You can keep this crochet Christmas tree ornament pattern plain or personalize it with small yarn decorations.
How to Keep Your Crochet Tree Flat and Symmetrical
Why Is My Tree Crooked?
Check the first and last stitch of each shaping row.
Every row after the start should widen at both edges. Missing one edge increase will make one side narrower.
Why Is My Tree Curling?
Uneven or tight tension can cause the fabric to curl.
Gently reshape the finished tree with your fingers. Keeping the turning tension consistent also helps the rows lie more evenly.
Why Is the Trunk Off-Center?
Make sure the trunk is worked across the four center stitches of Row 6:
stitches 5, 6, 7, and 8.
Why Does the Ornament Hang Sideways?
The hanging loop may be attached too far to one side.
Place it through the top-center space between the two stitches of Row 1.
Why Are My Decorations Distorting the Tree?
Embroidery may be pulled too tightly.
Use light tension and small decorative stitches so the flat tree keeps its shape.
Ways to Use This Crochet Christmas Tree
Although designed as an ornament, the same flat tree can also be used as:
- a handmade gift tag;
- part of a Christmas garland;
- a small seasonal appliqué;
- a decorative accent on a wrapped gift.
Repeat the same pattern in several colors if you want a coordinated set.
If you’d like to add another handmade ornament to your Christmas collection, try this crochet star ornament pattern next.
Frequently Asked Questions
Is This Crochet Christmas Tree Ornament Pattern Free?
Yes. This free crochet Christmas tree ornament pattern is included in full above, including the tree, trunk, hanging loop, and optional decoration steps.
Is This an Easy Crochet Christmas Tree Ornament?
The construction uses chains, single crochet stitches, and simple increases at the first and last stitch of each row.
Careful stitch counting is the most important part of keeping the triangle symmetrical.
Does the Tree Need Stuffing?
No. This is a flat crochet Christmas tree ornament.
Can I Use Different Yarn?
Yes.
Changing yarn or hook size will change the finished dimensions and stitch appearance, but the same row counts can be followed.
Can I Leave the Tree Undecorated?
Yes. The green tree, brown trunk, and hanging loop form a complete ornament without additional decoration.
Can I Make Several Trees for a Garland?
Yes. Repeat the same pattern for each tree and attach the finished ornaments to your preferred garland setup.
Final Thoughts
This crochet Christmas tree ornament pattern keeps the construction simple: six widening rows create the flat tree, a centered brown trunk is crocheted directly onto the bottom edge, and a ch-12 loop makes it ready to hang.
Leave the tree plain for a simple look or add small red, white, or gold yarn details for extra Christmas color. Because the design uses no stuffing or separate assembly pieces, it is easy to repeat for ornaments, gift tags, or a matching seasonal set
