
Easy crochet patterns, cute projects, and beginner-friendly ideas to inspire your next make.

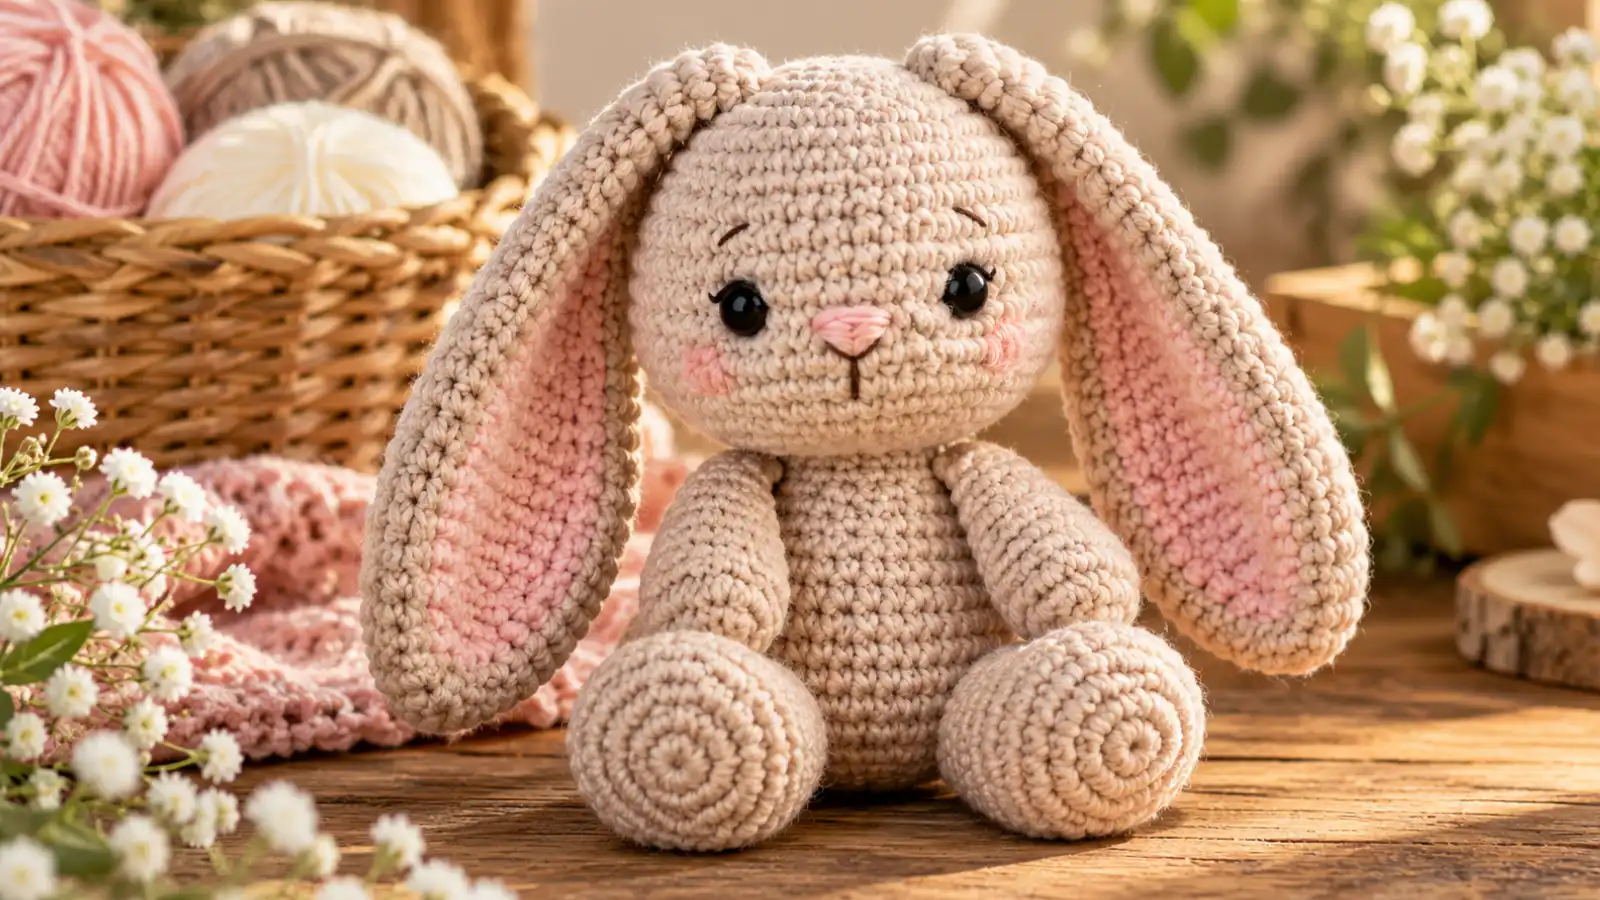
This crochet bunny pattern shows you how to make a small seated amigurumi bunny with a rounded head, long floppy ears, a compact body, slim arms, rounded feet, a small tail, and a simple embroidered face. The head and body are worked separately, then joined through matching 12-stitch openings for a clean, stable connection.
The long ears are left unstuffed so they can fall naturally beside the head, while the body and feet are shaped to give the bunny a seated silhouette. If you are looking for a free crochet bunny pattern with clear stitch counts, practical checkpoints, and straightforward assembly, this tutorial walks through each part from the first magic ring to the final symmetry check.
Table of Contents
Crochet Bunny Pattern at a Glance
| Pattern detail | What to expect |
|---|---|
| Project | Seated amigurumi bunny |
| Head | Separate piece, maximum 30 stitches |
| Body | Separate piece, maximum 24 stitches |
| Head/body join | 12 head stitches sewn to 12 body stitches |
| Ears | 2 long unstuffed floppy ears |
| Arms | 2 slim tubes |
| Feet | 2 rounded pieces |
| Tail | Small round stuffed tail |
| Face | Embroidered by default |
| Terminology | US crochet terms |
| Finished size | Varies with yarn, hook, tension, stuffing, and assembly |
What You’ll Need
For this crochet bunny, prepare:
- smooth yarn in your chosen main bunny color;
- black embroidery yarn or thread for the eyes;
- a small amount of pink or soft-brown yarn or thread for the nose;
- optional pink yarn or thread for cheek details;
- polyester stuffing;
- a crochet hook that gives you a dense amigurumi fabric with your chosen yarn;
- a yarn needle;
- a stitch marker;
- scissors;
- pins for positioning the pieces before sewing.
A smooth cotton or cotton-blend yarn is a practical option because the stitches and shaping are easy to see. Other fibers can also work, as long as the fabric is dense enough to keep the stuffing from showing through.
Crochet Stitches and Abbreviations
This pattern uses US crochet terminology.
For a general reference, see the Craft Yarn Council crochet abbreviations.
- MR — magic ring
- ch — chain
- sl st — slip stitch
- sc — single crochet
- inc — work 2 single crochets in the same stitch
- dec — single crochet decrease, working two stitches together
- st / sts — stitch / stitches
The head, body, ears, arms, feet, and tail are worked in continuous rounds. Move your stitch marker to the first stitch of each new round so you can keep the count accurate.
Before You Start
The bunny is built from several simple amigurumi pieces.
The head and body are worked separately, and both finish with 12 stitches around the opening. Instead of closing either piece completely, you match those two openings and sew them together one stitch to one stitch.
The ears are long but intentionally unstuffed. That helps them stay soft and floppy instead of standing rigidly upright.
The basic order is:
- crochet the head;
- stuff the head;
- mark and embroider the face;
- crochet and stuff the body;
- join the 12-stitch head opening to the 12-stitch body opening;
- crochet both ears;
- crochet both arms;
- crochet both feet;
- crochet the tail;
- pin all pieces in place;
- sew the ears, arms, feet, and tail;
- check the bunny from the front, back, and both sides.
Pinning before sewing is especially important for the ears. Long ears make small differences in height or angle easier to notice.
How to Crochet the Bunny Head
Step 1: Start the Head
With the main bunny color, make a magic ring.
Round 1: Work 6 sc into the magic ring. [6]
Pull the ring closed and place a stitch marker in the first stitch.
Round 2: Inc in each stitch around. [12]
Head checkpoint
You should have a small flat circle.
Count the stitches before continuing. The head widens evenly from this point, so a missed increase can affect the final shape.
Step 2: Widen the Head
Round 3: (sc, inc) ×6. [18]
Round 4: (2 sc, inc) ×6. [24]
Round 5: (3 sc, inc) ×6. [30]
Step 3: Build the Round Head
Rounds 6–10: Sc in each stitch around. [30]
Shape checkpoint
By the end of Round 10, the piece should look rounded rather than flat.
Keep the fabric dense and the tension consistent so the stuffing does not show through later.
Step 4: Shape the Lower Head
Round 11: (3 sc, dec) ×6. [24]
Round 12: (2 sc, dec) ×6. [18]
Round 13: (sc, dec) ×6. [12]
Fasten off, leaving a long tail for joining.
Do not close the opening.
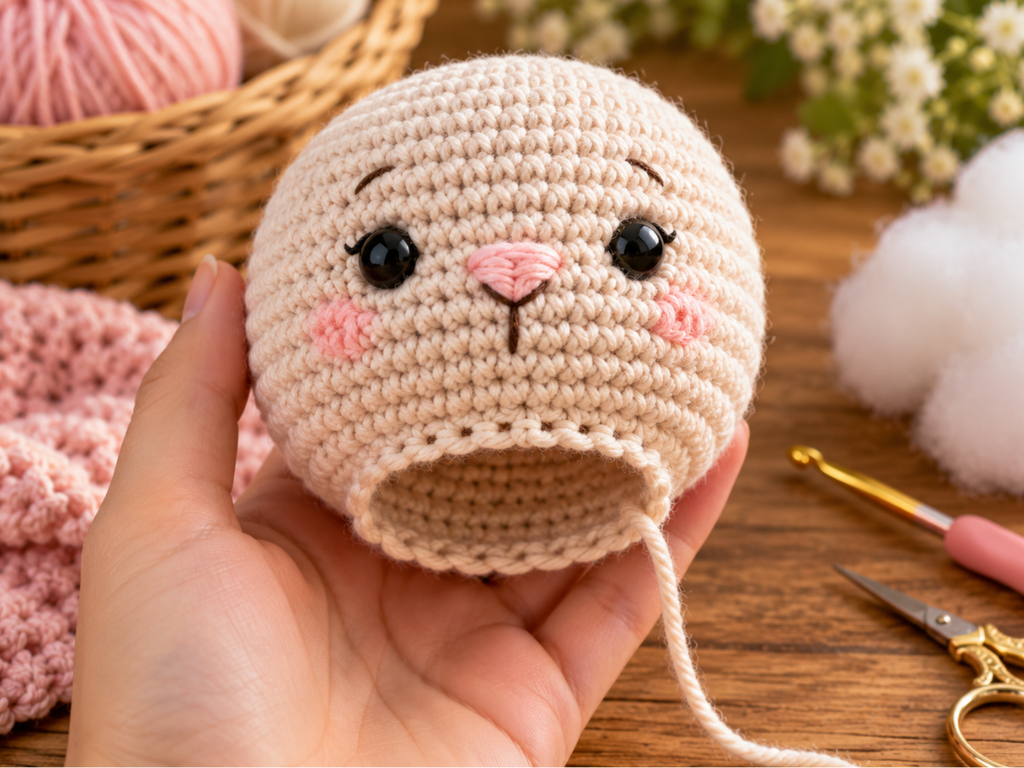
Stuff the head gradually through the 12-stitch opening.
Shape it with your fingers as you fill it. Keep the stuffing slightly below the open edge so it does not get caught in the head-to-body seam.
Final head checkpoint
You should have:
- a rounded head;
- a 12-stitch opening at the bottom;
- even stuffing;
- no obvious gaps in the fabric;
- enough structure to hold the shape without feeling hard.
Add the Bunny Face
It is easier to finish the face before joining the head to the body because you can still turn and hold the head comfortably.
Step 5: Mark the Eye Placement
Use two temporary stitch markers or pins to test the eye placement.
Look at the head from the front.
Check that the two markers:
- sit at a similar height;
- are equally spaced from the center;
- look balanced with the space left for the nose and mouth.
Do not rely on one fixed measurement, because the visual spacing changes with yarn, hook, tension, and stuffing.
Step 6: Embroider the Eyes, Nose, and Mouth
Use black embroidery yarn or thread for the eyes.
Make two small embroidered eyes where you marked them.
For the nose, use a small amount of pink or soft-brown yarn or thread. A small triangular shape works well with the simple bunny face.
Add a short vertical stitch or a small curved mouth below the nose.
Optional pink cheek stitches can be added if you want a softer expression.
Keep the embroidery tension light. Pulling too tightly can dent the stuffed head and distort the face.
Plastic safety eyes can be used as an optional alternative if you prefer that finish, but this tutorial does not make child-safety claims about plastic eye components.
How to Crochet the Bunny Body
Step 7: Start the Body
With the main bunny color, make a magic ring.
Round 1: 6 sc in MR. [6]
Round 2: Inc in each stitch around. [12]
Round 3: (sc, inc) ×6. [18]
Round 4: (2 sc, inc) ×6. [24]
Step 8: Build the Compact Body
Rounds 5–8: Sc in each stitch around. [24]
Body checkpoint
The body should look compact and slightly smaller than the head.
The lower section should have enough volume to support the seated pose once the feet and tail are attached.
Step 9: Shape the Upper Body
Round 9: (2 sc, dec) ×6. [18]
Round 10: (sc, dec) ×6. [12]
Fasten off, leaving the 12-stitch opening unclosed.
Stuff the body gradually.
Fill the lower section first, then add smaller amounts near the top. Keep the stuffing slightly below the opening so the join remains easy to sew.
Join the Head to the Body
The 12-to-12 join is one of the main construction points in this crochet bunny pattern.
Place the stuffed head above the body.
Align the 12 head stitches with the 12 body stitches.
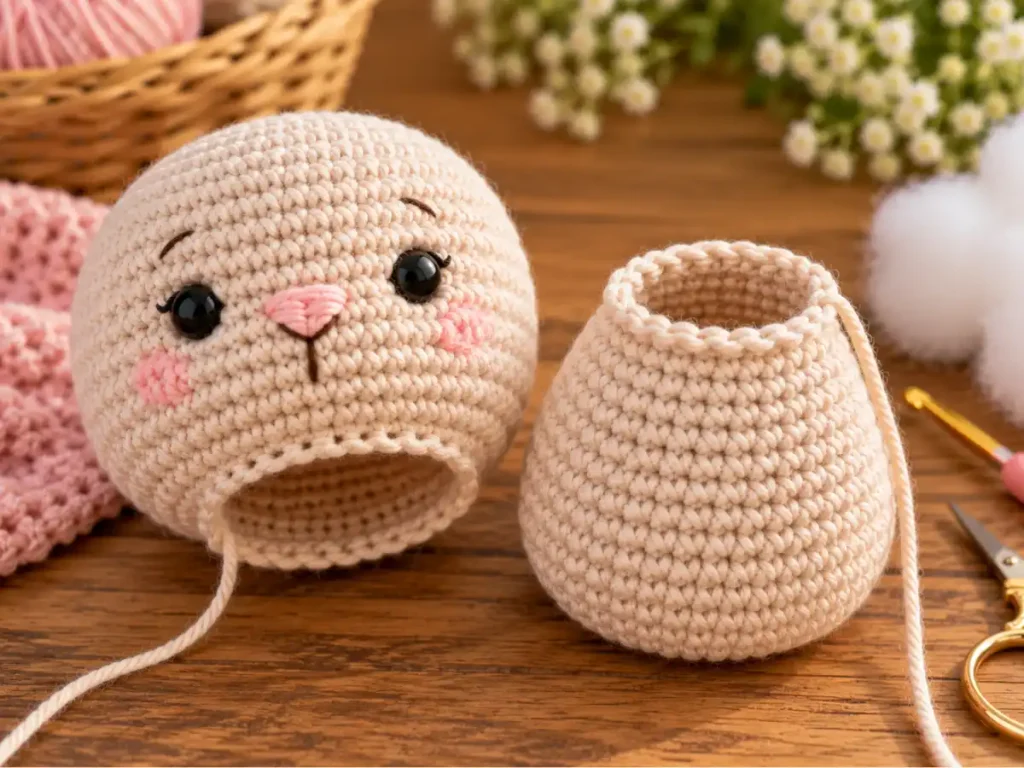
Before sewing, check that:
- the face points forward;
- the body sits upright;
- the head is not twisted to one side;
- the stuffing stays below both open edges.
Thread a yarn needle with the long joining tail.
Sew one head stitch to one body stitch, continuing around the entire opening.
Because both edges contain 12 stitches, they can be matched evenly:
12 head stitches ↔ 12 body stitches
Do not pull the seam excessively tight. A seam that is tighter on one side can make the head lean.
After joining, look at the bunny from the front and both sides. If the neck still feels loose, make a light reinforcing pass through nearby stitches.
Neck checkpoint
The head should sit centered over the body without leaning strongly forward, backward, or sideways.
Crochet the Long Floppy Bunny Ears
Make 2.
The ears are intentionally left unstuffed. Their shape comes from the crochet fabric itself, and the empty interior helps them fall naturally beside the head.
Step 10: Start the Ear
With the main bunny color:
Round 1: 6 sc in MR. [6]
Round 2: (sc, inc) ×3. [9]
Step 11: Build the Long Ear
Rounds 3–8: Sc in each stitch around. [9]
These straight rounds create the long central section.
Do not add stuffing.
Step 12: Narrow the Ear Base
Round 9: (sc, dec) ×3. [6]
Rounds 10–12: Sc in each stitch around. [6]
Fasten off, leaving a long sewing tail.
Make the second ear the same way.
The stitch-count sequence for each ear is:
6 → 9 → 9 → 9 → 9 → 9 → 9 → 9 → 6 → 6 → 6 → 6
Flatten each ear gently before attachment.
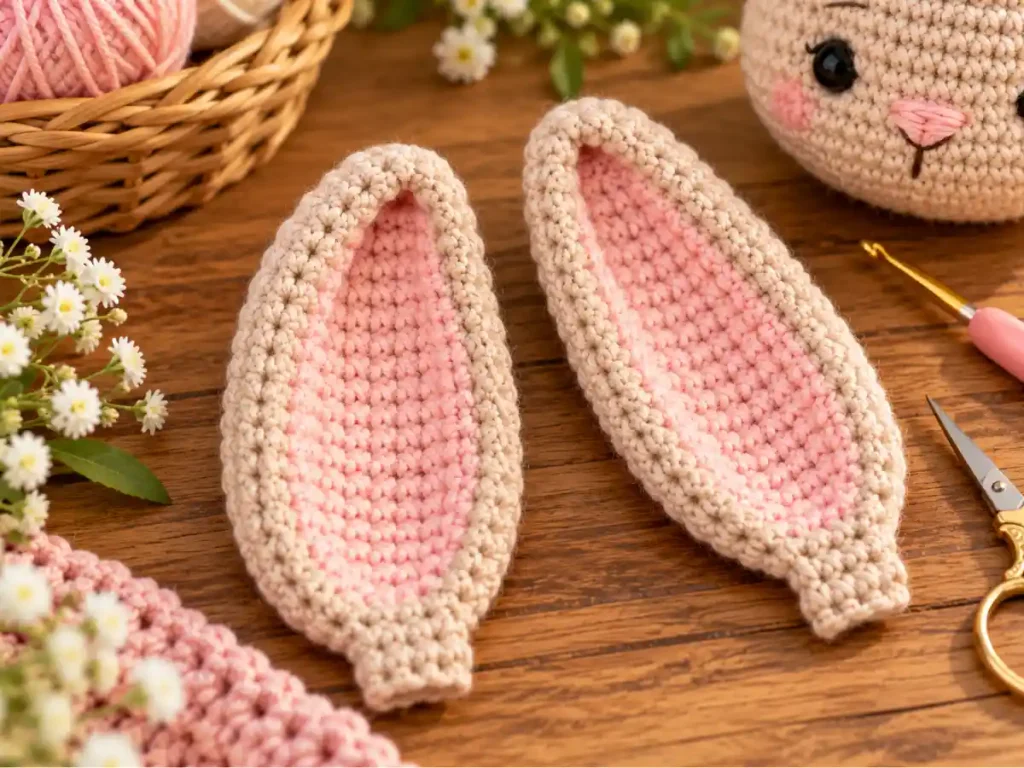
Position and Attach the Floppy Ears
The ears are one of the strongest visual features of the finished bunny, so spend a little time on placement before sewing.
Place both ears high on the head, slightly toward the back of the crown.
Let the long sections fall naturally beside the head.
Pin both ears before sewing either one permanently.
Then inspect the bunny from:
- the front;
- the left side;
- the right side;
- slightly above.
Check that the ears begin at similar heights and fall in a balanced way.
If one ear points forward while the other falls backward, adjust the pinned position first.
Once the placement looks balanced, sew each flattened ear base securely to the head.
Avoid stitching too far up the ear. Keeping most of the length free helps preserve the floppy look.
Crochet the Bunny Arms
Make 2.
Step 13: Crochet the Arms
With the main bunny color:
Round 1: 6 sc in MR. [6]
Rounds 2–6: Sc in each stitch around. [6]
Fasten off, leaving a long sewing tail.
No stuffing is needed for the default version.
Flatten the open end gently before sewing.
Crochet the Bunny Feet
Make 2.
Step 14: Crochet the Feet
With the main bunny color:
Round 1: 6 sc in MR. [6]
Round 2: Inc in each stitch around. [12]
Rounds 3–4: Sc in each stitch around. [12]
Round 5: (4 sc, dec) ×2. [10]
Round 5 consumes 12 stitches and returns 10 stitches:
Each repeat uses 4 single crochets plus one decrease, consuming 6 stitches and producing 5.
5 stitches × 2 repeats = 10 stitches.
Lightly stuff the foot.
Fasten off, leaving a long sewing tail.
Crochet the Bunny Tail
Make 1.
Step 15: Crochet the Tail
With the main bunny color:
Round 1: 6 sc in MR. [6]
Round 2: Inc in each stitch around. [12]
Round 3: Sc in each stitch around. [12]
Round 4: Dec ×6. [6]
Add a small amount of stuffing.
Fasten off, leaving a long sewing tail.
The tail should form a small rounded ball.
How to Assemble the Bunny
Step 16: Pin Everything First
Before sewing, pin:
- both ears if they are not already attached;
- both arms;
- both feet;
- the tail.
Check the bunny from the front, back, and both sides.
Step 17: Attach the Arms
Place one arm on each upper side of the body.
Angle them slightly inward rather than letting them point straight out.
Sew the flattened top of each arm through several body stitches.
After attaching the first arm, compare the second side before sewing the other one permanently.
Step 18: Attach the Feet
Place one foot on the lower front-left side and one on the lower front-right side of the body.
Angle the feet forward enough that they are clearly visible from the front.
This placement helps the bunny read as seated rather than standing.
Check that both feet begin at similar heights before sewing.
Secure each foot through several body stitches.
Step 19: Attach the Tail
Turn the bunny so the back faces you.
Position the tail around the lower-middle back.
Keep it high enough that it remains visible, but not so low that it pushes the body forward when the bunny sits.
Pin the tail first.
Check the bunny from the side to see whether the body still sits naturally.
Then sew the tail securely around its base.
Final Bunny Check
Inspect the finished bunny from several angles.
Check that:
- the head is centered;
- the face looks straight;
- the ears begin at similar heights;
- the ears remain soft and floppy;
- the arms sit at similar positions;
- the feet create a seated pose;
- the tail is centered;
- the neck seam feels secure;
- no stuffing is visible;
- loose yarn tails are woven in.
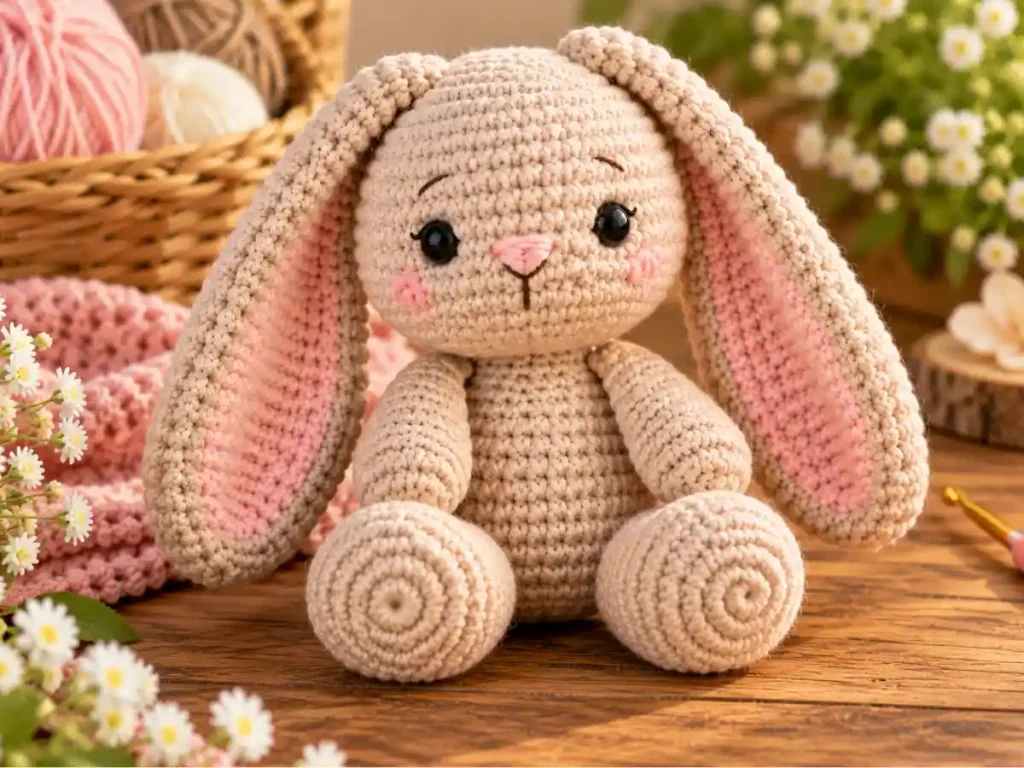
What Should the Finished Crochet Bunny Look Like?
The finished bunny should have a slightly oversized rounded head above a smaller compact body.
The long floppy ears should be the strongest visual feature.
From the front, the rounded feet should create a seated look, while the slim arms stay close to the sides of the body.
From the back, the small round tail should remain visible without lifting the body away from its resting position.
This bunny crochet pattern gets most of its character from the long ears, simple face, and balanced seated assembly rather than complicated shaping.
Common Crochet Bunny Problems and How to Fix Them
Why Does My Bunny Head Look Too Flat?
The head may be under-stuffed, or the crochet fabric may be too loose.
Add stuffing in small amounts and shape the head with your fingers.
If large gaps remain between stitches, use a hook that gives you denser fabric with the same yarn on a future version.
Why Does the Head Lean After Sewing?
The two 12-stitch openings may not have been aligned evenly, or one section of the seam may be tighter.
Check the bunny from the front and sides.
If needed, reopen the uneven section and resew it with more consistent tension.
Why Do the Ears Look Too Stiff?
The ears should not be stuffed.
If they were filled, remove the stuffing.
Also check that you did not sew too far up the ear when attaching it. Most of the ear length should remain free.
Why Are the Ears Uneven?
Long ears make small placement differences easy to see.
Pin both ears before sewing.
Compare the height, angle, and natural fall from the front and side views before committing to the final stitches.
Why Does the Bunny Not Look Seated?
The feet may be attached too high or too far toward the sides.
Move them lower and slightly toward the front so the rounded shape is visible when you look at the bunny straight on.
Why Does the Tail Push the Bunny Forward?
The tail may be attached too low on the back.
Move it slightly higher so it remains visible without acting like a support under the body.
Why Do the Arms Look Bulky?
The arms are designed to stay slim and are unstuffed by default.
If you added stuffing, remove some or leave the arms empty on your next version.
Why Is Stuffing Showing Through?
The fabric may be too loose or the pieces may be overstuffed.
Use enough stuffing to shape each part, but avoid forcing large amounts through the crochet fabric.
Can I Use Different Yarn?
Yes.
A thinner yarn will generally create a smaller bunny, while a thicker yarn will usually create a larger and heavier one.
Changing yarn can also affect how long or floppy the ears appear.
Whatever yarn you choose, use a hook that gives you a dense enough fabric for amigurumi.
Because the finished proportions depend on yarn, hook, tension, stuffing, and assembly, this pattern does not rely on one fixed finished measurement.
More Easy Crochet Amigurumi
If you enjoyed making this bunny, try our crochet bee pattern for another small amigurumi project with clear shaping and assembly steps.
Frequently Asked Questions
Is This Crochet Bunny Pattern Beginner-Friendly?
The pattern uses basic amigurumi shaping, simple increases and decreases, stuffing, embroidery, and sewing.
The parts that need the most attention are matching the 12-stitch head and body openings, keeping the ears symmetrical, and positioning the feet for a seated pose.
If you are comfortable making a magic ring and following stitch counts, the steps are designed to stay clear and manageable.
Is This a Free Crochet Bunny Pattern?
Yes.
The complete written instructions for the head, body, ears, arms, feet, tail, face, and assembly are included in this article.
Why Are the Bunny Ears Left Unstuffed?
Leaving the ears unstuffed keeps them soft and flexible.
Stuffing would make them firmer and more likely to stand away from the head instead of falling naturally.
How Do I Keep the Bunny Ears Floppy?
Do not stuff the ears.
Flatten them gently before sewing, and attach only the narrow base area.
Avoid sewing too far up the sides of the ears.
How Do I Stop the Bunny Head From Leaning?
Align the 12 head stitches with the 12 body stitches evenly before sewing.
Make sure the face points forward and avoid pulling one section of the seam tighter than the others.
Can I Use Safety Eyes Instead of Embroidered Eyes?
You can use another eye finish if you prefer.
Embroidered eyes are the default for this tutorial because they are simple to position and do not require plastic components.
Can I Make the Bunny With Thicker Yarn?
Yes.
The bunny will become larger and heavier, and the ears may also appear proportionally thicker.
Keep the crochet fabric dense enough that the stuffing stays hidden.
Can I Make the Ears Shorter?
Yes, you can shorten the long straight section of the ear by working fewer even rounds.
That changes the proportions, so compare both ears carefully and make the same adjustment on each one.
Finished Amigurumi Bunny
This crochet bunny pattern combines straightforward round shaping with a few strong character details: a rounded head, long floppy ears, a compact seated body, slim arms, rounded feet, a small tail, and a simple embroidered face.
The matching 12-stitch head and body openings create a clean join, while leaving the ears unstuffed helps them fall naturally beside the head.
If you want a free amigurumi bunny with a classic long-eared look and clear step-by-step construction, this pattern gives you a simple structure to follow from the first round through final assembly.
Pattern Notes
This crochet bunny pattern was created for Small Crochet Ideas with a focus on clear stitch-count checkpoints, balanced seated proportions, long floppy ears, and beginner-friendly assembly.
The pattern uses US crochet terminology. Finished size and proportions will vary with yarn, hook, tension, stuffing, and assembly.
