Easy crochet patterns, cute projects, and beginner-friendly ideas to inspire your next make.

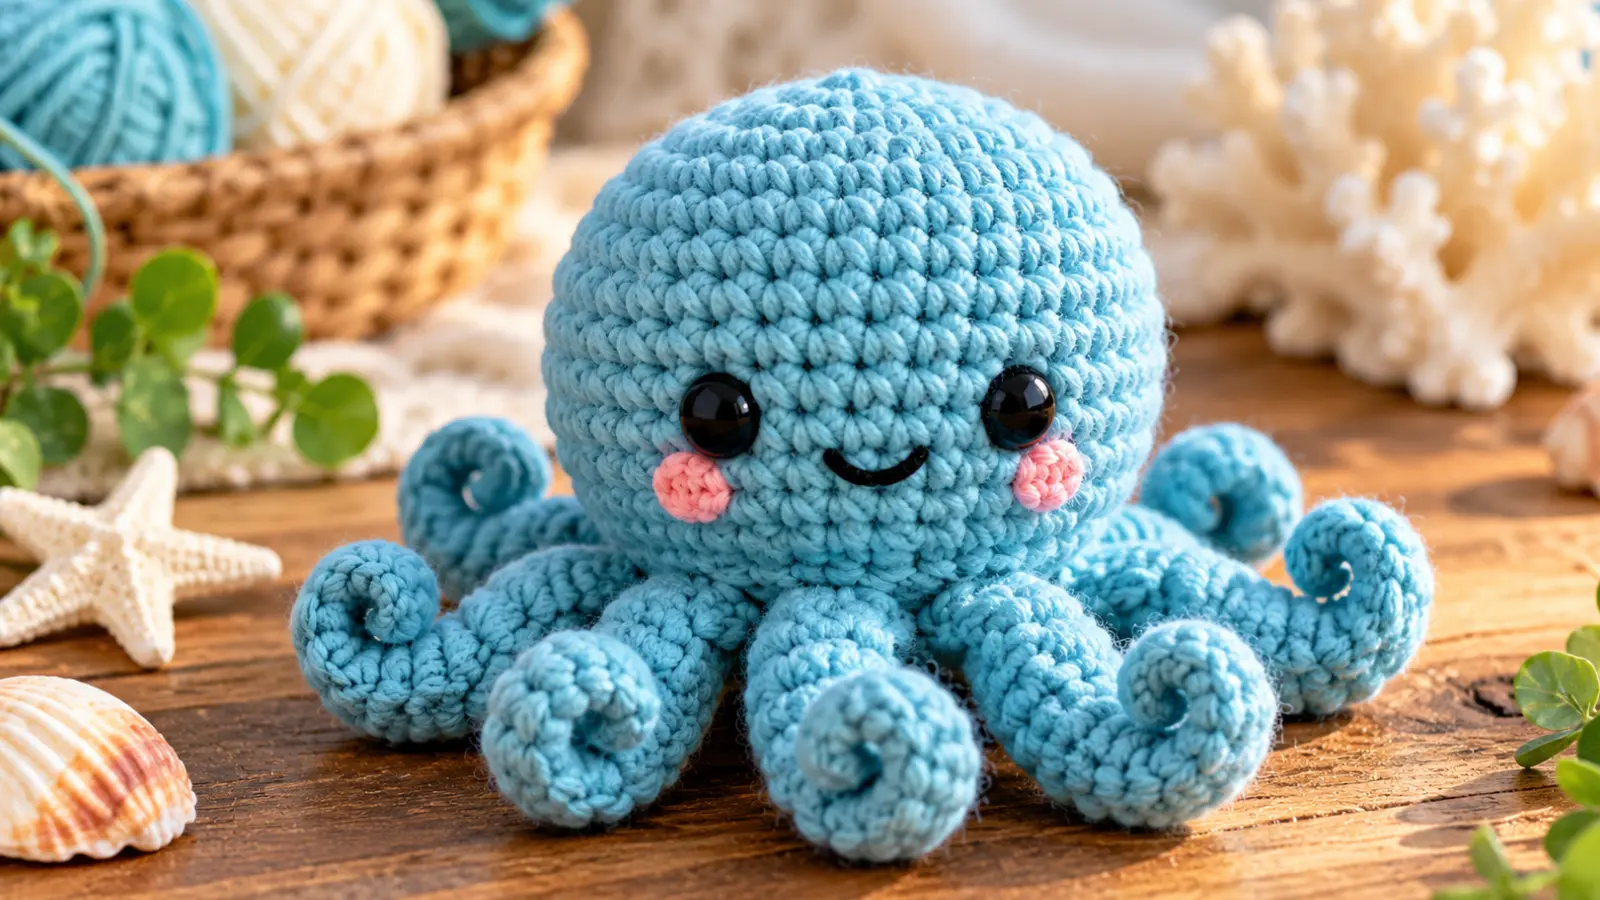
This crochet octopus pattern shows you how to make a small, rounded amigurumi octopus with eight curly tentacles and a simple embroidered face. The entire octopus is built around one main body, and the tentacles are crocheted directly into the lower edge instead of being made separately and sewn on later.
The body grows from a magic ring to 36 stitches, then narrows to a 24-stitch base. Those 24 stitches divide evenly into eight groups, giving each tentacle three body stitches to work from. The tentacles are made through the front loops, while the unused back loops become the hidden bottom closure.
If you are looking for a free crochet octopus pattern with clear stitch counts, straightforward shaping, and no separate limb assembly, this tutorial takes you through the complete construction step by step.
Table of Contents
Crochet Octopus Pattern at a Glance
| Pattern Detail | Construction |
|---|---|
| Project | Small no-sew amigurumi octopus |
| Main body | One continuous piece |
| Maximum stitch count | 36 stitches |
| Tentacle base | 24 stitches |
| Tentacles | 8 |
| Tentacle method | Crocheted directly in FLO |
| Bottom closure | Worked through remaining BLO |
| Separate sewn crochet pieces | 0 |
| Face | Embroidered by default |
| Terminology | US crochet terms |
| Finished size | Varies with yarn, hook, tension, stuffing, and finishing |
The no-sew construction means you do not need to crochet eight separate legs and attach them individually. A yarn needle can still be useful for the embroidered face, weaving in ends, and cinching the final opening closed.
What You’ll Need
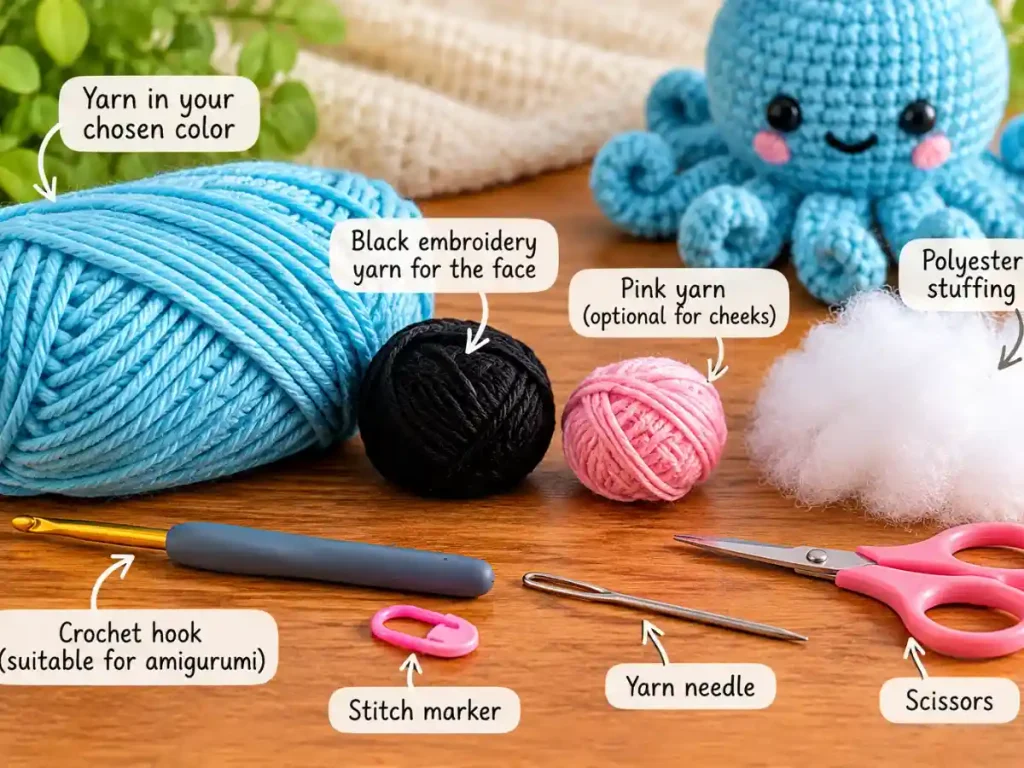
For this crochet octopus, prepare:
- smooth yarn in your chosen octopus color;
- black embroidery yarn or thread for the face;
- optional pink yarn or embroidery thread for cheek details;
- polyester stuffing;
- a crochet hook that creates dense amigurumi fabric with your chosen yarn;
- a stitch marker;
- a yarn needle;
- scissors.
A smooth cotton or cotton-blend yarn can be a practical choice because it makes the stitch structure easy to see, but it is not required.
The finished size will depend on your yarn, hook, tension, stuffing, and finishing, so this pattern does not rely on one fixed measurement.
Crochet Stitches and Abbreviations
This pattern uses US crochet terminology.
For a general reference, see the Craft Yarn Council crochet abbreviations.
- MR — magic ring
- ch — chain
- sc — single crochet
- inc — work 2 single crochets in the same stitch
- dec — single crochet decrease
- FLO — front loop only
- BLO — back loop only
- st / sts — stitch / stitches
The main body is worked in continuous rounds. Place a stitch marker in the first stitch of each round and move it upward as you work.
Before You Start
The construction of this octopus is simple once you understand how the bottom works.
You will begin at the top of the head and increase until the body reaches 36 stitches. After several straight rounds, you will decrease to 24 stitches.
Those 24 stitches are important because they divide evenly into eight groups:
24 stitches ÷ 8 tentacles = 3 body stitches per tentacle
The tentacles are worked directly around that 24-stitch edge through the front loops only.
That leaves the back loops unused underneath the tentacles.
You will then rejoin the yarn through those remaining back loops and decrease:
24 → 18 → 12 → 6
That closes the underside without sewing separate crochet pieces onto the octopus.
The basic order is:
- crochet the top of the head;
- increase to 36 stitches;
- work the rounded body;
- decrease to 24 stitches;
- embroider the face;
- add most of the stuffing;
- crochet eight tentacles directly in FLO;
- rejoin the yarn through the unused BLO;
- decrease the bottom from 24 to 6 stitches;
- finish stuffing;
- cinch the small opening closed;
- weave in the ends and shape the tentacles.
How to Crochet the Octopus Body
Step 1: Start the Top of the Head
With your main octopus color, make a magic ring.
Round 1: Work 6 sc into the magic ring. [6]
Pull the ring closed.
Place your stitch marker in the first stitch.
Round 2: Inc in each stitch around. [12]
Head checkpoint
You should have a small flat circle with 12 stitches.
Count carefully before continuing because the next rounds increase evenly around this circle.
Step 2: Widen the Head
Round 3: (sc, inc) ×6. [18]
Round 4: (2 sc, inc) ×6. [24]
Round 5: (3 sc, inc) ×6. [30]
Round 6: (4 sc, inc) ×6. [36]
At this point, the top of the octopus has reached its widest stitch count.
The shaping sequence is:
6 → 12 → 18 → 24 → 30 → 36
Step 3: Build the Rounded Head and Body
Rounds 7–11: Sc in each stitch around. [36]
These five even rounds add depth without increasing the circumference.
As you work, keep your tension consistent. Dense fabric helps prevent the stuffing from showing through later.
Body checkpoint
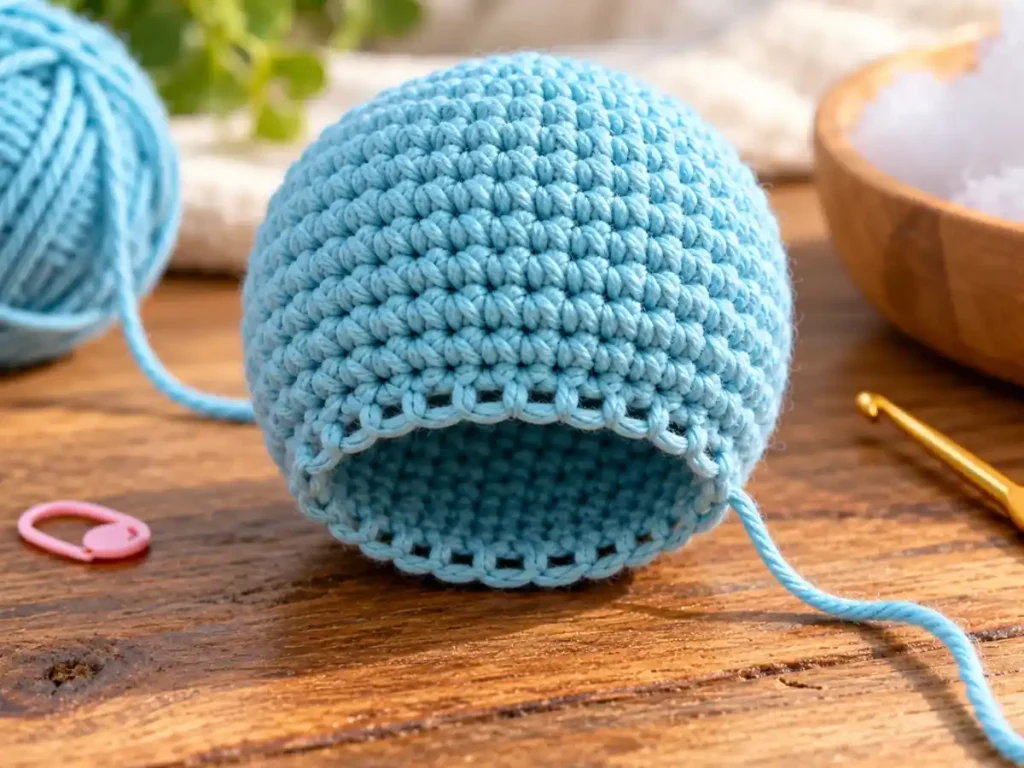
By the end of Round 11, the piece should have a rounded cup or dome-like shape rather than looking flat.
Do not stuff yet if doing so would make the face difficult to embroider.
Step 4: Shape the Lower Body
Begin narrowing the body.
Round 12: (4 sc, dec) ×6. [30]
Round 13: (3 sc, dec) ×6. [24]
Stop decreasing here.
Do not close the opening.
The 24-stitch edge is intentional because it will become the base for all eight tentacles.
Tentacle-base checkpoint
Count the round carefully.
You need exactly:
24 stitches
That gives:
24 ÷ 8 = 3 stitches for each tentacle
If your count is different, correct it before beginning the tentacles.
Add the Octopus Face
It is easier to embroider the face before the bottom becomes crowded with tentacles and stuffing.
Step 5: Mark the Face Placement
Place two temporary pins or stitch markers where you want the eyes.
Look at the octopus from the front.
Check that:
- both markers sit at a similar height;
- the spacing looks balanced;
- there is enough room between them for a small smile;
- the face appears centered on the rounded body.
Exact spacing can vary depending on your yarn, hook, tension, and shaping, so visual balance is more useful than forcing one fixed measurement.
Step 6: Embroider the Face
Use black embroidery yarn or thread for the eyes.
Make two small embroidered eyes where you placed the markers.
Add a short embroidered smile below and between the eyes.
If you want extra detail, add small pink cheek stitches on either side of the face.
Keep the embroidery tension gentle. Pulling the yarn too tightly can dent the crochet fabric.
Plastic safety eyes can be used as an optional alternative if that is the finish you prefer, but this tutorial does not make baby- or child-safety claims about plastic eye components.
Once the face is finished, begin stuffing the octopus.
Add stuffing gradually and shape the rounded body with your fingers.
Do not pack the stuffing tightly against the 24-stitch opening because you still need access to the loops around that edge.
Crochet the 8 Tentacles Directly Onto the Body
The tentacles are the key no-sew feature of this pattern.
Instead of making eight separate pieces, each tentacle grows directly from the 24-stitch body edge.
Step 7: Divide the 24-Stitch Base
Each tentacle uses three stitches from Round 13.
The math is:
3 body stitches × 8 tentacles = 24 stitches
You can place temporary stitch markers every three stitches if that helps you keep track of the groups.
All tentacles will be worked through the front loops only.
Do not work through both loops.
The unused back loops need to remain available for the bottom closure.
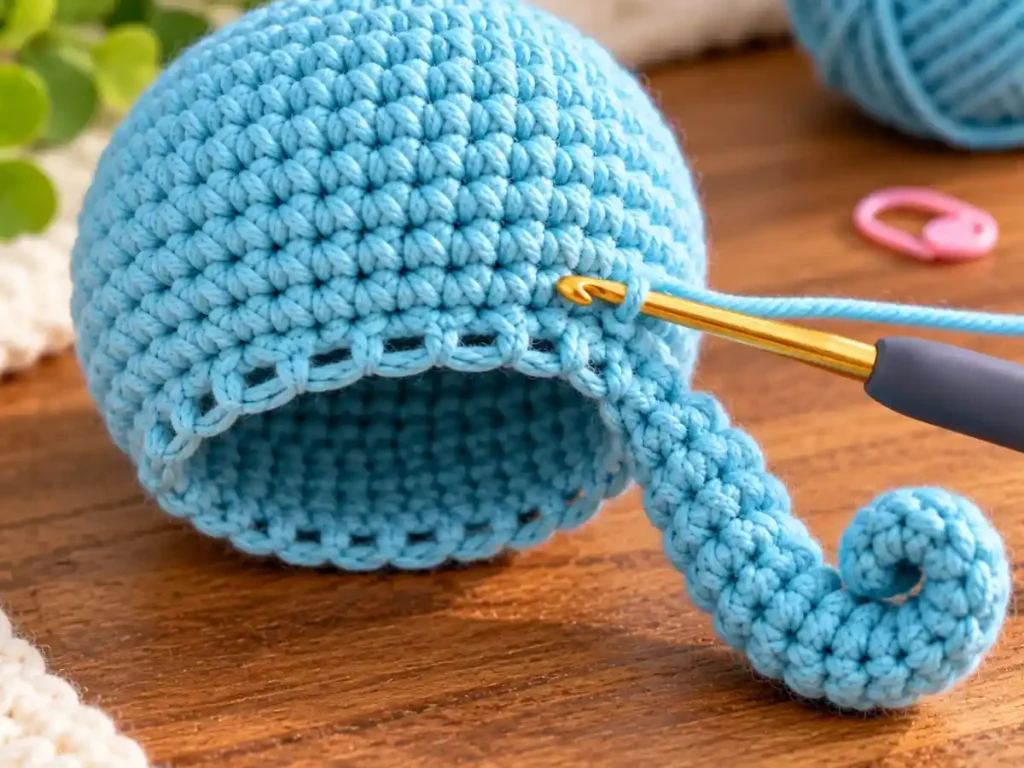
Step 8: Crochet the First Tentacle
Working in the front loops only:
1. Sc in FLO of the next stitch.
2. Sc in FLO of the next stitch.
3. Sc in FLO of the next stitch.
Without moving to another body stitch, make:
Ch 11.
You now have one chain extending away from the body.
Starting in the second chain from the hook, work:
2 sc in each chain back toward the body.
Because the first chain next to the hook is skipped, you have 10 usable chain stitches.
That means:
10 chain stitches × 2 sc in each = 20 sc
Working two single crochets into each chain creates extra stitch density, which encourages the tentacle to curl.
When you reach the body again, continue with the next unused front loop.
Step 9: Repeat for All Eight Tentacles
Repeat the same three-stitch base sequence around the entire 24-stitch edge.
For each tentacle:
- sc in FLO of the next stitch;
- sc in FLO of the next stitch;
- sc in FLO of the next stitch;
- ch 11;
- starting in the second chain from the hook, work 2 sc in each chain back toward the body.
Complete the sequence eight times.
Tentacle math checkpoint
Each tentacle uses:
3 body stitches
Eight tentacles use:
3 × 8 = 24 body stitches
You should now have exactly:
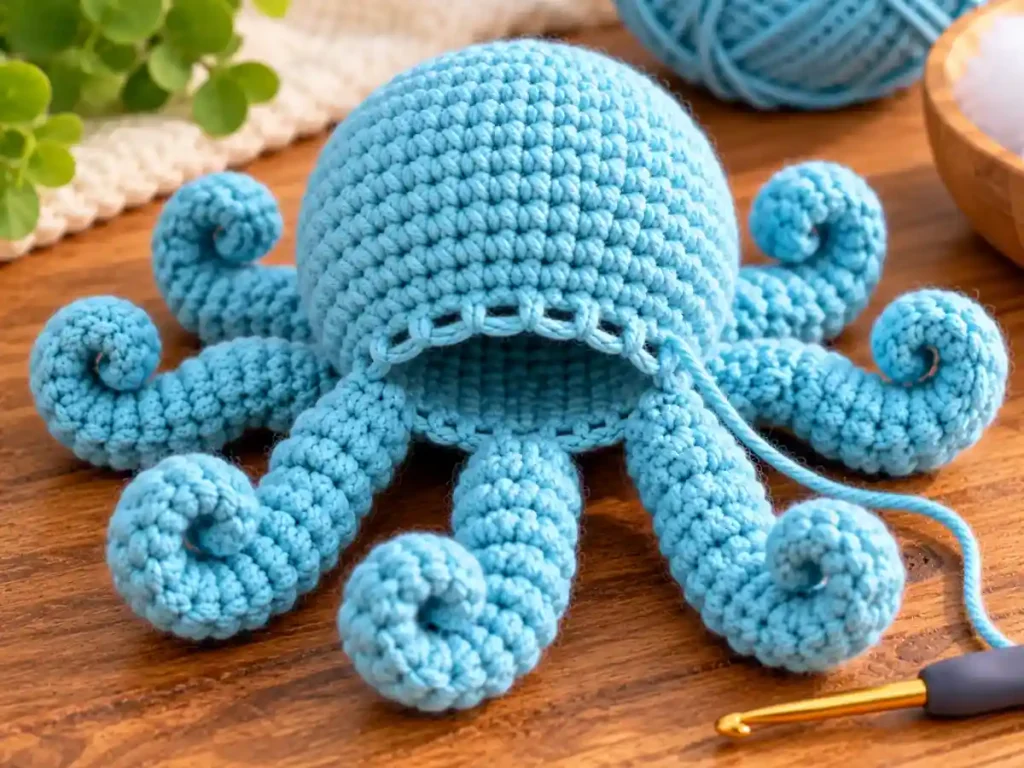
8 curly tentacles
Before moving on, count them.
If you have seven or nine, check how the 24 base stitches were divided before closing the bottom.
What the tentacles should look like
Each tentacle should curl naturally because of the two single crochets worked into every chain stitch.
The curls do not need to look perfectly identical.
Small differences in tension can make one curl tighter than another.
That is normal for handmade crochet.
Close the Bottom Without Sewing on Separate Pieces
The tentacles were worked through the front loops of Round 13.
The back loops from those same 24 stitches should still be visible underneath.
Those back loops form the foundation for the hidden bottom closure.
Step 10: Rejoin the Yarn in the Remaining Back Loops
Fasten off after the final tentacle.
Turn or position the octopus so you can comfortably reach the unused back loops underneath the tentacle round.
Join the main-color yarn into one unused back loop.
From this point, work only through the remaining back loops.
Check that you are not accidentally picking up the tentacle loops again.
Step 11: Begin the Bottom Closure
Work:
Bottom Round 1: (2 sc, dec) ×6. [18]
This round consumes all 24 remaining back loops and reduces the opening to 18 stitches.
The math is:
Each repeat consumes 4 stitches:
- 2 single crochets;
- 2 stitches used in one decrease.
Repeated six times:
4 × 6 = 24 stitches consumed
The round produces:
3 stitches × 6 = 18 stitches
Next work:
Bottom Round 2: (sc, dec) ×6. [12]
The opening should now be noticeably smaller.
Pause here before the final decrease.
Step 12: Finish Stuffing and Close the Bottom
Add the remaining stuffing through the 12-stitch opening.
Shape the body gently with your fingers.
Try to keep the stuffing rounded through the head and body rather than pushing a large amount directly against the base.
Once you are satisfied with the shape, work:
Bottom Round 3: Dec ×6. [6]
Fasten off, leaving a tail.
Thread the tail onto a yarn needle.
Pass it through the remaining six stitches and pull gently to cinch the small opening closed.
Secure the yarn and weave in the end.
No separate tentacle pieces have been sewn onto the body.
That is why this construction can accurately be described as no-sew amigurumi, even though a yarn needle may still be used for finishing and embroidery.
Shape the Curly Tentacles
After closing the bottom, turn the octopus upright.
Use your fingers to separate the eight curls.
If two tentacles are twisted around each other, gently unwind them.
You can also guide individual curls around your finger to help them sit more evenly.
Avoid pulling hard on the tentacle chains because stretching them can loosen the curl.
The curls do not need to form eight identical spirals. The goal is a balanced ring of tentacles around the base.
Final Octopus Check
Before weaving in any remaining tails, inspect the finished octopus.
Check that:
- there are exactly eight tentacles;
- the head and body look rounded;
- the face appears centered;
- the tentacles are spread around the full base;
- the underside is securely closed;
- no stuffing is visible;
- the curls are not tangled together;
- all yarn ends are secured.
Turn the octopus from side to side as you check it.
The tentacles should form a clear lower silhouette beneath the rounded body.
What Should the Finished Crochet Octopus Look Like?
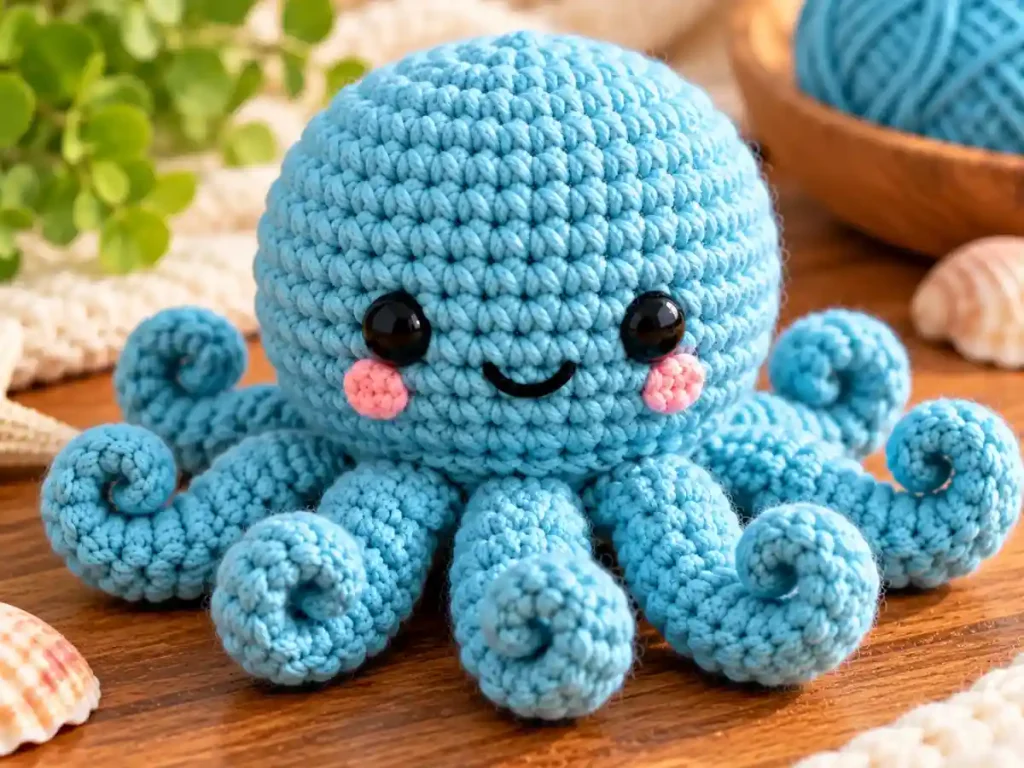
The finished octopus should have one large rounded head-and-body shape with eight short curly tentacles around the bottom.
The face should sit on the front of the rounded section rather than too close to the tentacle edge.
From underneath, the closure should sit behind the tentacles rather than looking like a separate attached piece.
This octopus crochet pattern gets most of its character from the simple round body, curled tentacles, and facial embroidery instead of complicated shaping or assembly.
Common Crochet Octopus Problems and How to Fix Them
Why Is My Octopus Body Too Flat?
The body may need more stuffing, or the straight rounds may have been compressed during handling.
Add stuffing gradually and shape the rounded section with your fingers.
Avoid forcing too much stuffing into one area.
Why Aren’t My Tentacles Curling?
Check the return stitches.
The pattern uses:
2 sc in each chain stitch
If you worked only one single crochet in each chain, the tentacle will be much straighter.
Yarn type and tension can also affect how tightly the curl forms.
Why Do I Have Fewer Than Eight Tentacles?
Check the body base.
You should have exactly 24 stitches after Round 13.
Each tentacle uses three body stitches:
24 ÷ 3 = 8
If one tentacle accidentally used four base stitches, there will not be enough stitches left for all eight.
Why Do I Have More Than Eight Tentacles?
The opposite problem can happen if one or more tentacles use fewer than three body stitches.
Count the groups carefully.
Each tentacle must use three consecutive front loops from the 24-stitch base.
Why Can’t I Find the Back Loops for the Bottom Closure?
Make sure the tentacle round was worked through the front loops only.
If both loops were used, the back loops will no longer remain available as a clean separate edge.
Look underneath the tentacles for the unused loop from each of the 24 body stitches.
Why Does the Bottom Closure Look Uneven?
Check that the first closure round uses all 24 remaining back loops.
The correct sequence is:
24 → 18 → 12 → 6
If one loop was skipped, the decrease pattern may shift.
Why Is Stuffing Showing Through?
The crochet fabric may be too loose, or the body may be overstuffed.
Use a hook that creates dense fabric with your yarn and add stuffing in small amounts.
The body should hold its shape without being stretched tightly.
Why Are the Tentacles Crowded Together?
The curls may simply need separating after the bottom is closed.
Gently arrange the eight tentacles around the base with your fingers.
Do not pull on the chains to create space.
Why Does the Face Look Off-Center?
Facial placement is easier to correct before embroidery is secured.
Use temporary pins or stitch markers first and check the octopus from the front.
Remember that the beginning of the crochet round does not necessarily need to become the visual center of the face.
Can I Use Different Yarn?
Yes.
A thinner yarn will generally produce a smaller octopus, while a thicker yarn will usually make a larger and heavier one.
Changing the yarn can also affect how the tentacles curl.
A soft, flexible yarn may create looser curls, while a firmer fabric can produce more defined spirals.
Whatever yarn you choose, use a crochet hook that gives you dense amigurumi fabric so the stuffing stays inside.
Because yarn, hook, tension, stuffing, and finishing all affect the final result, this pattern does not use one fixed finished size.
Can I Make the Tentacles Longer?
You can change the starting chain to experiment with longer tentacles, but doing so changes the proportions and curl of the finished octopus.
The instructions in this pattern use:
Ch 11
followed by:
2 sc in each of the 10 usable chain stitches
That construction has been mathematically audited as part of this written pattern.
If you change the chain length, make the same adjustment to all eight tentacles so the design remains balanced.
More No-Sew Amigurumi Patterns
If you enjoy projects with minimal assembly, browse our No-Sew Amigurumi patterns for more small crochet ideas.
You can also try our crochet duck pattern, which uses a different no-sew construction to create a small amigurumi duck.
Frequently Asked Questions
Is This Crochet Octopus Pattern Really No-Sew?
Yes, in the amigurumi construction sense.
No separate crochet pieces need to be sewn onto the octopus.
The eight tentacles are worked directly into the body.
A yarn needle may still be used to embroider the face, weave in ends, or cinch the final six-stitch opening closed.
How Many Tentacles Does This Crochet Octopus Have?
The pattern makes exactly eight tentacles.
The 24-stitch body base is divided into eight equal sections of three stitches:
24 ÷ 8 = 3 stitches per tentacle
Why Are the Tentacles Worked in Front Loops Only?
Working the tentacles through the front loops leaves the back loops unused.
Those remaining back loops become the foundation for the bottom closure.
This lets you create the tentacles and close the body without making a separate bottom piece.
How Do the Crochet Tentacles Curl?
Each tentacle begins with a chain of 11.
Starting in the second chain from the hook, you work:
2 sc in each chain
There are 10 usable chain stitches, producing 20 single crochets along the return.
The extra stitches packed along the chain encourage it to curl.
Is This a Free Crochet Octopus Pattern?
Yes.
The complete written instructions for the body, face, eight tentacles, bottom closure, stuffing, and finishing are included in this article.
Can I Make This Octopus With Thicker Yarn?
Yes.
Thicker yarn will generally produce a larger and heavier octopus.
You may also notice a difference in the firmness and curl of the tentacles.
Choose a hook that creates dense enough fabric to keep the stuffing from showing.
Can I Make the Tentacles Longer?
You can experiment with a longer starting chain, but that changes the proportions and curl.
If you make an adjustment, use the same number of chains for all eight tentacles.
Do I Need to Make Eight Separate Tentacle Pieces?
No.
All eight tentacles are crocheted directly into the 24-stitch lower body edge.
There are no separate tentacle pieces to attach later.
Finished No-Sew Amigurumi Octopus
This crochet octopus pattern combines a simple rounded body with an integrated eight-tentacle construction.
The body grows from 6 to 36 stitches, decreases to a 24-stitch tentacle base, and uses that base evenly:
24 stitches ÷ 8 tentacles = 3 stitches per tentacle
Working the tentacles through the front loops leaves the back loops available for the hidden underside closure, which decreases cleanly from:
24 → 18 → 12 → 6
The result is a compact no-sew amigurumi octopus with no separate crochet limbs to attach.
Careful counting at the 24-stitch base, consistent tentacle construction, and gradual stuffing are the most important parts of the project.
Pattern Notes
This crochet octopus pattern was created for Small Crochet Ideas with a focus on clear stitch-count checkpoints, a true eight-tentacle layout, direct no-sew construction, and beginner-friendly finishing.
The pattern uses US crochet terminology. Finished size and proportions will vary depending on yarn, hook, tension, stuffing, and finishing.
