Easy crochet patterns, cute projects, and beginner-friendly ideas to inspire your next make.

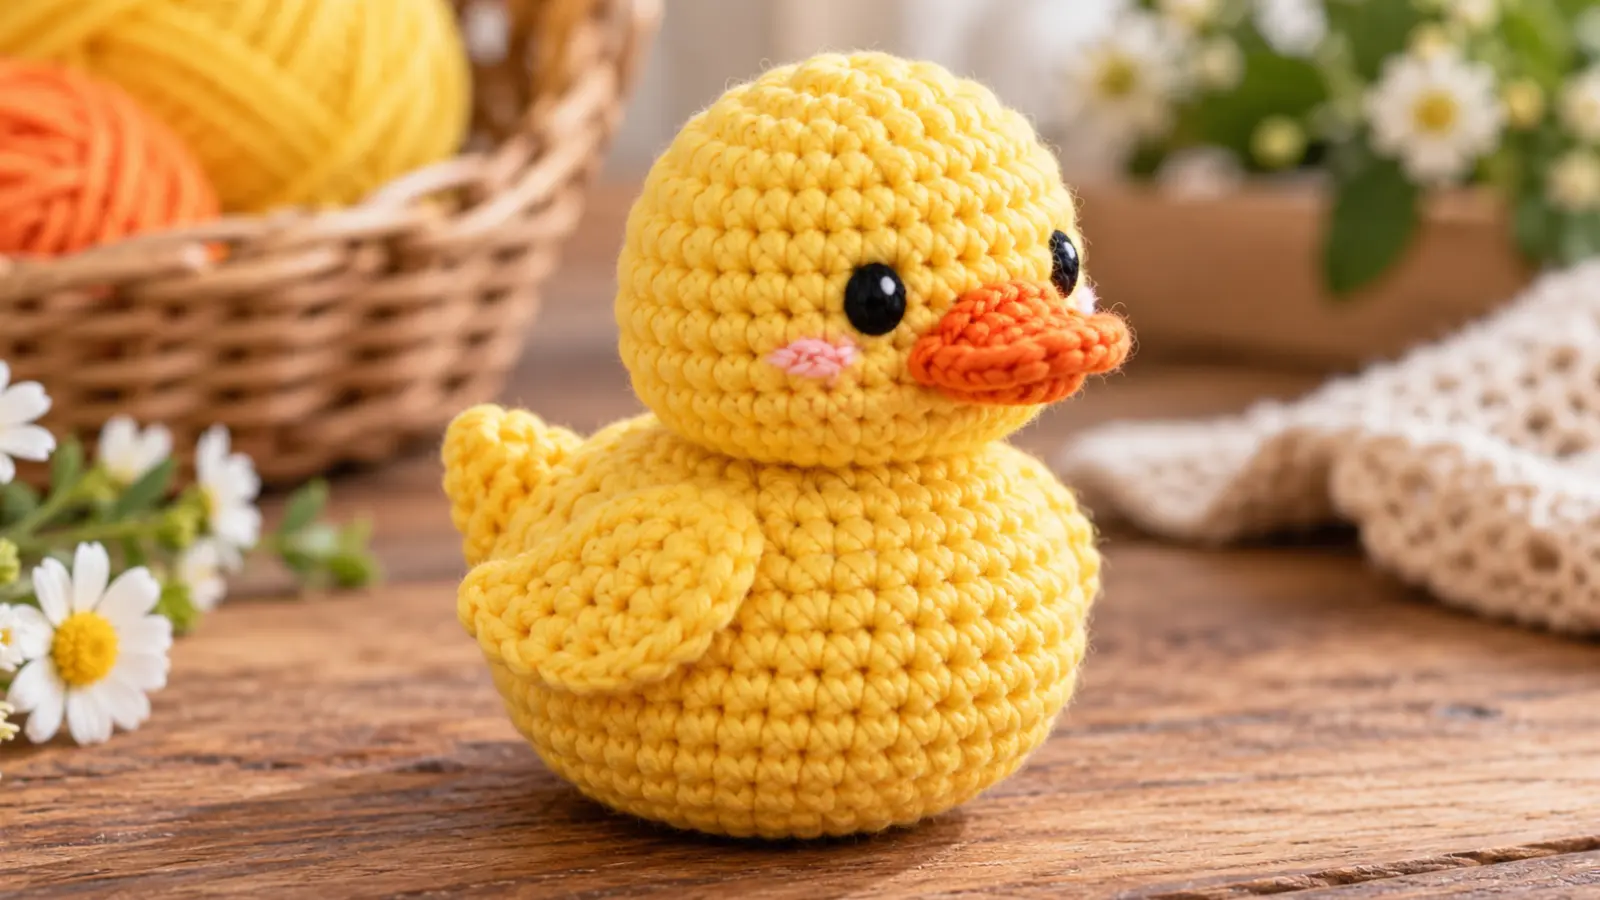
This crochet duck pattern shows you how to make a small yellow amigurumi duck with a rounded body, simple wings, a tiny tail, an orange beak, and an embroidered face. The body and head are worked as one continuous piece, and the wings, tail, and beak are crocheted directly onto the finished shape.
That means there are no separate crochet pieces to sew together at the end. You will still use a yarn needle for the face and for weaving in yarn tails, but the construction stays simple and beginner-friendly.
If you are looking for a free crochet duck pattern with clear stitch counts, practical checkpoints, and minimal assembly, this tutorial takes you from the first magic ring to the final shaping.
Table of Contents
Crochet Duck Pattern at a Glance
| Pattern detail | What to expect |
|---|---|
| Project | Small yellow amigurumi duck |
| Main construction | Body and head worked continuously |
| Wings | Crocheted directly onto the body |
| Tail | Crocheted directly onto the body |
| Beak | Crocheted directly onto the head |
| Face | Embroidered |
| Separate crochet pieces to sew on | None |
| Terminology | US crochet terms |
| Finished size | Varies with yarn, hook, tension, stuffing, and finishing |
The main shape is worked from the bottom of the body upward. The lower section widens to create a plump body, narrows slightly at the neck area, then expands again for the head.
What You’ll Need
For this crochet duck pattern, prepare:
- smooth yellow yarn;
- a small amount of orange yarn for the beak;
- black embroidery yarn or thread for the eyes;
- optional pink yarn or thread for cheek details;
- polyester stuffing;
- a crochet hook that gives you a dense amigurumi fabric with your chosen yarn;
- a stitch marker;
- a yarn needle;
- scissors.
A smooth cotton or cotton-blend yarn is a practical option because the stitches and shaping are easy to see. Another fiber can also work as long as the fabric is dense enough to keep the stuffing from showing through.
Crochet Stitches and Abbreviations
This pattern uses US crochet terminology.
For a general reference, see the Craft Yarn Council crochet abbreviations.
- MR — magic ring
- ch — chain
- sl st — slip stitch
- sc — single crochet
- hdc — half double crochet
- inc — work 2 single crochets in the same stitch
- dec — single crochet decrease, working two stitches together
- st / sts — stitch / stitches
The main body and head are worked in continuous rounds. Move your stitch marker to the first stitch of each new round so you can keep the count accurate.
Before You Start
The most important thing to understand before beginning is that the duck is built as one main piece.
The body begins at the bottom and widens to 30 stitches. It then narrows to 18 stitches before expanding again to 24 stitches for the head.
After the head is closed, the wings, tail, and beak are crocheted directly onto the finished shape.
This is a no-sew construction in the sense that no separate crochet pieces need to be sewn onto the duck. You will still use a yarn needle for embroidery and for weaving in loose ends.
The basic order is:
- crochet the lower body;
- stuff the body;
- continue directly into the head;
- finish stuffing and close the top;
- crochet the first wing directly onto the body;
- crochet the second wing;
- add the tail directly to the back;
- add the orange beak directly to the face;
- embroider the eyes;
- check the final shape and symmetry.
How to Crochet the Duck Body
Step 1: Start the Base
With yellow yarn, make a magic ring.
Round 1: Work 6 sc into the magic ring. [6]
Pull the ring closed.
Place a stitch marker in the first stitch.
Round 2: Inc in each stitch around. [12]
Round 3: (sc, inc) ×6. [18]
Base checkpoint
At this stage, the work should look like a small flat circle.
Count the stitches before continuing. A missed increase here can affect the shape of the body later.
Step 2: Widen the Body
Round 4: (2 sc, inc) ×6. [24]
Round 5: (3 sc, inc) ×6. [30]
The base is now at its widest stitch count.
The fabric may still look mostly flat at this point. The next rounds will add depth without adding more stitches.
Step 3: Build the Chubby Lower Body
Rounds 6–8: Sc in each stitch around. [30]
These straight rounds create the fuller lower section of the duck.
Body checkpoint
By the end of Round 8, the piece should begin to look rounded and three-dimensional rather than flat.
The lower body should feel wider than the section that will become the neck.
Keep your tension consistent so the sides do not develop visible gaps.
Step 4: Narrow the Upper Body
Round 9: (3 sc, dec) ×6. [24]
Round 10: (2 sc, dec) ×6. [18]
The reduction from 30 stitches to 18 stitches creates the transition between the plump body and the head.
Pause here and begin stuffing.
Add stuffing gradually to the lower body.
Focus on keeping the base rounded and evenly filled. Avoid packing the stuffing too tightly, especially near the 18-stitch opening, because the next round needs room to expand for the head.
Continue Into the Duck Head
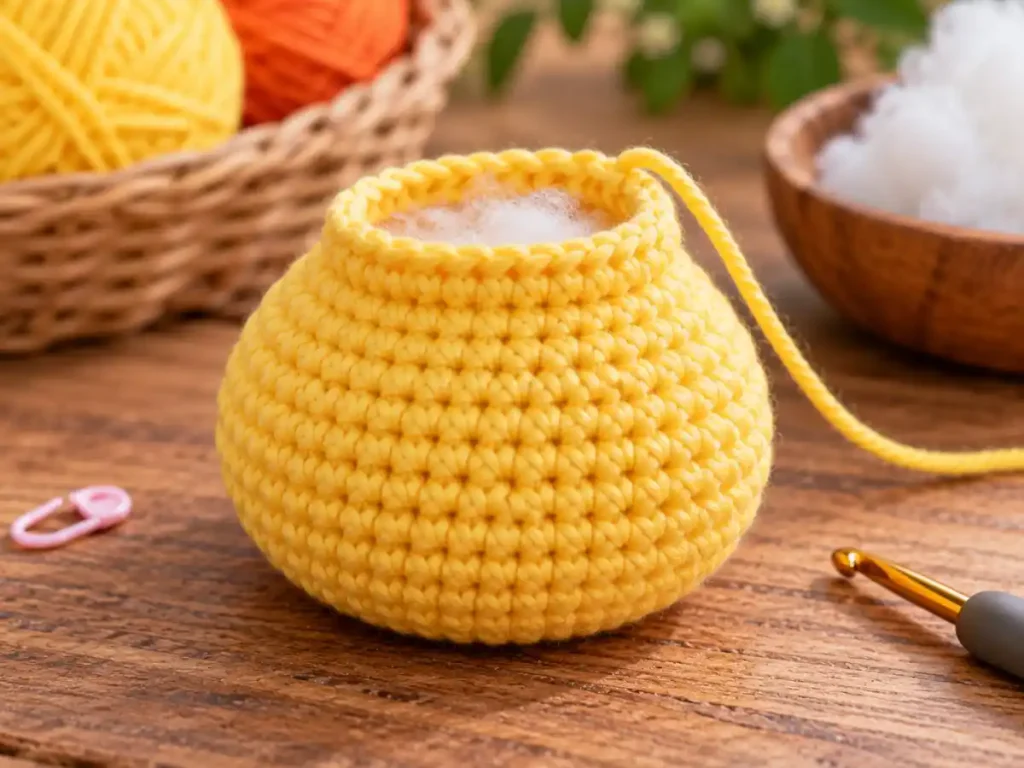
The head is not a separate piece. It continues directly from the upper body.
Step 5: Expand for the Head
Round 11: (2 sc, inc) ×6. [24]
This round increases the stitch count from 18 to 24 and begins the head section.
Transition checkpoint
You should be able to see a slight narrowing between the fuller body and the new head section.
The change does not need to look like a sharp neck. A gentle transition is enough.
Step 6: Build the Rounded Head
Rounds 12–15: Sc in each stitch around. [24]
These straight rounds add height to the head without making it wider.
Keep the stitch count at 24 for every round.
If the head begins leaning to one side, check whether the stuffing underneath is uneven.
Step 7: Close the Head
Round 16: (2 sc, dec) ×6. [18]
Round 17: (sc, dec) ×6. [12]
Pause and finish stuffing the head.
Add small amounts at a time and shape the head with your fingers as you fill it.
The head should feel rounded but not rigid.
Round 18: Dec ×6. [6]
Fasten off, leaving a tail.
Use the yarn tail to close the remaining opening.
Weave the end securely into the body.
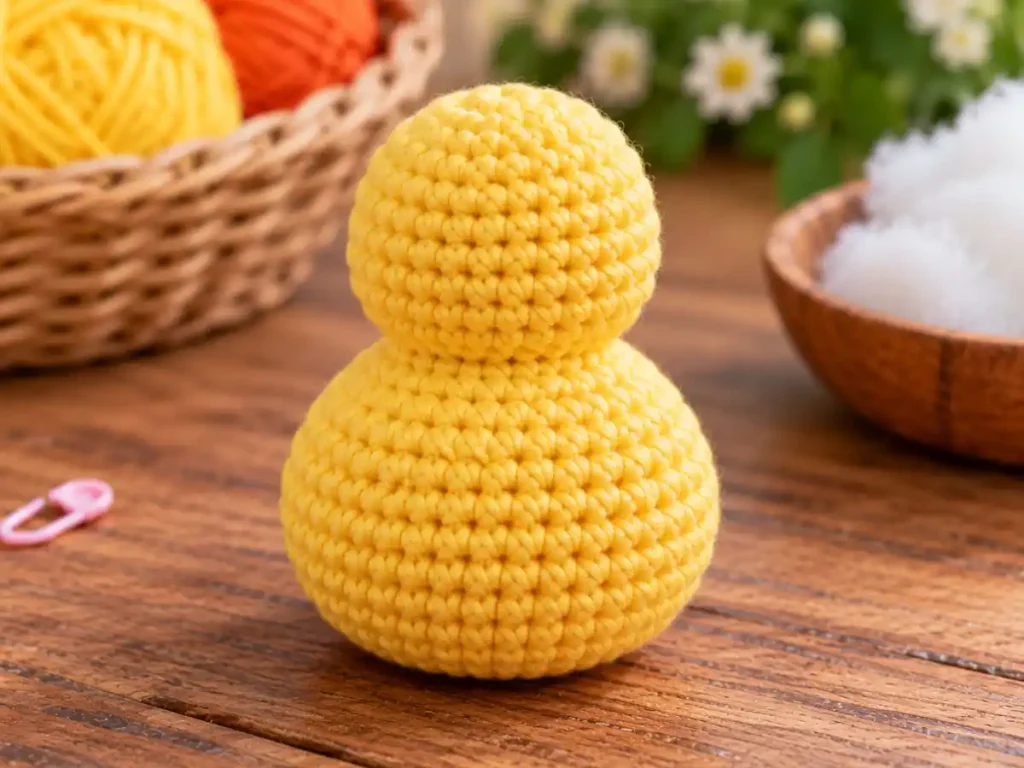
Main Shape Checkpoint
The completed yellow shape should have:
- a wide, rounded lower body;
- a narrower transition above the body;
- a smaller rounded head;
- no separate head seam;
- even stuffing with no obvious gaps.
The stitch-count sequence for the main piece is:
6 → 12 → 18 → 24 → 30 → 30 → 30 → 30 → 24 → 18 → 24 → 24 → 24 → 24 → 24 → 18 → 12 → 6
Crochet the Wings Directly Onto the Body
The wings are added after the main yellow shape is complete.
You do not make separate wings and sew them on.
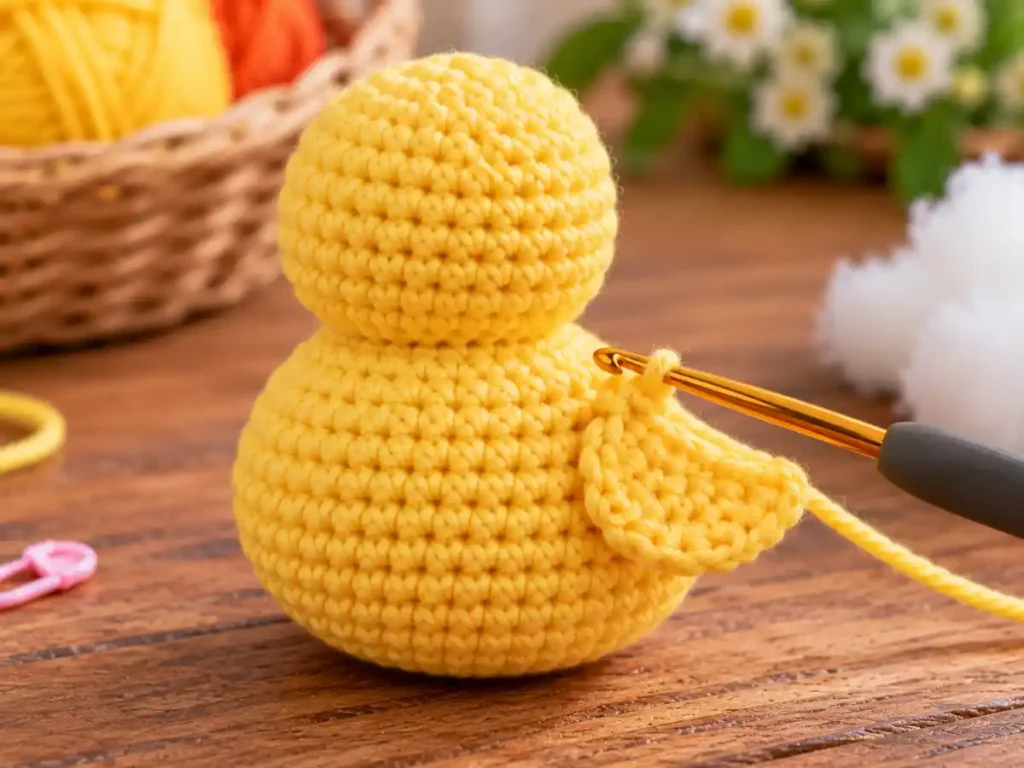
Step 8: Crochet the First Wing
Look at the duck from the front and choose a point on one side of the body around the Round 6–7 area.
Join yellow yarn directly to a body stitch.
Ch 5.
Starting in the second chain from the hook, work:
sc, hdc, dc, hdc
Sl st into the next body stitch.
Fasten off.
Weave the yarn end into the body.
The chain and return stitches create a small tapered wing shape attached directly to the duck.
Step 9: Crochet the Second Wing
Turn the duck so you can see both sides clearly.
Choose a matching point on the opposite side.
Repeat:
Ch 5.
Starting in the second chain from the hook:
sc, hdc, dc, hdc
Sl st into the next body stitch.
Fasten off and weave in the end.
Wing placement checkpoint
Look at the duck from the front.
Check that:
- both wings begin at a similar height;
- the wings angle in a similar direction;
- neither wing is much higher or lower than the other.
Because the main body is worked in continuous rounds, the exact stitch position can shift slightly with tension. Visual symmetry is more useful here than forcing one exact numbered stitch.
Add the Tail
The tail is also crocheted directly onto the body.
Step 10: Crochet the Tail at the Back
Find the center back of the duck.
Join yellow yarn around the lower-middle part of the body, close to the Round 7 area.
Ch 3.
Starting in the second chain from the hook, work:
sl st, sc
Sl st into the adjacent body stitch.
Fasten off and weave in the end.
The result should be a small pointed tail.
Tail checkpoint
Check the duck from the side and back.
The tail should sit near the center rather than pulling strongly toward one side.
Crochet the Orange Beak Directly Onto the Head
The beak is worked directly onto the front of the head rather than made separately.
Step 11: Add the Beak
Find the center front of the head.
Before joining the orange yarn, look at the duck from both the front and side to make sure the position is not too high or too low.
Join orange yarn directly to a front head stitch.
Ch 4.
Starting in the second chain from the hook, work:
sc, hdc, 3 sc in the last chain
Continue along the opposite side of the foundation chain:
hdc, sc
Sl st into a nearby head stitch at the same face area to anchor the opposite end of the beak.
Fasten off and weave in the yarn ends.
The beak has 7 worked stitches around the chain:
1 sc + 1 hdc + 3 sc + 1 hdc + 1 sc = 7 stitches
Beak checkpoint
The beak should sit near the center front of the head and project slightly outward.
The exact width and angle will vary with yarn, tension, and placement.
If the beak looks noticeably crooked, it is easier to redo the attachment before adding the eyes.
Add the Duck Face
Step 12: Mark the Eye Placement
Before embroidering the eyes, use two temporary stitch markers or small pins to test the placement.
Place one on each side of the beak.
Look at the duck from the front.
Adjust until the eyes appear balanced.
Step 13: Embroider the Eyes
Use black embroidery yarn or thread.
Make two small embroidered eyes.
Keep the stitches simple and avoid pulling too tightly, because strong embroidery tension can dent the stuffed head.
If you want to add a little extra color, use a small amount of pink yarn or thread for subtle cheek stitches.
Embroidered eyes are the default finish for this pattern.
Final Duck Check
Once the face is complete, inspect the duck from several angles.
Check that:
- the lower body is rounded;
- the head sits above the body without leaning strongly;
- the wings are at similar heights;
- the tail sits near the center back;
- the beak is centered on the face;
- the eyes look balanced;
- no stuffing is visible;
- loose yarn tails have been woven in.
If the duck feels slightly uneven, gently reshape the stuffing with your fingers.
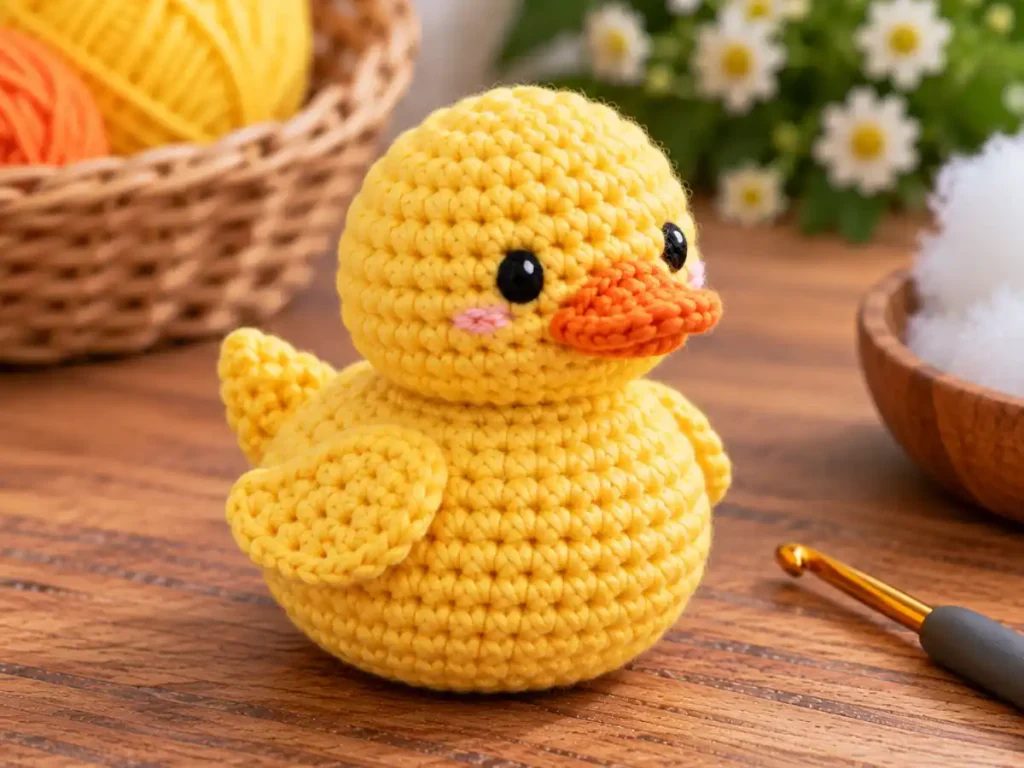
What Should the Finished Duck Look Like?
The finished duck should have a compact, rounded silhouette.
The lower body is the widest section, while the head is slightly smaller.
The yellow wings sit at the sides, the small tail points from the back, and the orange beak creates the strongest facial detail.
This duck crochet pattern is intentionally simple. The shape depends more on balanced proportions and careful placement than on complicated assembly.
Why This Is a No-Sew Duck Pattern
Many amigurumi projects are made from several separate parts that need to be pinned and sewn together.
This design takes a different approach.
The body and head are one continuous piece.
The wings are crocheted directly onto the body.
The tail is crocheted directly onto the back.
The beak is crocheted directly onto the head.
So there are no separate crochet pieces that need to be sewn onto the duck.
You will still use a yarn needle for embroidered facial details and for weaving in yarn ends, so the pattern should not be described as completely needle-free.
The advantage is that there is much less assembly at the end.
Common Crochet Duck Problems and How to Fix Them
Why Does My Duck Body Look Too Flat?
The lower body may need more stuffing, or the fabric may be too loose.
Add stuffing in small amounts and shape the body with your fingers.
If the stitch gaps are large, a hook that creates denser fabric may work better with the same yarn.
Why Does the Head Look Too Small?
Check the stitch count around Round 11.
The upper body should narrow to 18 stitches in Round 10, then increase back to 24 stitches in Round 11.
If the increase round was missed or incomplete, the head may look narrower than intended.
Why Does the Duck Lean to One Side?
Uneven stuffing is a common cause.
Press and reshape the lower body so the stuffing is distributed more evenly.
Also check that the head was stuffed evenly before the top was closed.
Why Are the Wings Uneven?
One wing may have been attached higher than the other.
Before making the second wing, compare the height from the front.
If the difference is obvious, remove the second attachment and move it to a better matching position.
Why Does the Beak Look Crooked?
The orange yarn may have been joined slightly off-center.
Use the center front of the head as a visual guide before beginning the beak.
Temporary stitch markers can help you check the position before committing to the attachment.
Why Is the Tail Off-Center?
The back of a spiral-worked amigurumi can be harder to judge than the front.
Use the wings and face as reference points, then rotate the duck until you can identify the visual center back.
Attach the tail only after checking from both the back and side.
Why Is Stuffing Showing Through?
The fabric may be too loose or the duck may be overstuffed.
Use enough stuffing to shape the piece, but avoid forcing large amounts through the crochet fabric.
A denser gauge can also help hide the filling.
Can I Use Different Yarn?
Yes.
A thinner yarn will generally produce a smaller duck, while a thicker yarn will create a larger and heavier one.
Changing yarn can also affect the appearance of the wings, beak, and tail.
Whatever yarn you choose, use a hook that gives you a dense enough fabric for amigurumi.
Because finished proportions vary with yarn, hook, tension, stuffing, and finishing, this pattern does not rely on one fixed finished measurement.
More Easy No-Sew Amigurumi
If you enjoy projects with minimal assembly, explore our No-Sew Amigurumi collection for more small crochet projects built around simple construction and reduced assembly.
Frequently Asked Questions
Is This Crochet Duck Pattern Beginner-Friendly?
Yes, the construction uses basic amigurumi stitches, simple increases and decreases, stuffing, direct surface attachment, and simple embroidery.
The most important skills are keeping accurate stitch counts and placing the wings, tail, beak, and eyes evenly.
Is This a Free Crochet Duck Pattern?
Yes.
The complete instructions for the body, head, wings, tail, beak, and embroidered face are included in this article.
Is This Really a No-Sew Duck Pattern?
There are no separate crochet pieces that need to be sewn onto the duck.
The body and head are one piece, and the wings, tail, and beak are crocheted directly onto the finished shape.
A yarn needle is still used for embroidery and weaving in loose ends.
Do I Need to Sew the Wings On?
No.
Each wing is worked directly from the side of the body with a short chain and a small sequence of stitches.
How Is the Beak Attached?
The orange yarn is joined directly to the front of the head.
The beak is then crocheted from a short chain and secured back to the head with a slip stitch.
Can I Use Safety Eyes?
You can choose another eye finish if you prefer, but embroidered eyes are the default for this pattern.
This tutorial does not make child-safety claims about plastic eye components.
Can I Make the Duck With Thicker Yarn?
Yes.
The duck will become larger and heavier, and the small details may also appear proportionally larger.
Keep the fabric dense enough that the stuffing stays hidden.
Why Is My Duck Leaning?
The lower body may be stuffed unevenly.
Redistribute the stuffing and gently reshape the base.
Also check that the head is not overfilled on one side.
Finished No-Sew Amigurumi Duck
This crochet duck pattern keeps the construction simple by building the body and head as one continuous piece and adding the remaining features directly onto the finished shape.
The rounded yellow body, small wings, orange beak, tiny tail, and embroidered eyes create a recognizable duck without requiring a pile of separate parts to assemble.
The best results come from accurate stitch counts, even stuffing, and checking the placement of each detail before fastening off.
If you want a small amigurumi project with minimal assembly, this free no-sew duck design gives you a straightforward place to start.
Pattern Notes
This pattern was created for Small Crochet Ideas with a focus on simple construction, clear stitch-count checkpoints, minimal assembly, and beginner-friendly finishing.
It uses US crochet terminology. Finished proportions will vary with yarn, hook, tension, stuffing, and finishing.
